Table of Contents:
1. How to Create Memberships
2. How to Enable Memberships Online
3. How to Sell Memberships from the Point of Sale
4. How to Manage Memberships
5. Overview of the Membership Dashboard
6. How to Use a Membership to Pay for an Appointment
7. How to Edit a Membership
8. How to Delete a Membership
9. How to Pause a Membership
10. How to Resume a Membership
11. How to Cancel a Membership
12. How to View Event Logs for Memberships
13. How to Sell Memberships Online
14. How to View and Manage Memberships in the Client Portal
How to Create Memberships
NOTE: The membership feature will be usable only when the Stripe integration is active.
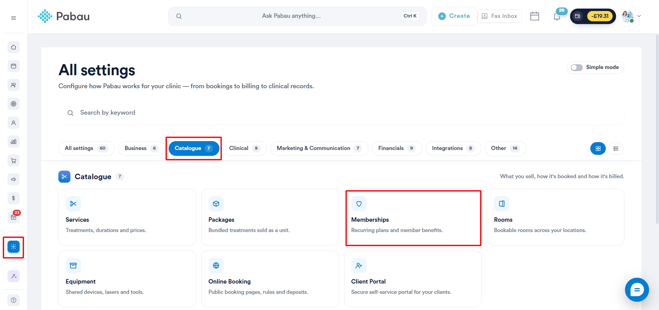
Step 1: Navigate to Setup
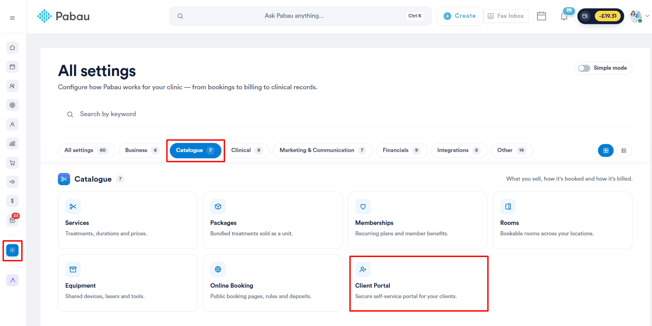
Start by logging in to your Pabau account using your login credentials. Then, navigate to the Setup page and find Memberships under the Catalogue section.
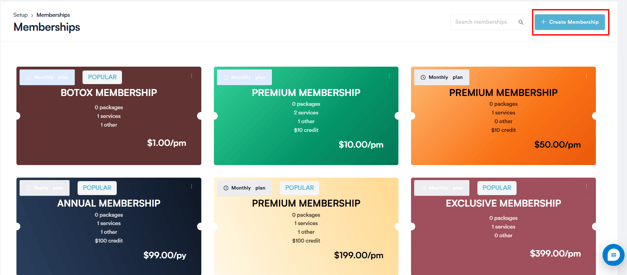
Step 2: Create a Membership
Once you're on the Memberships page, you will be able to see all of the Memberships you have created in the clinic. Navigate to the top right corner and click the "Create Membership" button to get started.
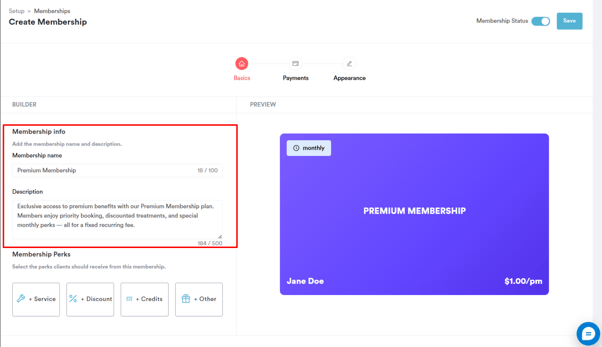
Step 3: Insert Details
In the first step, you need to add the basic details of the membership plan, such as the membership name and description, and set the membership perks.
Step 4: Add Perks
The membership perks can be in the form of services or discounts:
Service: Choose services from your account and specify how many times each service is included in the membership.
Every time the membership is active, the client can access the list of selected services free of charge. This means that if any of these services require a deposit, they can be booked free of charge.
To add additional services, click on the "Service" button again.
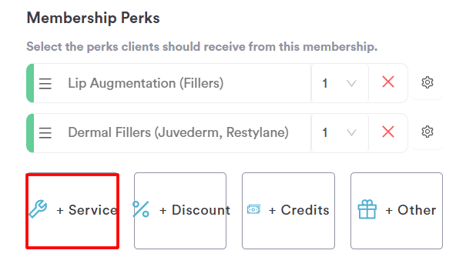
Clients receive the service/s free of charge as long as the membership is active. If an appointment is booked and occurs during the membership period, it's free. If booked before the membership expires but happens after it ends, the service must be paid for.
Discount: Set automatic discounts for members at checkout. Choose from the discounts you have created in the system. Every time the membership is active, the client will have a discount rate auto-applied in the Point of Sale or online bookings. The rules of the discount will apply, i.e. which services or products the discount can be used with.
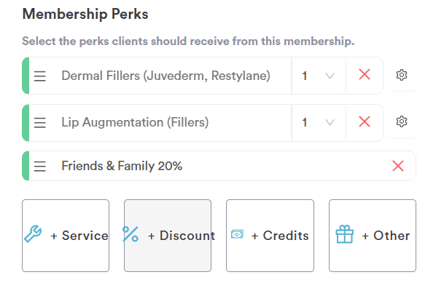
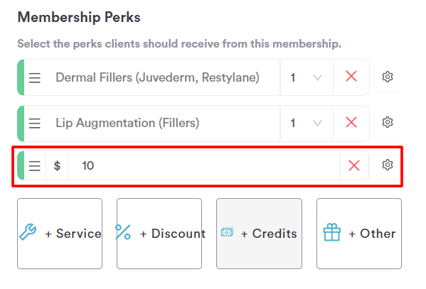
Credits: Add a credits amount to the membership. Members will receive the specified credits automatically while the membership is active, which they can use toward services or products at checkout.
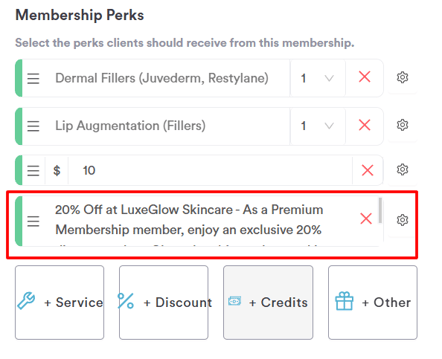
Other: A third type of membership perk is "Other". In this field, you can free-type any other external or additional benefits you want to offer to your clients.
Rearrange the perks on your digital membership card by clicking the three-line icon next to each perk and dragging it to your preferred position.
NOTE: The perks are cumulative, meaning a membership can include multiple benefits, such as service A free of charge, service B free of charge, plus discounts on additional services.
The client cannot have more services free of charge than the number of allowed services. Discounts are not restricted and can be applied for as long as the membership is active.
The allowed service limits will renew every time a payment is taken for the membership.
Step 5: Set Up Pricing and Duration
Once you've set up the membership details and perks, click on "Next step" in the bottom right corner.
First, enter the price of the membership plan in the "Amount" field.
Next, you can choose how you would like to charge your clients. Memberships can be offered with the following payment schedules:
- Weekly
- Monthly
- Yearly
In the Tax field, choose the tax rate that should apply to this membership. For more details on creating and managing taxes, please refer to this article.
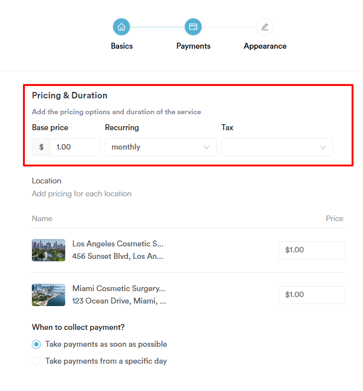
If your account has multiple locations, you can also set a different price per location under the Location section. Each location will be listed with its own price field, allowing you to customize the membership cost depending on where the client is being seen.
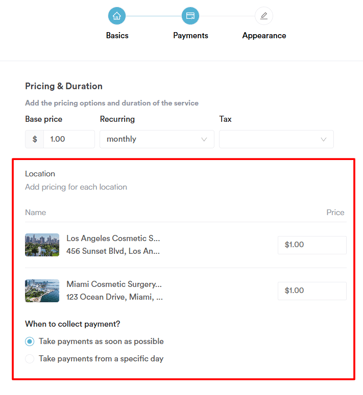
You can also choose from two options for the first payment of a membership:
- Charge immediately and start the membership right away.
- Charge on a specific day of the month or year and start the membership from that date.
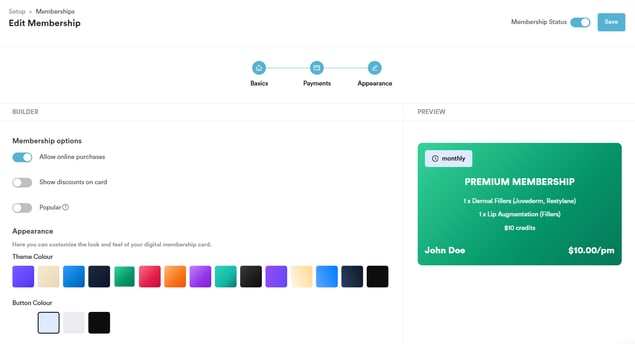
Step 6: Customize Appearance
Once you have set up the payment schedules, the next step is customizing the appearance.
In the builder on the left side of the page, you can make the membership available for online purchase and choose whether to display the discount amount on the digital membership card.
You can select the background theme of the membership card and choose the button color.
The membership will be marked as active by default. If needed, you can adjust the status by toggling the switch in the top-right corner.
To finalize the membership setup, click "Save" in the top-right corner of the screen.
NOTE: After your first client subscribes to a membership, you won’t be able to edit the Basics or Pricing tabs. This prevents changes that would affect every member already on that plan.
By following these steps, you can create memberships in your Pabau account.
Step 1: Navigate to Setup
Start by logging into your Pabau account using your login credentials. Then, navigate to the Setup page and select the ''Catalogue'' tab.
Under the Catalogue section, find and click on Client Portal.
Step 2: Customize Portal
Click the ''Customize'' button located on the bottom right side of the screen to access the available actions.
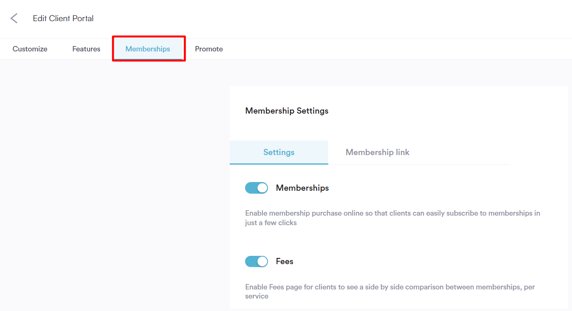
Step 3: Enable Memberships
In the Client Portal section navigate to ''Features'' and scroll down slightly to find the ''Memberships'' option.
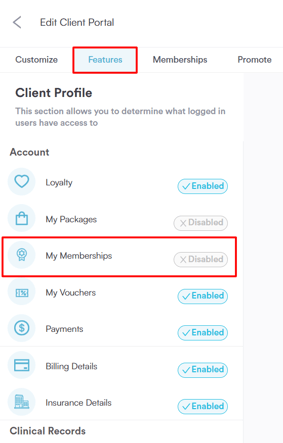
Once you select “Memberships,” a pop-up window will appear. Click “Enable” to activate the feature — the status will turn blue to indicate it’s active.
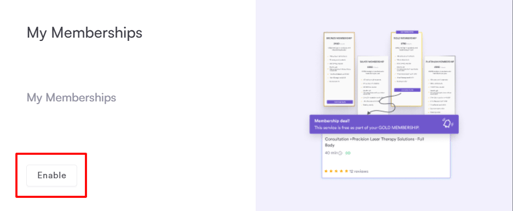
This activates the feature and allows clients to manage their memberships directly from their portal.
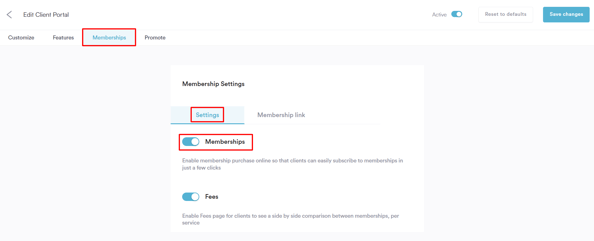
Step 4: Enable Online Membership Purchases
Next, go to the ''Memberships tab'' located beside the Features section.
Turn on the toggle under ''Membership Settings'' to allow clients to easily purchase and manage memberships directly through the Client Portal.
Step 5: Save the Changes
Next, click ''Save changes'' in the top right corner to apply your settings.
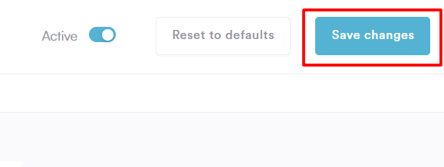
Make sure Client Portal is enabled by toggling the switch at the top, then click ''Save changes'' to apply.
NOTE: To learn more about how to enable Client Portal please refer to this article.
By following these steps, you’ll successfully enable memberships in the Client Portal, making it easy for clients to view and purchase plans online.
How to Sell Memberships from the Point of Sale
In this article, we'll cover how you can sell memberships to your clients through the Point of Sale.
Step 1: Navigate to the Point of Sale
Step 2: Select Membership
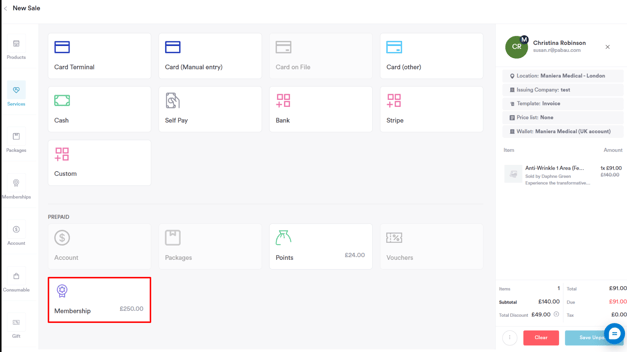
Proceed as you would when performing a sale. Memberships will be displayed on the left-hand side. They will have their own section on the side menu from where you can choose which membership to sell.
Clicking on Memberships will show all the memberships you have created in Pabau.
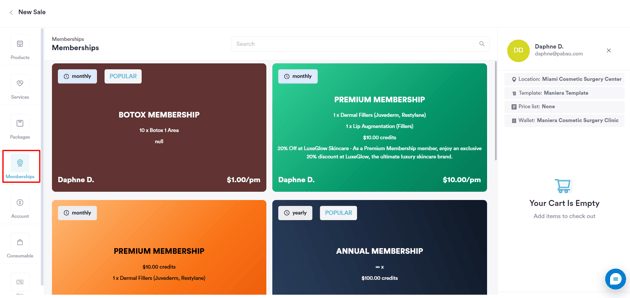
NOTE: You're not able to add anything else to the cart once you've selected a membership.
Step 3: Select Payment Method
At the payment stage, when purchasing a membership, the only available payment option is "Setup Subscription". This can only be done with a credit card and no other payment method.
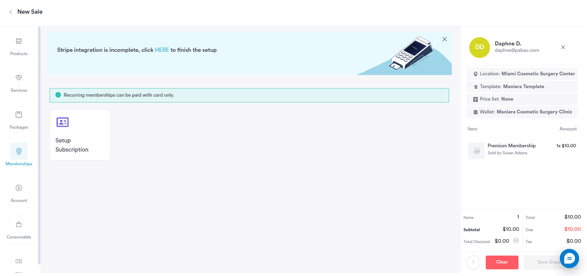
The membership amount will be displayed by default (but can be adjusted), along with the subscription start date. Lastly, input the client's card details to complete the setup.

Once the subscription is set up and the payment is successful, the following will occur:
- An invoice and payment under the item category "Membership" will be created.
- The employee listed on the invoice will be the one who sold the membership.
- The item name will match the name of the membership.
- The unit price will reflect the membership’s cost.
- Quantity will always be set to 1.
- No discount will be applied.
- Tax will follow the settings defined when the membership was created.
- The total price will include the membership cost after tax.
The invoice date and the associated payment will correspond to the date the membership is activated, which may differ from the actual sale date.
An invoice and payment will be generated each time the membership is due, whether weekly or monthly. Future invoices will be tied to the same location where the membership was originally sold.
By following these steps, you will be able to sell memberships successfully.
How to Manage Memberships
In this article, we'll cover how you can manage the memberships sold to clients through their client cards.
Step 1: Navigate to the Client Card
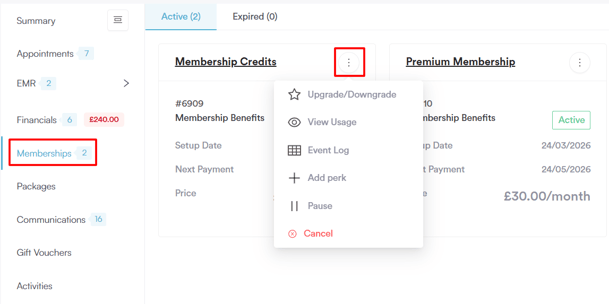
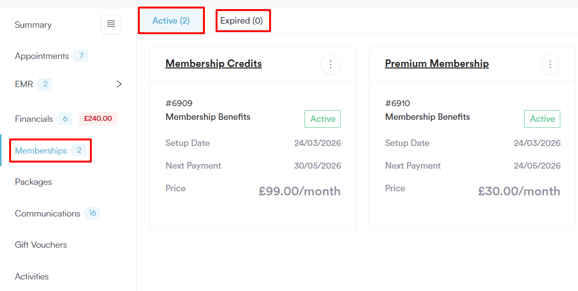
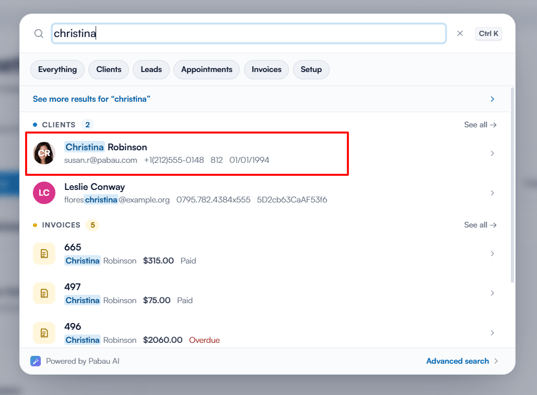
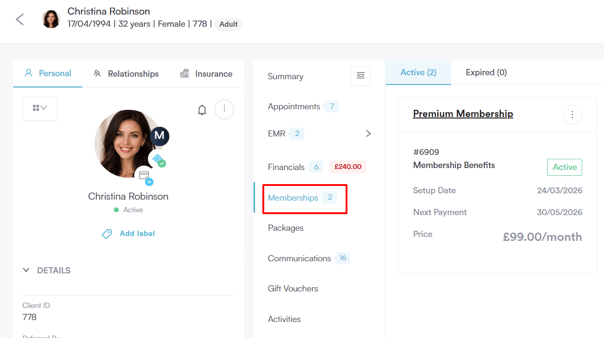
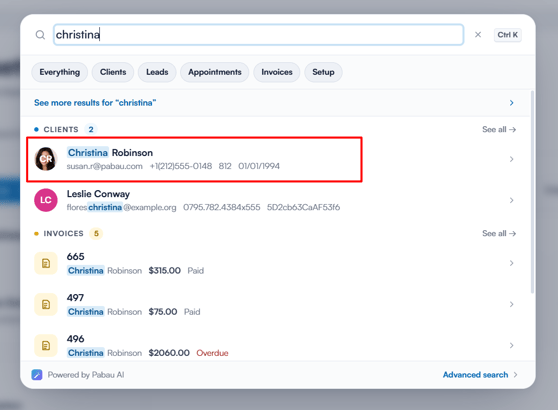
Search for the client name in the search bar to access the client card. Switch to the "Memberships" tab to view all active and expired memberships.
Step 2: Review Membership
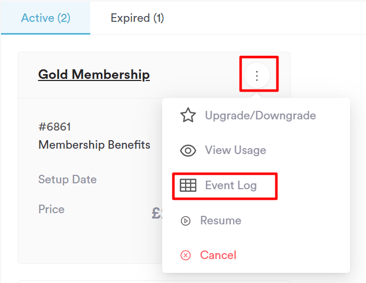
By clicking on the three-dot icon next to the membership's name, you will be able to pause and cancel memberships. A client can have only 1 active membership at a time.
The unique Membership ID for each membership is displayed at the top, making it easy to track and reference specific memberships.
Each membership will have one of the following membership statuses:
- Green: The membership is active, and payments are being processed automatically.
- Blue: The membership is manually paused, or the current date hasn't reached the activation date.
- Red: The membership has been canceled or has expired after reaching the maximum allowed time. It won’t renew, and clients can no longer use it. It will be moved to the "Canceled" tab.
- Grey: The membership has been canceled as of a specific date or is set to expire on a specific date. The client can continue to use the membership’s perks until the cancellation takes effect.
Step 3: Membership Actions
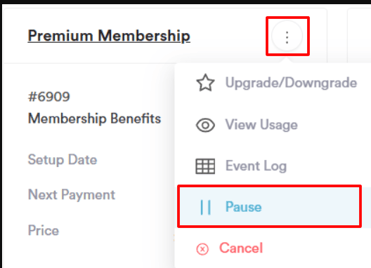
By clicking on the three-dot icon next to a membership, you can perform the following actions:
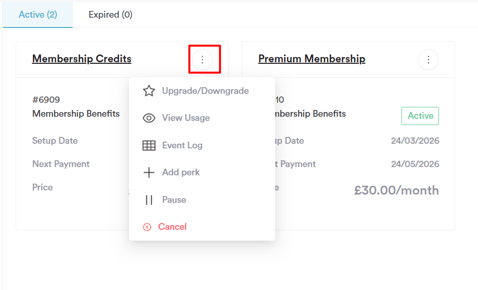
- Upgrade/Downgrade: Switch the client to a different membership plan. Select the new membership you want to move the client to, and the system will update their plan accordingly.
-
View Usage: Review how the membership has been utilized. Hover over the green circle with a checkmark to see when a service included in the membership was used.
If the membership is canceled, the circles will turn red for the duration the membership was meant to be active.
Use the date and month picker to navigate to specific days or months to view activity during that timeframe. -
Event Log: Opens a side menu displaying detailed information, organized into the following sections:
Customer: Displays the name and email of the customer the membership belongs to.
Invoices: Lists all invoices processed for the membership.
Events: Includes all activities related to the membership, such as draft invoices, successful or unsuccessful payment attempts, and more. - Add Perk: Add an extra perk to the client's existing membership. You can choose from a service, discount, credits, or other benefit, allowing you to customize the membership for individual clients without changing the original plan.
-
Pause: Pauses the membership. You can choose between two options:
- Indefinite: The membership remains paused until manually re-enabled.
- Until a custom date: The membership is paused until the specified date.
Once a membership is paused:
The "Membership" payment method will not appear in the Point of Sale, and payments using the membership will be unavailable.
Discount perks included in the paused membership will not be automatically applied at the Point of Sale.
During this time, the client will not be charged for the membership. -
Cancel: Cancels the membership. When selecting "Cancel," choose one of the following options in the pop-up:
- Immediately: The membership is canceled immediately and moved to the Expired tab in the client card. The client will no longer be able to use membership benefits.
- End of the current billing period: The membership is canceled the day before the next billing cycle begins. From that date onward, the client will no longer have access to membership benefits.
By following these steps, you can easily keep track of active and expired memberships, pause or cancel them, and ensure clients get the most out of their plans.
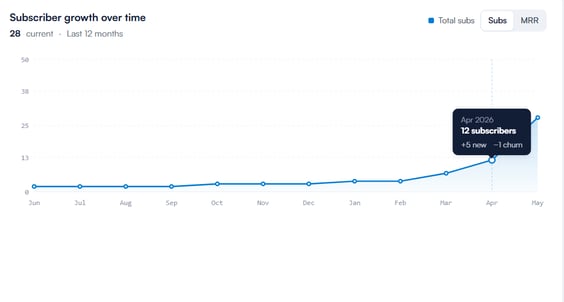
Overview of the Membership Dashboard
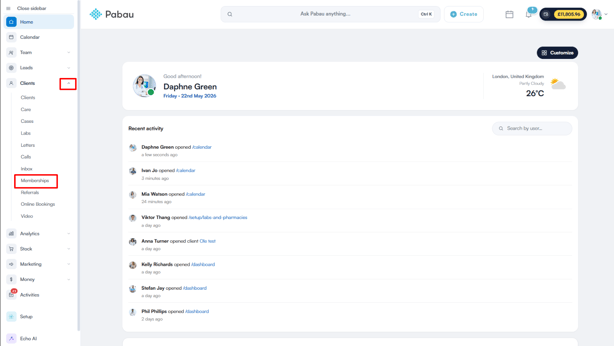
Memberships in Pabau make it easy to offer flexible plans to your clients, helping you build loyalty and recurring revenue. You can access the Membership dashboard under Clients in the left sidebar menu.
Membership Dashboard
The Membership Dashboard gives you a complete overview of your membership performance and subscriber activity.
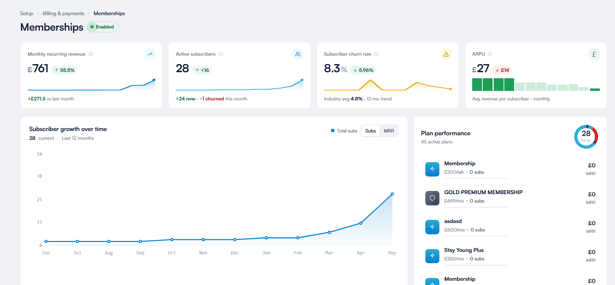
At the top of the dashboard, you'll find four key metrics:
- Monthly Recurring Revenue (MRR): The total revenue generated from active memberships each month, including a comparison to the previous month so you can track growth over time.
- Active Subscribers: The total number of clients currently subscribed to a membership plan, along with how many are new or churned this month.
- Subscriber Churn Rate: The percentage of clients who have canceled their memberships over a specific period, shown alongside the industry average for comparison.
- ARPU (Average Revenue Per User): The average monthly revenue generated per subscriber.

Below the metrics, the Subscriber Growth Over Time chart displays how your total subscriber count has changed over the last 12 months, giving you a clear visual of your membership growth trends. You can toggle between viewing total subscribers and MRR using the buttons above the chart.
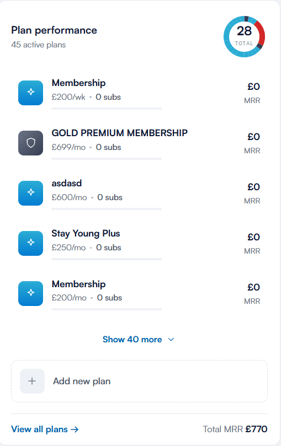
On the right side of the dashboard, the Plan Performance section lists all your active membership plans along with the number of subscribers and MRR each plan is generating.
You can click ''Show more'' to see the full list, ''Add new plan'' to create a new membership directly from the dashboard, or ''View all plans'' to go to the full Memberships management page.
Members
Below the dashboard overview, the Members table gives you a detailed breakdown of all clients who have subscribed to a membership plan. You can search by name or email, and filter by Status or Plan to narrow down the list.
The table includes the following columns for each member:
Member: The client's full name and email address.
Plan: The membership plan the client is subscribed to.
Status: The current status of their membership — Active, Paused, or Canceled.
Payment Method: The payment method linked to their membership for automatic billing.
Total Spend: The total amount the client has spent.
Payments: A visual record of all payments made by the client.
Last Payment: The date and time of the most recent payment.
Joined: The date the client first subscribed to the membership.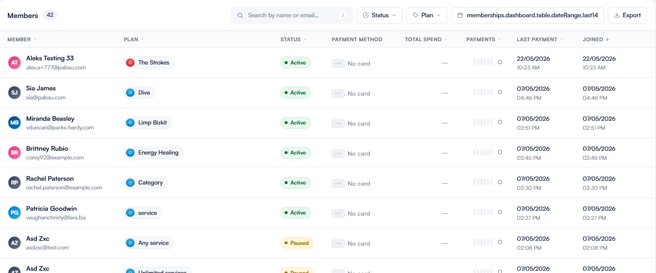
You can also export the full members list using the ''Export'' button in the top right corner of the table.
Now that you know how to set up and manage memberships in Pabau, you can start building stronger client relationships and generating reliable recurring revenue for your clinic.
How to Use a Membership to Pay for an Appointment
In this article, we'll explain how to use a client's membership to pay for appointments in the Point of Sale.
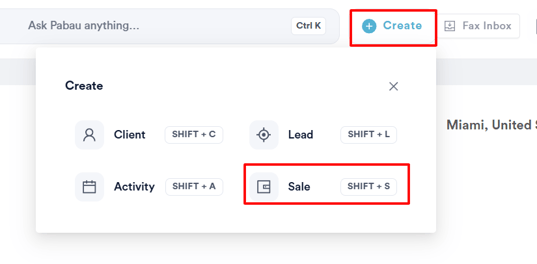
Step 1: Navigate to the Point of Sale
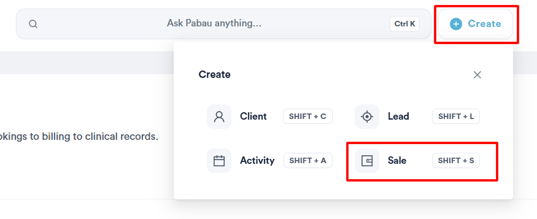
To access the Point of Sale, click the Create button at the top right corner of the screen and then "Sale."
Step 2: Select Payment Option
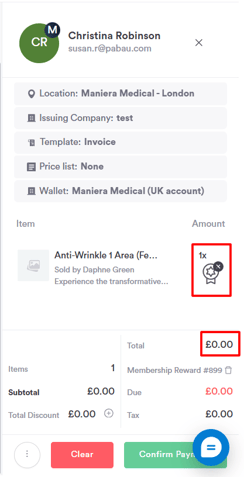
Proceed as you would when performing a sale. When you reach the payment stage, the membership option will appear in the prepaid section if the selected client has an active membership.
If the client’s membership reward is a free service, the membership payment option will only be clickable when a service perk is available. Once selected, it will show the membership icon next to the service and remove the price.
If the membership is paused or not yet activated, it will still be visible but marked with a "Paused" status.
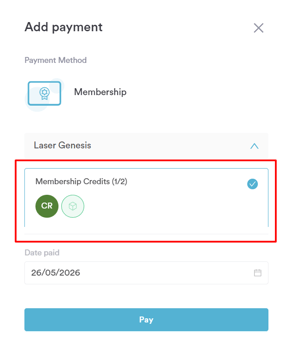
If the membership includes credits, the available credits balance will be displayed on the Membership button in the prepaid section. Click on it to open the payment popup, select the credits to apply, and click ''Pay'' to complete the transaction.
For discounts, there’s no need to select "Membership" at the Point of Sale — the discount is automatically applied to eligible products and services in the cart.
NOTE:
If a membership includes both a free service and a discounted service, the free service perk will take priority, as you can't discount a service that’s free of charge.
If a service booked while the membership was active is being attended when the membership is paused or expired, such a service will need to be paid for.
By following these steps, you can seamlessly use memberships as a payment method at the Point of Sale.
How to Edit a Membership
In this article, we'll guide you through the steps to edit the settings of an existing membership.
Step 1: Navigate to Memberships
Start by logging into your Pabau account. Once logged in, navigate to the left sidebar menu, click on Setup, and select Memberships under the ''Catalogue'' section.

Step 2: Access the Memberships Page
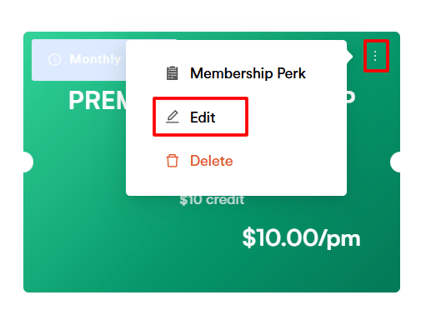
On the Memberships page, you’ll find all your existing memberships. Locate the membership you want to edit, click the three-dot icon next to it, and select "Edit."
Step 3: Make the Necessary Changes
Update the membership settings by following the same steps you used when originally creating the membership. Adjust the perks, pricing, or any other options as needed.
NOTE: After your first client subscribes to a membership, you won’t be able to edit the Basics or Pricing tabs. This prevents changes that would affect every member already on that plan.
Step 4: Save Your Changes
Once you've made your edits, click "Save" in the top right corner to apply the changes.
NOTE: Any changes made will only apply to memberships sold moving forward and will not affect memberships sold before the update.
By following these steps, you can easily modify your membership settings to keep them up-to-date.
How to Delete a Membership
In this article, we'll guide you through the steps to delete a membership.
Step 1: Navigate to Memberships
Start by logging into your Pabau account. Once logged in, navigate to the left sidebar menu, click on Setup, and select "Memberships" under the ''Catalogue'' section.

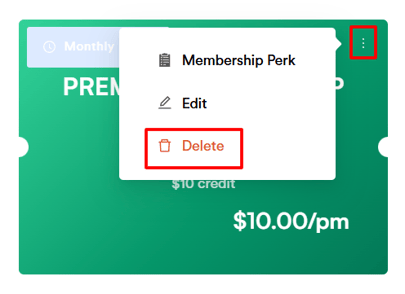
Step 2: Access the Memberships Page
On the Memberships page, you’ll find all your existing memberships. Locate the membership you want to edit, click the three-dot icon next to it, and select "Delete."
Step 3: Cancel Active Memberships
If the membership you’re trying to delete is currently active in any client cards, you’ll be prompted to first cancel those active memberships. Follow the prompts to complete the cancellation before proceeding with the deletion.
Step 4: Confirm Deletion
Once all active memberships have been canceled, you can confirm the deletion of the membership.
NOTE: Deleted memberships will not be seen on the Memberships listing page, but they can still be viewed in the client cards of the clients who had them.
You will be able to create a new membership with the same name and the same properties as a membership that is being deleted.
By following these steps, you can effectively delete memberships that are no longer needed.
How to Pause a Membership
In this guide, we'll cover how you can pause an active membership for a client.
Step 1: Open Client Card
Start by logging into your Pabau account and opening the client card of the client you wish to pause a membership for.
Step 2: Navigate to Memberships
In the client card, click on the ''Memberships'' tab.
Step 3: Select the Membership and Choose Pause
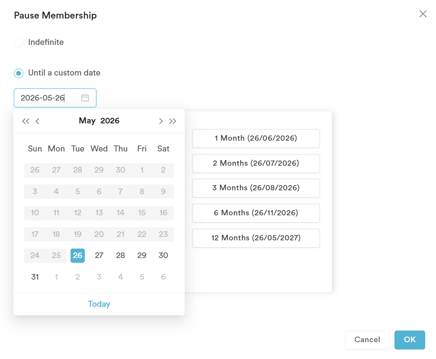
Click on the three-dot icon next to the membership you want to pause and select "Pause" from the available options. You can choose between two options:
- Indefinite: The membership remains paused until manually re-enabled.
- Until a custom date: The membership is paused until the specified date.
Step 4: Confirm the Pause
Click on "OK" to confirm the pause.
Once a membership is paused:
- The "Membership" payment method will not appear in the Point of Sale, and payments using the membership will be unavailable.
- Discount perks included in the paused membership will not be automatically applied at the Point of Sale.
- During this time, the client will not be charged for the membership.
By following these steps, you can pause memberships.
How to Resume a Membership
In this guide, we'll cover the steps to resume a membership that was previously paused.
Step 1: Open Client Card
Start by logging into your Pabau account and navigate to the client card of the client whose membership you want to resume.

Step 2: Go to the Memberships Tab
In the client card, click on the Memberships tab to view the list of memberships associated with the client.

Step 3: Select and Resume Membership
Click on the three-dot icon next to the membership you wish to resume and select "Resume" from the available options.
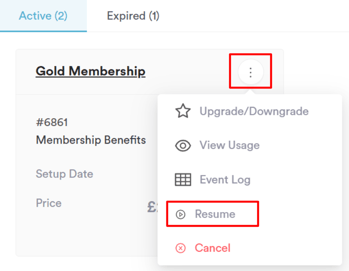
You will have two options for resuming the membership:
- Today: This option will resume the membership and payment from the current day.
- From a Custom Date: This option will resume the membership from a specific date that you choose.
If you select Today, the system will display the client’s saved payment (card) information, along with an "Edit" icon, allowing you to update the client’s card details if needed.
Step 4: Confirm the Resume
Once you’ve selected and saved your preferred option, the membership will be resumed, and its status will return to "Active." This means the client will once again have access to the benefits of the membership.
By following these steps, you can easily resume a membership that was previously paused.
How to Cancel a Membership
In this guide, we'll cover the steps to cancel a membership for a client.
Step 1: Open Client Card
Start by logging into your Pabau account and navigating to the client card of the client whose membership you wish to cancel.
Step 2: Go to the Memberships Tab
In the client card, click on the "Memberships" tab to view the list of memberships associated with the client.

Step 3: Select and Cancel Membership
Click on the three-dot icon next to the membership you wish to cancel and select "Cancel" from the available options.
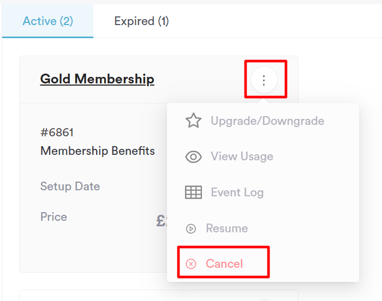
You will be presented with two cancellation options:
- Immediately: The membership is canceled immediately and moved to the Expired tab in the client card. The client will no longer have access to membership benefits.
- End of the Current Billing Period: The membership is canceled at the end of the current billing cycle, and the client will continue to have access to the membership benefits until the next billing period starts.
Step 4: Confirm Cancellation
After selecting your preferred option, click "OK" to confirm the cancellation. The membership will be canceled based on the selected option, and the client will no longer have access to the benefits as per your chosen cancellation date.
By following these steps, you can easily cancel a client's membership.
How to View Event Logs for Memberships
In this guide, we'll walk you through the steps to view the event logs for a membership.
Step 1: Open Client Card
Start by logging into your Pabau account and navigating to the client card of the client whose membership event logs you wish to view.
Step 2: Go to Memberships Tab
In the client card, click on the Memberships tab to view the list of memberships associated with the client.

Step 3: Select Event Log
Click on the three-dot icon next to the membership and select "Event Log" from the available options. This will open a side menu displaying detailed information about the membership.
Step 4: View Customer Details
The Customer section will show the name and email of the client whose membership is being viewed.
Step 5: View Invoices
The Invoices section displays all invoices processed for this membership, organized chronologically (most recent first). This section includes the following columns:
- Invoice Number: Clickable; clicking opens the Edit Invoice modal.
- Amount: The price paid for the membership.
- Status: The status of the invoice.
- Due: Shows the unpaid amount, if the invoice is outstanding.
- Created On: The date and time the invoice was created.
For each invoice, you'll have the following options when clicking the three-dot menu:
- Download as PDF: Download a PDF version of the invoice.
- View Invoice: Opens the Edit Invoice modal for the selected invoice.
Step 6: View Events
The Events section lists all events related to this membership, including actions like draft invoices created and payment attempts (both successful and unsuccessful).
The events are organized by Event and Created On in chronological order, with the most recent event listed first.
By following these steps, you can easily view event logs for a client's membership and access relevant information about invoices and events.
How to Sell Memberships Online
Step 1: Customize the Client Portal
To be able to sell memberships online, you will first need to activate it on the client portal customization page. Navigate to Setup, then click on the ''Client Portal'' tab under the ''Catalogue'' section.

Click the ''Customize'' button to access the customization page.

Step 2: Activate Memberships
Once you access it, switch to the ''Memberships'' tab and activate the ''Memberships'' and ''Fees'' toggles.
Step 3: Navigate to the Online Booking Portal
Once you enable ''Memberships'', your clients will be able to access the memberships icon in the online bookings. When clicking this icon, they will access all memberships you've created in the system.
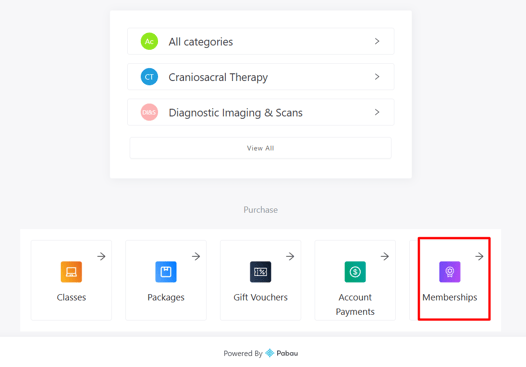
They will also be displayed on the right side of the screen as a membership upsell option when booking.

If the Fees setting is enabled, clients will see a membership comparison table organized in their respective categories against all services bookable online.

Step 3: Choose Membership
When clicking on either the membership icon or membership upsell options, clients will view all available plans. They can click the 'Choose Plan' button in any of the membership plans to continue to the next step.

Step 4: Set Up Subscription
After selecting the plan, they can add their card information to set up a subscription. If a client already has a card on file, they can complete the payment right away.
They can save their card details for future use while making the payment, or you can add their card details to their client card.

Once they select the 'Set Up Subscription' button, they will view the screen that is shown below, which confirms that the membership plan has been successfully set up.

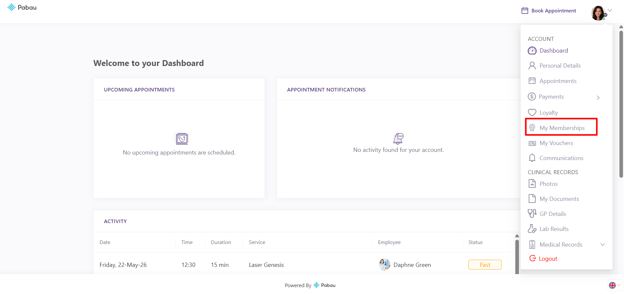
Clients can view their memberships in the client portal by clicking their avatar in the top right corner. If the feature is enabled, they’ll see a “Memberships” option in the dropdown menu.

Clients will see membership perks in a banner that appears when they select a service to book.

Membership purchases and usage will be seen on the Memberships page. And in the client card on the Memberships tab.
By following these steps, clients can purchase a membership plan online.
How to View and Manage Memberships in the Client Portal
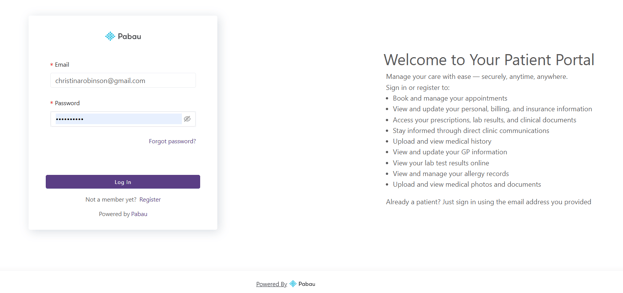
Step 1: Access the Client Portal
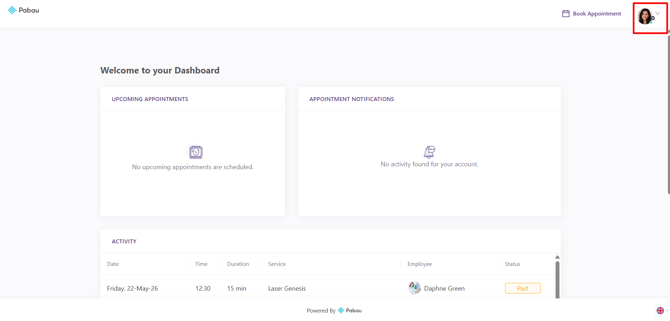
To get started, log into your Client Portal using your login credentials. Once logged in, you’ll see your dashboard.
Step 2: Open the Memberships Section
Navigate to your avatar on the top right corner of the screen and click to view more options.
Click on the ''My Memberships'' tab within the Client Portal. Here, you’ll be able to view all memberships associated with the client account.
NOTE: The visibility of the Memberships tab (as well as other sections in the Client Portal) is fully customizable.
You can choose which features are shown to clients, including memberships, forms, invoices, and more.
To learn how to customize the Client Portal and control which sections are visible (i.e. Memberships), please refer to our guide on How to Enable Memberships Online.
Step 3: View Membership Details
When you open the Memberships section in the Client Portal, you’ll see a clear overview of all memberships linked to your account.
At the top of the page, the Memberships Activity panel provides a quick summary. If no memberships are currently assigned, this will display a message such as “No Memberships.”
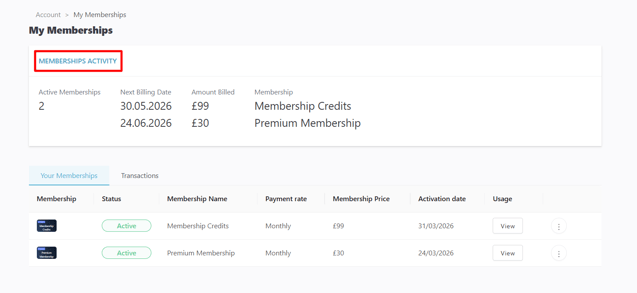
Below this, the page is divided into two tabs:
Your Memberships
This tab displays all memberships associated with the account in a structured table format. The table includes:
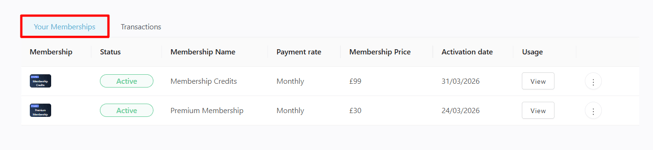
-
Membership – The type or category of membership
-
Status – Indicates whether the membership is active or expired
-
Membership Name – The name of the plan
-
Payment rate – How the membership is billed (e.g. monthly)
-
Membership Price – The cost of the membership
-
Activation date – When the membership started
-
Usage – Any usage or benefits linked to the membership
If there are no memberships available, the table will show a ''No data'' message.
Transactions
The Transactions tab allows you to view any payments or financial activity related to memberships. This helps track billing history and understand how memberships have been paid over time.
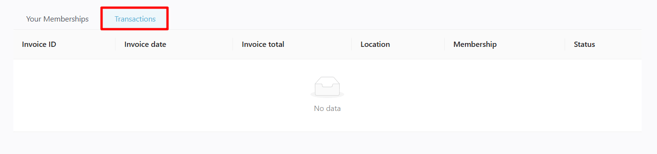
Here, you’ll find the following details:
-
Invoice ID – A unique reference number for each invoice
-
Invoice date – The date the invoice was created
-
Invoice total – The total amount charged
-
Location – The clinic location where the membership was purchased or processed
-
Membership – The name of the associated membership
-
Status – The current status of the invoice (e.g. paid, unpaid)
This section allows you to easily track billing history and review all financial activity related to memberships in one place.
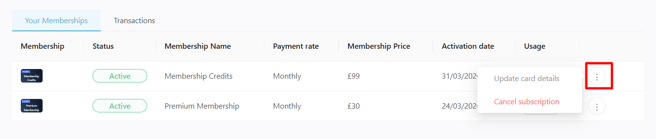
Step 4: Cancel Subscription
To cancel a membership, click the three dots on the far right of your membership plan under the ''Your Memberships'' tab.
By following these steps, you can easily manage memberships from the client portal
For more guides, refer to related articles below, select additional guides, or use the search bar at the top of the page. These guides will help you get the most out of your Pabau account.
Additionally, to help you fully utilize and understand your Pabau account, we recommend exploring additional guides and resources offered at the Pabau Academy. It offers in-depth video tutorials and lessons, offering a holistic learning experience that can equip you with the essential skills for achieving success with Pabau.