Table of Contents:
1. How to Process Payments with Manual Card Details Entry
2. How to Pay with Card on File via POS
3. How to Use a Gift Voucher to Pay for an Appointment
4. How to Use a Package to Pay for an Appointment
5. How to Process a Payment Using the Pabau Pay Card Terminal
6. How to Use Cash as a Payment Method
7. How to Use Money on Account When Raising an Invoice
8. How to Use Loyalty Points to Pay for an Appointment
How to Process Payments with Manual Card Details Entry
Step 1: Access the Point of Sale
Start by logging into your Pabau account using your login credentials. You can access the point of sale in Pabau in three ways: by raising the invoice from the Create button, the Calendar, or the Client Card.
Step 2: Enter Details
After selecting the client and service when raising the invoice, click on the Continue button at the bottom right corner to proceed to the payment page.

To manually enter a client's card details for payment processing in Pabau, choose the Card (Phone) payment method.

NOTE: Pabau requires integration with Stripe for payment processing.
Reconnecting will ensure that all Pabau Pay terminal features function smoothly and will also unlock 12 additional payment processing options.
When selecting Card (Phone) a pop-up window will appear, allowing you to enter the client's card details. You can edit the amount if the client wants to only pay the deposit for example. In that case, the invoice will be saved as partly paid.

With the client's permission, you can save their card details for future use within the system.
Another way for clients to save their card information themselves in Pabau is when they pay online. They have the option to save the card information for future transactions in the online booking portal.
Step 3: Confirm Payment
After charging the client, proceed to click on the "Confirm Payment" button at the bottom right corner to finalize the process. 
This action will direct you to the checkout page, where you can choose to email the invoice to the client, send it as an SMS, or print it. Additionally, you can review the invoice on the client card. A short cut to the client card from the checkout page is by clicking on the client's name.

To view the invoice, navigate to the Financials tab in the client card and you can find it under "Invoices."

Following these steps will allow you to manually process the payment using the client's details.
How to Pay with Card on File via POS
Clients can save their card information by themselves in the Online Booking portal or authorize you to add their card details to their client cards. To review how you can add a client's card details to their client card, refer to this article.
Step 1: Access the Point of Sale
Start by logging into your Pabau account using your login credentials. You can access the point of sale in Pabau in three ways: by raising the invoice from the Create button, the Calendar, or the Client Card.
Step 2: Enter Details
After selecting the client and service when raising the invoice, click on the Continue button at the bottom right corner to proceed to the payment page.

NOTE: Pabau requires integration with Stripe for payment processing.
Reconnecting will ensure that all Pabau Pay terminal features function smoothly and will also unlock 12 additional payment processing options.
If the client has a card saved on file, the "Card on File" payment method will appear on the payment page.

By clicking on the "Card on File" payment method, you will view a pop-up window where you can charge the client using the card they have on file.

Step 3: Confirm Payment
Click on the "Confirm Payment" button in the bottom right corner to finalize the process.

This action will direct you to the checkout page, where you can choose to email the invoice to the client, send it as an SMS, or print it. Additionally, you can review the invoice on the client card. A short cut to the client card from the checkout page is by clicking on the client's name.

To view the invoice, navigate to the Financials section in the client card and you can find it under the "Invoices" tab.

By following these steps, you can use a card saved on file to process a client's payment.
How to Use a Gift Voucher to Pay for an Appointment
Step 1: Navigate to Calendar
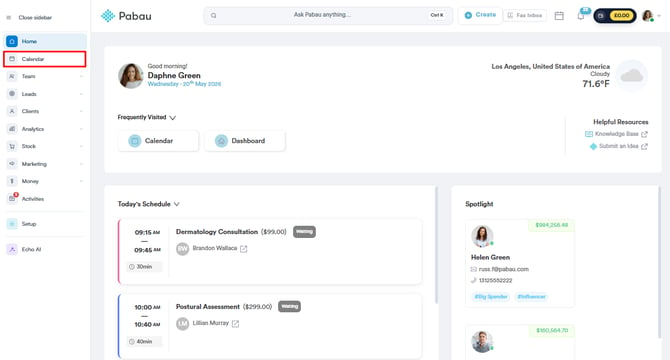
Log in to your Pabau account and click on "Calendar" in the left sidebar menu.
Log in to your Pabau account and click on "Calendar" in the left sidebar menu.
Click on the specific appointment you want to check out, then select "Checkout."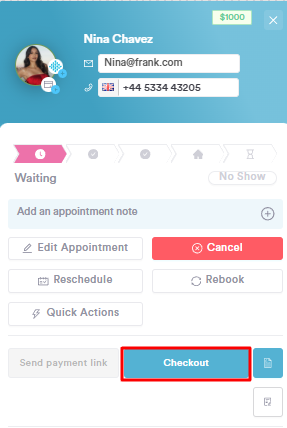
Step 3: Navigate through Point of Sale
In the Point of Sale, click on "Continue" in the bottom right corner. Select "Vouchers" from the pre-paid payment methods.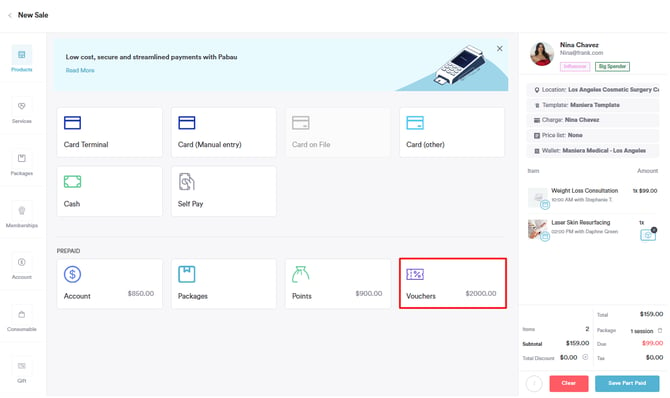
NOTE: Vouchers will only be available if the client possesses a valid voucher.
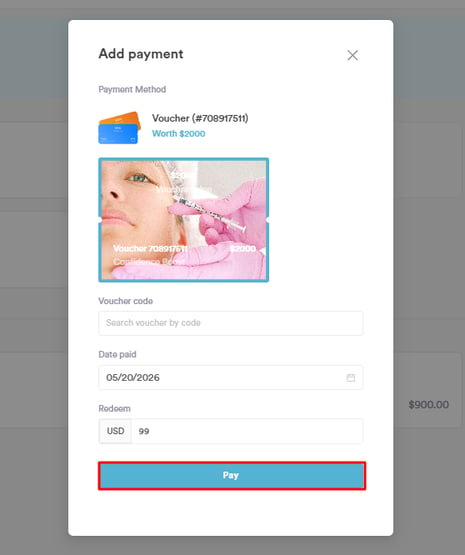
Step 4: Redeem Voucher
Choose the voucher you wish to redeem for the appointment, specify the amount to redeem, and click on "Pay." Confirm the payment by clicking on "Confirm Payment."
The appointment has been successfully checked out using the selected voucher. Streamline your payment processes by effortlessly utilizing gift vouchers in Pabau.
How to Use a Package to Pay for an Appointment
Step 1: Navigate to Calendar
Log in to your Pabau account, and in the left sidebar menu, click on Calendar.
Step 2: Access Appointment Checkout
Click on the specific appointment you wish to check out, then select "Checkout."
Step 3: Navigate through Point of Sale
In the Point of Sale, click on "Continue" in the bottom right corner to proceed.
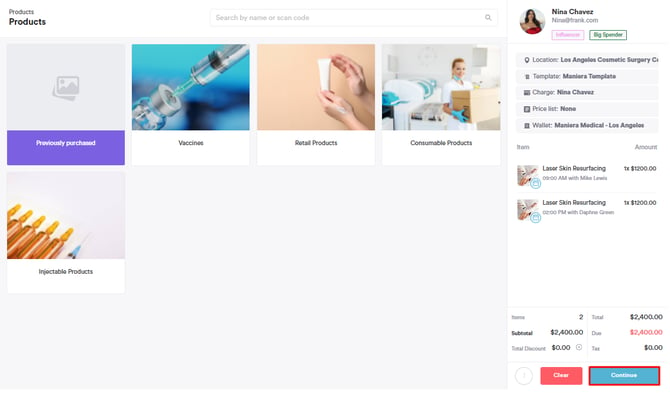
Select "Packages" from the pre-paid payment methods.
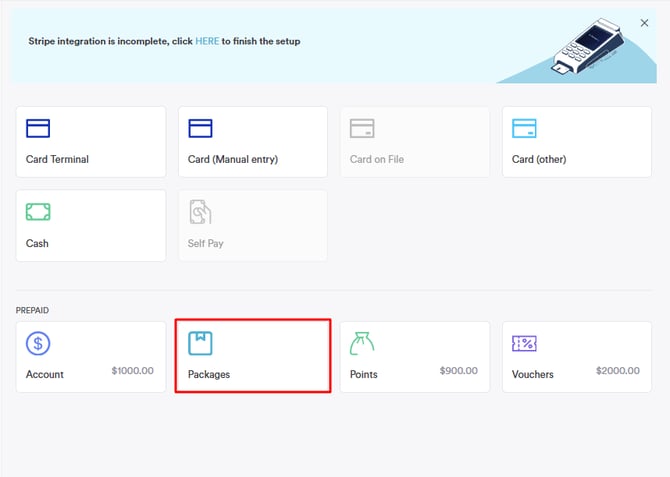
Note: Packages will only be available if the client has a valid package.
Step 4: Apply Package Session
By selecting the appropriate package, the package session will be applied against the invoice. Click on "Confirm Payment" to proceed with the checkout process.
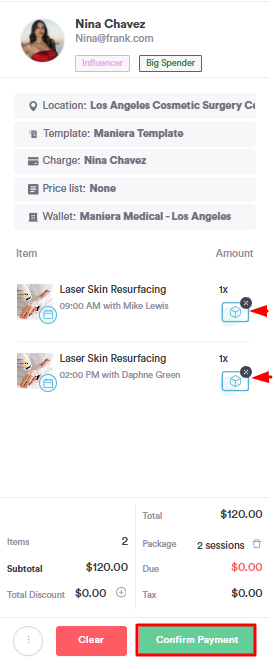
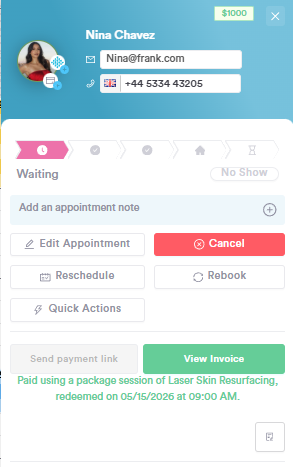
The appointment has been successfully checked out using a package session. You can find detailed information on the context menu of the appointment for your reference.
How to Process a Payment Using the Pabau Pay Card Terminal
Step 1: Access the Point of Sale (POS)
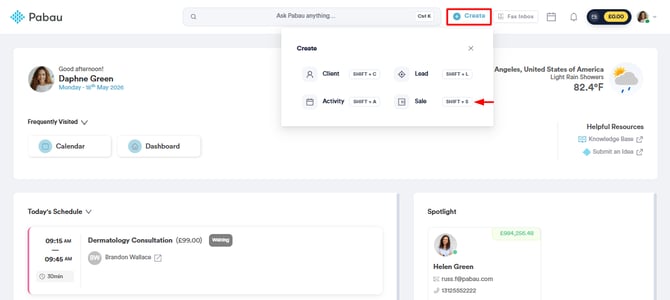
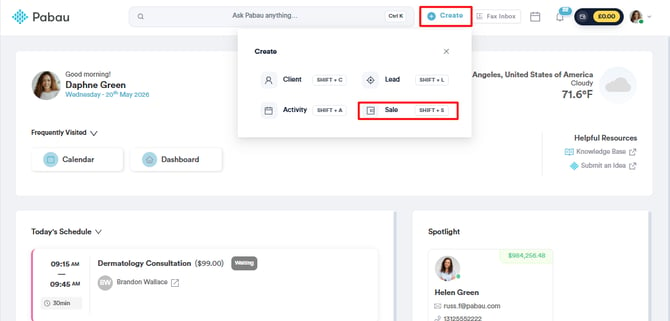
Log into your Pabau account and open the Point of Sale by clicking on the "Create" button at the top of the screen and selecting "Sale."
Alternatively, use the hotkeys Shift + S to access the Point of Sale.
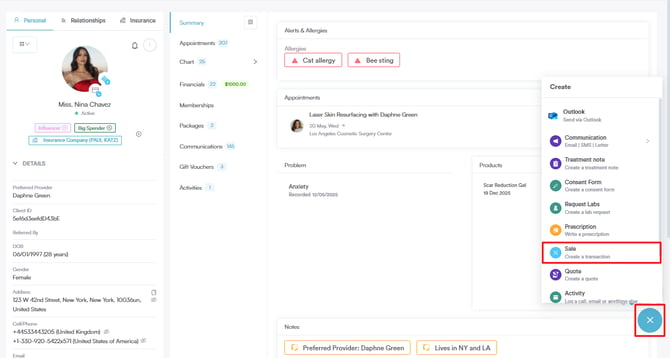
You can also choose to check out an appointment from the calendar by clicking on the appointment and then selecting "Checkout" or perform a sale from a client card by clicking on the blue plus icon in the bottom right corner of the client card and then selecting "Sale."
Step 2: Create the Invoice
Once in the Point of Sale, populate the client field in the top right corner of the screen with the name of the client. If raising the invoice from the calendar or the client card, this field will be prepopulated.

Select the client and proceed to choose the services and/or products to add to the invoice by using the appropriate icons on the left. If raising the invoice for an appointment through the calendar, prepopulated services and/or products can be modified as needed. After adding all items to the invoice, click on "Continue" in the bottom right corner.
Step 3: Choose Payment Method
In the payment options, select "Card Terminal" as the payment method.
Step 4: Process Payment
Processing payments at the Point of Sale will be restricted to the terminal's registered location.
Additionally, keep in mind that for the terminal to function properly, it must be connected to the same Wi-Fi network as the laptop used for processing payments.
If you have more than one terminal, select which one you want to process the transaction on by clicking on "Choose terminal."

Tap or insert the client card into the Pabau Pay card terminal. If using a chip-and-pin transaction, follow the prompts on the card terminal to complete the payment transaction. Once the payment is processed, you'll see the Checkout Completed screen containing the invoice and details regarding the payment.

By following these steps, you can process payments using the Pabau Pay card terminal, streamlining your transaction process and providing a seamless experience for both you and your clients.
How to use Cash as a Payment Method
Step 1: Navigate to the Point of Sale
Once you've logged in to your Pabau account, navigate to the top of the page and find the "Create" button next to the search bar. From there click on it and select Sale. Alternatively, press the hotkeys Shift + S to open the Point of Sale.

Step 2: Select a Client
Start by selecting the client on the right corner of the screen. You can also create a new client or create a sale for a walk-in client.
Step 3: Select a Category
On the left-hand side of the screen, you'll find various categories to choose from based on what you want to sell. Clicking on any category will display the items associated with it in the center of the screen. To add any of them to the cart, click on them, and they'll appear on the right side of the screen.

Step 4: Process Payment
After selecting the service or product, click "Continue" to proceed to the payment page where you'll see a list of all available payment methods. Select "Cash" to continue.

When selecting cash as the payment method, you'll need to enter the amount the client paid. Click "Collect" to confirm the payment.

The payment details and amount you've added will be visible in the bottom right corner of the screen. If everything looks correct, click "Confirm Payment" to finalize the transaction.

This action will direct you to the checkout page, where you can choose to email the invoice to the client, send it as an SMS, or print it. Additionally, you can review the invoice on the client card. A short cut to the client card from the checkout page is by clicking on the client's name.

The invoice has been successfully paid, and it will appear on the client card under the Financials tab.
How to Use Money on Account When Raising an Invoice
Step 1: Access the Point of Sale
Start by logging into your Pabau account using your login credentials. You can access the point of sale in Pabau in three ways: by raising the invoice from the Create button, the Calendar, or the Client Card.
Step 2: Enter Details
After selecting the client and service/product when raising the invoice, click on the Continue button at the bottom right corner to proceed to the payment page.

Step 3: Process Payment
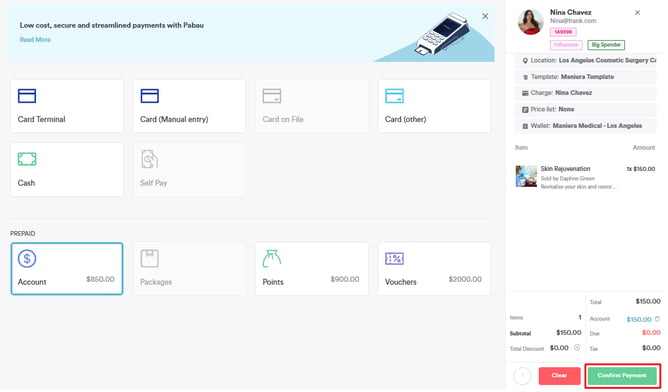
After selecting the service or product, click "Continue" to proceed to the payment page. Here, you'll find a list of all available payment methods, including "Account."
NOTE: The option to use "Money on Account" to pay for a service is only available for clients who have added money to their accounts.
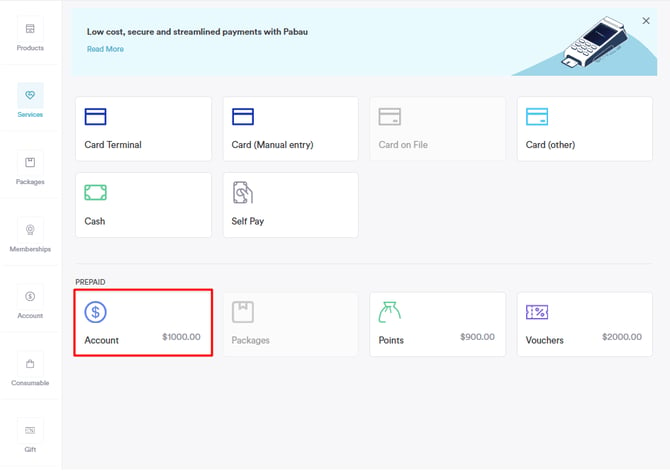
Upon clicking "Account," you will be prompted to enter the amount you want to pay. After adding the amount select "Pay."
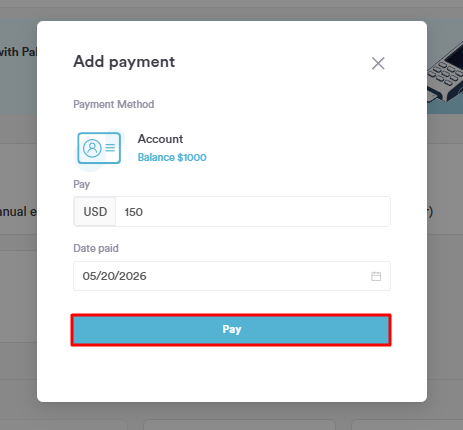
The payment details and amount you've added will be visible in the bottom right corner of the screen. If everything looks correct, click "Confirm Payment" to finalize the transaction.
This action will direct you to the checkout page, where you can choose to email the invoice to the client, send it as an SMS, or print it. Additionally, you can review the invoice on the client card. A short cut to the client card from the checkout page is by clicking on the client's name.
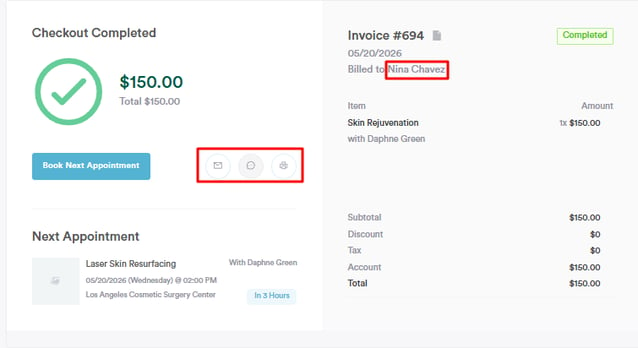
The invoice has been successfully paid, and it will appear on the client card under the Financials tab.
How to Use Loyalty Points to Pay for an Appointment
Leveraging loyalty points as a payment method offers flexibility and rewards for clients while simplifying the checkout process.
Step 1: Accessing the Point of Sale
To begin, log into your Pabau account and navigate to the Point of Sale. You can access the Point of Sale using one of the following methods:
-
Use the Create button at the top of the screen and select "Sale."
-
Navigate to "Calendar" in the left sidebar menu and click on the appointment you wish to check out, then select "Checkout."
-
Open the client card of a client, then click on the blue plus icon in the bottom right corner of the screen and select Sale.
Step 2: Processing the Transaction
Within the Point of Sale interface, proceed with the transaction as usual.
If you used the Create button to access the Point of Sale, first add a client in the top right corner. Then, add the products and services that should be included in the invoice.

If you are raising the invoice from within the calendar, the client and service will be pre-selected. If necessary, you can add additional products and services. Once the items on the invoice are correct, click on Continue in the bottom right corner.

Step 3: Paying with Loyalty Points
To pay for the appointment with loyalty points, select "Points" from the available payment methods.

Choose the amount the client wishes to pay using loyalty points and click on "Pay." If they wish, they can pay for only part of the appointment using loyalty points, and they can pay for the rest using another payment method. 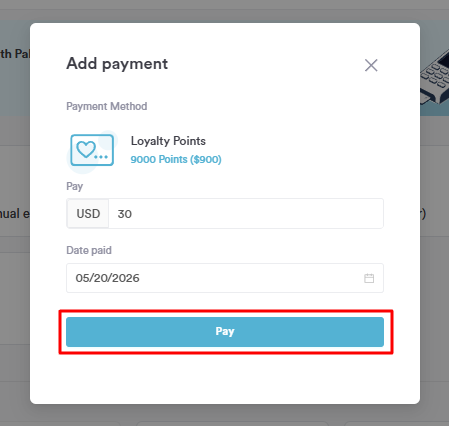
If the client wishes to split the payment, click on "Pay," then choose the other payment method for the remainder of the total price. Click on "Confirm Payment" in the bottom right corner to complete the checkout.
NOTE: We suggest reading our Loyalty article for a more in-depth exploration of this topic.
For more guides, refer to related articles below, select additional guides, or use the search bar at the top of the page. These guides will help you get the most out of your Pabau account.
Additionally, to help you fully utilize and understand your Pabau account, we recommend exploring additional guides and resources offered at the Pabau Academy. It offers in-depth video tutorials and lessons, offering a holistic learning experience that can equip you with the essential skills for achieving success with Pabau.