Table of Contents:
1. How to Create a New Lead Inquiry Automation
2. How to Automate Follow-Up for Leads After First Outreach
3. How to Automate Follow-Up for Leads After Second Outreach
How to Create a New Lead Inquiry Automation
This article outlines the steps to create a new lead inquiry email automation in Pabau.
Implementing lead automation for your clinic ensures that no potential patient inquiry goes unanswered. The New Lead Inquiry automation immediately acknowledges new inquiries, providing a professional and prompt response to build trust.
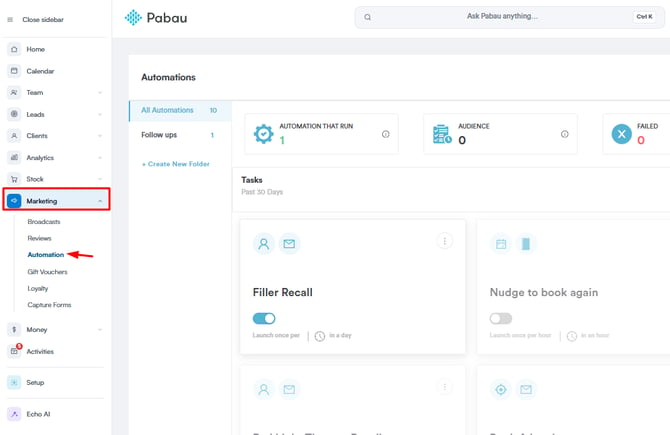
Step 1: Navigate to Marketing
Start by logging in to your Pabau account using your login credentials. Then, navigate to the Marketing tab and click to expand it. This will reveal the "Automations" sub-tab.
Step 2: Create a New Automation
Click the "Create Automation" button in the top right corner of the screen to begin setting up your automation.

Clicking this button will prompt you to choose a template or create one from scratch. Select the "Start from scratch" option in this case.
Next, select the object for which you want to create an automation. In this case, choose the "Lead" option.

The next step would be to choose whether you'd like to create an email or SMS automation. In this guide, we'll cover the Email automation.

Step 3: Configure Settings
In the "Settings" tab, configure the following automation settings:
- Automation Title: Enter a title for your automation (this is for internal use and will not be visible to leads).
- Email Subject: Enter the subject line for your automation email (this will be visible to leads).
- When: Choose how often you want the automation to run.
- Automation Description: Write short description for your automation (this is for internal use and will not be visible to leads).
If you're setting up a new lead inquiry automation email, make sure to set the automation to run every 1 hour and enable the "Don't send to the same client more than once" toggle.

Step 4: Filter Audience
To filter your audience, navigate to the "Audience" tab. To create a new audience for your leads, click the 'Create' button in the center of the page.

A pop-up will appear, allowing you to set filters to define your target audience.
To email only new lead enquiries, you can set the following filters under "Show leads that match ALL of these conditions":
- Lead Lead stage is Open Lead
Note that stages are created within the lead pipeline, and the stage name does not have to match what we've used here—it can be whatever you choose.

NOTE: To learn more about lead pipelines, review this article.
Step 5: Customize Email Design
To customize your email template, switch to the "Design" tab. At this stage, you can use the components on the right-hand side to build your email template.
Here is an example of the email content that you could use for New Lead Inquiry. Feel free to adjust it as needed, such as by modifying the text, adding buttons, images, or anything else that reflects your brand and communication style.
Subject: Thank You for Your Inquiry at [COMPANYNAME]
Hello [Client/Lead First Name],
Thank you for your interest in [COMPANYNAME]. We’ve received your inquiry and one of our team members will be in touch with you shortly.
If you’d prefer a specific time for us to contact you, please let us know, and we will accommodate your schedule.
In the meantime, feel free to explore our website and learn more about the services we offer.
VISIT WEBSITE
We look forward to assisting you soon!
[COMPANYNAME]
[COMPANYPHONE]
[COMPANYSITE]

Step 6: Review Automation
Once you’ve finished customizing the email template, switch to the "Review" tab.
If any steps were skipped, this section will list what needs to be resolved before you can save or activate the automation.
If all required steps are completed, you’ll see the message: "You are almost done." 
Step 7: Activate Automation
To activate the automation, click the "Turn On" button. If you prefer to save the template without sending emails, click "Save"— this will store the template in the system without triggering any emails.

By following these steps, you'll be able to create a new lead inquiry automation in Pabau.
How to Automate Follow-Up for Leads After First Outreach
This guide explains how to create an automation that triggers every time you attempt to contact a lead for the first time.
Implementing lead automation for your clinic ensures that no potential patient inquiry goes unanswered. The First Attempt Contact keeps the conversation going, ensuring leads feel valued and engaged.
Step 1: Navigate to Marketing
Start by logging in to your Pabau account using your login credentials. Then, navigate to the Marketing tab and click to expand it. This will reveal the "Automations" sub-tab.
Step 2: Create a New Automation
Click the "Create Automation" button in the top right corner of the screen to begin setting up your automation.
.webp?width=622&height=244&name=image-png-Jan-22-2025-02-52-51-1205-PM%20(2).webp)
Clicking this button will prompt you to choose a template or create one from scratch. Select the "Start from scratch" option in this case..webp?width=670&height=286&name=image-png-Jan-22-2025-02-56-09-2679-PM%20(2).webp)
Next, select the object for which you want to create an automation. In this case, choose the "Lead" option.
.webp?width=355&height=321&name=image-png-Jan-22-2025-02-55-23-2645-PM%20(2).webp)
The next step would be to choose whether you'd like to create an email or SMS automation. In this guide, we'll cover the Email automation.
.webp?width=515&height=283&name=image-png-Jan-22-2025-03-00-27-6866-PM%20(2).webp)
Step 3: Configure Settings
In the "Settings" tab, configure the following automation settings:
- Automation Title: Enter a title for your automation (this is for internal use and will not be visible to leads).
- Email Subject: Enter the subject line for your automation email (this will be visible to leads).
- When: Choose how often you want the automation to run.
- Automation Description: Write short description for your automation (this is for internal use and will not be visible to leads).
If you're setting up a "First contact attempt automation" email, make sure to set the automation to run every 1 day , at [select preferred time] and enable the "Don't send to the same client more than once" toggle.
.webp?width=649&height=231&name=image-png-Feb-14-2025-09-33-18-7153-AM%20(1).webp)
Step 4: Filter Audience
To filter your audience, navigate to the "Audience" tab. To create a new audience for your leads, click the "Create" button in the center of the page.
.webp?width=616&height=327&name=image-png-Jan-22-2025-03-10-06-1153-PM%20(3).webp)
A pop-up will appear, allowing you to set filters to define your target audience.
To email only leads that you tried to contact for the first time, you can set the following filters under "Show leads that match ALL of these conditions":
- Lead Lead stage is Contact - 1st Attempt
Note that stages are created within the lead pipeline, and the stage name does not have to match what we've used here—it can be whatever you choose.

NOTE: To learn more about lead pipelines, review this article.
Step 5: Customize Email Design
To customize your email template, switch to the "Design" tab. At this stage, you can use the components on the right-hand side to build your email template.
Here is an example of the email content that you could use for First Contact Attempt with Leads. Feel free to adjust it as needed, such as by modifying the text, adding buttons, images, or anything else that reflects your brand and communication style.
Subject: Following Up on Your Inquiry
Hello [Client/Lead First Name],
We hope you’re doing well!
We recently reached out to you regarding your inquiry at [COMPANYNAME], but we’ve been unable to connect. We’d love to answer any questions you may have.
If there’s a better time to contact you or a different phone number we can use, please let us know. We’d be happy to reach out at your convenience.
Feel free to visit our website to explore the full range of services we offer.
VISIT WEBSITE
Feel free to visit our website to explore the full range of services we offer.
[COMPANYNAME]
[COMPANYPHONE]
[COMPANYSITE]

Step 6: Review Automation
Once you’ve finished customizing the email template, switch to the "Review" tab.
If any steps were skipped, this section will list what needs to be resolved before you can save or activate the automation.
If all required steps are completed, you’ll see the message: "You are almost done." .webp?width=652&height=357&name=image-png-Jan-22-2025-03-36-50-7100-PM%20(2).webp)
Step 7: Activate Automation
To activate the automation, click the "Turn On" button. If you prefer to save the template without sending emails, click "Save"— this will store the template in the system without triggering any emails.
.webp?width=298&height=248&name=image-png-Jan-22-2025-03-39-46-3191-PM%20(2).webp)
By following these steps, you'll be able to create a first contact attempt automation in Pabau.
How to Automate Follow-Up for Leads After Second Outreach
This article explains how you can set up an automation that triggers every time you attempt to contact a lead for the second time.
Implementing lead automation in your clinic ensures that no patient inquiry goes unanswered. If the first contact attempt doesn’t receive a response, the second attempt acts as a strategic follow-up, prompting action such as booking a consultation to enhance engagement and improve conversion rates.
Step 1: Navigate to Marketing
Start by logging in to your Pabau account using your login credentials. Then, navigate to the Marketing tab and click to expand it. This will reveal the "Automations" sub-tab.

Step 2: Create a New Automation
Click the "Create Automation" button in the top right corner of the screen to begin setting up your automation.
Clicking this button will prompt you to choose a template or create one from scratch. Select the "Start from scratch" option in this case.
Next, select the object for which you want to create an automation. In this case, choose the "Lead" option.
.webp?width=392&height=354&name=image-png-Jan-22-2025-02-55-23-2645-PM%20(2).webp)
The next step would be to choose whether you'd like to create an email or SMS automation. In this guide, we'll cover the Email automation.
Step 3: Configure Settings
In the 'Settings' tab, configure the following automation settings:
- Automation Title: Enter a title for your automation (this is for internal use and will not be visible to leads).
- Email Subject: Enter the subject line for your automation email (this will be visible to leads).
- When: Choose how often you want the automation to run.
- Automation Description: Write short description for your automation (this is for internal use and will not be visible to leads).
If you're setting up a second contact attempt automation email, make sure to set the automation to run every 1 day , at [select preferred time] and enable the "Don't send to the same client more than once" toggle.

Step 4: Filter Audience
To filter your audience, navigate to the "Audience" tab. To create a new audience for your leads, click the "Create" button in the center of the page.
A pop-up will appear, allowing you to set filters to define your target audience.
To email only leads that you tried to contact for the second time, you can set the following filters under "Show leads that match ALL of these conditions":
- Lead Lead stage is Contact - 2nd Attempt
Note that stages are created within the lead pipeline, and the stage name does not have to match what we've used here—it can be whatever you choose.
.webp?width=590&height=348&name=image-png-Jan-27-2025-10-23-41-3855-AM%20(1).webp)
NOTE: To learn more about lead pipelines, review this article.
Step 5: Customize Email Design
To customize your email template, switch to the "Design" tab. At this stage, you can use the components on the right-hand side to build your email template.
Here is an example of the email content that you could use for Secound Contact Attempt. Feel free to adjust it as needed, such as by modifying the text, adding buttons, images, or anything else that reflects your brand and communication style.
Subject: Still Interested in [COMPANYNAME]?
Hello [Client/Lead First Name],
Just checking in!
We’ve tried reaching you regarding your inquiry at [CLINICNAME], but we’ve been unable to connect. We understand your time is valuable, and we’re ready to assist whenever it’s convenient for you.
To make things easier, we’d love to offer you a chance to schedule a consultation with one of our experts at a time that works best for you. Click the link below to book your consultation.
BOOK YOUR CONSULTATION
In the meantime, feel free to explore our website for more information about the services we offer.
VISIT WEBSITE
Looking forward to hearing from you and helping you get started!
[COMPANYNAME]
[COMPANYPHONE]
[COMPANYSITE]
.webp?width=447&height=540&name=image-png-Feb-13-2025-04-40-32-0532-PM%20(1).webp)
Step 6: Review Automation
Once you’ve finished customizing the email template, switch to the "Review" tab.
If any steps were skipped, this section will list what needs to be resolved before you can save or activate the automation.
If all required steps are completed, you’ll see the message: "You are almost done." %20(1).webp?width=642&height=351&name=image-png-Jan-22-2025-03-36-50-7100-PM%20(1)%20(1).webp)
Step 7: Activate Automation
To activate the automation, click the "Turn On" button. If you prefer to save the template without sending emails, click "Save"— this will store the template in the system without triggering any emails.
By following these steps, you'll be able to create a second contact attempt automation in Pabau.
How to Create a Won Lead Automation
This article explains how you can create an automation to be sent to won leads.
Implementing lead automation for your clinic ensures that no potential patient inquiry goes unanswered. The Won Leads automation welcomes new patients with a warm and informative message, reinforcing their decision to choose your clinic.
Step 1: Navigate to Marketing
Start by logging in to your Pabau account using your login credentials. Then, navigate to the Marketing tab and click to expand it. This will reveal the "Automations" sub-tab.
Step 2: Create a New Automation
Click the "Create Automation" button in the top right corner of the screen to begin setting up your automation.
.webp?width=670&height=263&name=image-png-Jan-22-2025-02-52-51-1205-PM%20(1).webp)
Clicking this button will prompt you to choose a template or create one from scratch. Select the "Start from scratch" option in this case..webp?width=670&height=286&name=image-png-Jan-22-2025-02-56-09-2679-PM%20(1).webp)
Next, select the object for which you want to create an automation. In this case, choose the "Lead" option.
.webp?width=391&height=354&name=image-png-Jan-22-2025-02-55-23-2645-PM%20(1).webp)
The next step would be to choose whether you'd like to create an email or SMS automation. In this guide, we'll cover the Email automation.
Step 3: Configure Settings
In the "Settings" tab, configure the following automation settings:
- Automation Title: Enter a title for your automation (this is for internal use and will not be visible to leads).
- Email Subject: Enter the subject line for your automation email (this will be visible to leads).
- When: Choose how often you want the automation to run.
- Automation Description: Write short description for your automation ((this is for internal use and will not be visible to leads).
If you're setting up a Won lead automation email, make sure to set the automation to run every 1 hour, at [select preferred time], and enable the "Don't send to the same client more than once" toggle.

Step 4: Filter Audience
To filter your audience, navigate to the "Audience" tab. To create a new audience for your leads, click the "Create" button in the center of the page.
.webp?width=670&height=355&name=image-png-Jan-22-2025-03-10-06-1153-PM%20(2).webp)
A pop-up will appear, allowing you to set filters to define your target audience.
To email only leads that have been converted to clients, you can set the following filters under "Show leads that match ALL of these conditions":
- Lead Lead status is Won
You can also filter leads by lead stage if you have a "Converted" stage created and use these filters:
- Lead Lead stage is Converted
Note that stages are created within the lead pipeline, and the stage name does not have to match what we've used here—it can be whatever you choose.

NOTE: To learn more about lead pipelines, review this article.
Step 5: Customize Email Design
To customize your email template, switch to the "Design" tab. At this stage, you can use the components on the right-hand side to build your email template.
Here is an example of the email content that you could use for Won Leads. Feel free to adjust it as needed, such as by modifying the text, adding buttons, images, or anything else that reflects your brand and communication style.
Subject: Welcome to [COMPANYNAME]! We’re Excited to Have You!
Hello [Client/Lead First Name],
It was a pleasure to talk to you.
Fantastic news! We’re thrilled to officially welcome you to [CLINICNAME]. Your inquiry has been processed, and we are excited to assist you with your needs.
Click the link below to learn more about our services and how we can support you.
CLICK TO OPEN OUR WEBSITE
If you have any questions or need assistance at any time, don’t hesitate to reach out. We’re here to help.
We look forward to working with you!
[COMPANYNAME]
[COMPANYPHONE]
[COMPANYSITE]

Step 6: Review Automation
Once you’ve finished customizing the email template, switch to the "Review" tab.
If any steps were skipped, this section will list what needs to be resolved before you can save or activate the automation.
If all required steps are completed, you’ll see the message: "You are almost done."
Step 7: Activate Automation
To activate the automation, click the "Turn On" button. If you prefer to save the template without sending emails, click "Save"— this will store the template in the system without triggering any emails.
By following these steps, you'll be able to create a won lead automation in Pabau.
How to Create a Lost Lead Automation
This article explains how you can create an automation to follow up on lost leads.
Implementing lead automation for your clinic ensures that no potential patient inquiry goes unanswered. Lost Leads automation maintains a connection with potential patients who may not be ready yet, leaving the door open for future engagement.
Step 1: Navigate to Marketing
Start by logging in to your Pabau account using your login credentials. Then, navigate to the Marketing tab and click to expand it. This will reveal the "Automations" sub-tab.
Step 2: Create a New Automation
Click the "Create Automation" button in the top right corner of the screen to begin setting up your automation.
Clicking this button will prompt you to choose a template or create one from scratch. Select the "Start from scratch" option in this case.
Next, select the object for which you want to create an automation. In this case, choose the "Lead" option.
The next step would be to choose whether you'd like to create an email or SMS automation. In this guide, we'll cover the Email automation.
Step 3: Configure Settings
In the "Settings" tab, configure the following automation settings:
- Automation Title: Enter a title for your automation (this is for internal use and will not be visible to leads).
- Email Subject: Enter the subject line for your automation email (this will be visible to leads).
- When: Choose how often you want the automation to run.
- Automation Description: Write short description for your automation (this is for internal use and will not be visible to leads).
If you're setting up a "Lost Lead Follow-Up" email, make sure to set the automation to run every 1 hour, at [select preferred time] and enable the "Don't send to the same client more than once" toggle.

Step 4: Filter Audience
To filter your audience, navigate to the "Audience" tab. To create a new audience for your leads, click the "Create" button in the center of the page.
A pop-up will appear, allowing you to set filters to define your target audience.
To email only leads that you've marked as lost, you can set the following filters under Show leads that match ALL of these conditions':
- Lead Lead stage is Lost- Mark as junk.
Note that stages are created within the lead pipeline, and the stage name does not have to match what we've used here—it can be whatever you choose.
Note that stages are created within the lead pipeline, and the stage name does not have to match what we've used here—it can be whatever you choose.

NOTE: To learn more about lead pipelines, review this article.
Step 5: Customize Email Design
To customize your email template, switch to the "Design" tab. At this stage, you can use the components on the right-hand sides to build your email template.
Here is an example of the email content that you could use for Lost Leads. Feel free to adjust it as needed, such as by modifying the text, adding buttons, images, or anything else that reflects your brand and communication style.
Subject: We’re Here If You Need Us
Hello [Client/Lead First Name],
We understand now might not be the right time for you to move forward with [COMPANYNAME]. We appreciate your initial interest.
Should your needs change or if you wish to revisit our offerings in the future, don’t hesitate to reach out. We’ll be here to assist when you’re ready.
Feel free to visit our website for updates on our services and new offerings.
CHECK OUR WEBSITE
We wish you all the best and hope to reconnect soon!
[COMPANYNAME]
[COMPANYPHONE]
[COMPANYSITE]

Step 6: Review Automation
Once you’ve finished customizing the email template, switch to the "Review" tab.
If any steps were skipped, this section will list what needs to be resolved before you can save or activate the automation.
If all required steps are completed, you’ll see the message: "You are almost done."
Step 7: Activate Automation
To activate the automation, click the "Turn On" button. If you prefer to save the template without sending emails, click "Save"— this will store the template in the system without triggering any emails.
By following these steps, you'll be able to create a lost lead follow-up automation in Pabau.
For more guides, refer to related articles below, select additional guides, or use the search bar at the top of the page. These guides will help you get the most out of your Pabau account.
Additionally, to help you fully utilize and understand your Pabau account, we recommend exploring additional guides and resources offered at the Pabau Academy. It offers in-depth video tutorials and lessons, offering a holistic learning experience that can equip you with the essential skills for achieving success with Pabau.