Table of Contents:
1. How to Add Review Widgets to Your Website
2. How to Add Gift Vouchers on Your Website
3. How to Access and Use Your Package Widget Code
4. How to Add Forms to Your Website
5. How to Add Memberships to Your Website
6. How to Implement Your Online Booking Platform on Your Website
How to Add Review Widgets to Your Website
Adding review widgets from Pabau to your website allows you to showcase your clinic’s positive feedback directly on your site. It’s a great way to build trust with potential clients and highlight the great work you’re doing!
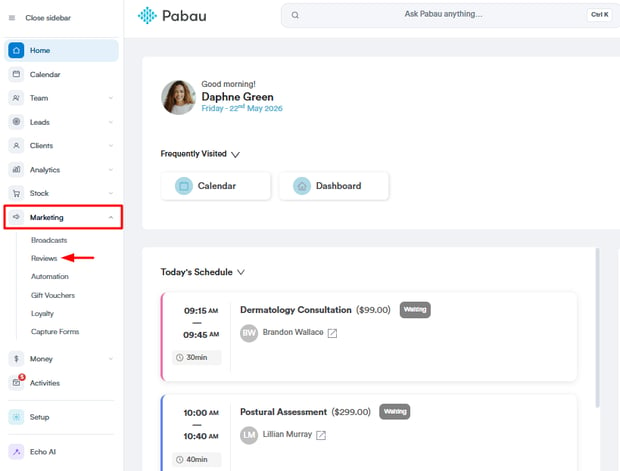
Step 1: Accessing the Review Dashboard
To begin managing your reviews, log in to your Pabau account and navigate to the Marketing section in the left sidebar menu, then click on "Reviews" to access the Review Dashboard.
Step 2: Complete the Setup Process
Before you can access the review widgets, you’ll first need to go through the feedback survey builder, customize your survey questions, and set up the desired review integrations.

NOTE: If you want to learn more about reviews and how to manage them, please refer to the following article.
Step 3: Locate Widgets and Badges
After customizing the survey, you will be redirected to the next page. Scroll down to locate the Widgets and Badges section.
- In this section, you have the option to add Badges, which are useful for displaying strong product ratings and attracting new reviews. To do this, you can use the provided embed code.
- Additionally, you can add Review Widgets, which can be embedded on your website using the embed code. To obtain the code, click on ''View Embed Code'', and a pop-up window will appear. From there, you can copy the code and use it on your website.

If you want to preview how the review widget will appear once embedded, click on the ''Preview'' button.
This step allows you to showcase your reviews effectively, enhancing your online presence and credibility.
Step 3: Integrate the Code into Your Website
Once you've copied the embed code, navigate to your website’s backend where you can edit the HTML code. Paste the embed code in the desired location on your website, typically where you'd like the reviews to appear (e.g., on a testimonial or reviews page). Don’t forget to save the changes to ensure the widget is successfully integrated.

NOTE: This is a service we provide, and if you need assistance with embedding the review widget, please contact our support team for more details at the following link.
By following these steps, you’ll successfully embed the reviews widget onto your website, allowing your clients to easily view the feedback and experiences shared by others.
How to Add Gift Vouchers on Your Website
Locating the Gift Vouchers Link on Pabau
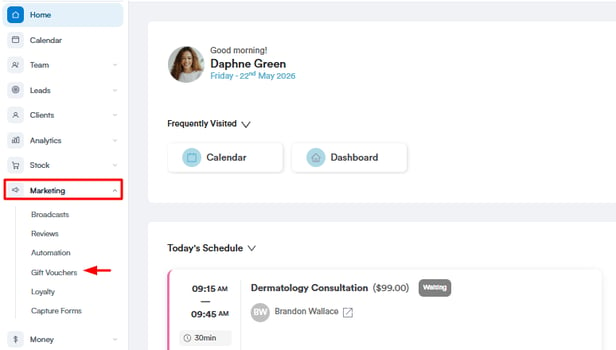
Step 1: Navigate to Gift Vouchers
Start by logging in to your Pabau account using your login credentials. Then, click on the "Marketing" section on the left sidebar menu. This will reveal the "Gift Vouchers" tab.
Step 2: Create or Edit Gift Vouchers
You can generate the voucher link to add it to your website. Depending on whether you have existing vouchers or creating new ones, follow the steps below:
NOTE:
For guidance on creating a new gift voucher in your Pabau account, refer to this article.
For instructions on how to edit an existing voucher, review this article.
- New Voucher - For this voucher to appear online, ensure the "Sell this voucher online" toggle at the top right side is enabled. To save the changes, click the "Next Step" button on the bottom right side and the "Create" button right after.
- Existing Vouchers - You can review and edit existing vouchers to ensure that they're set up correctly to appear online. Ensure the "Sell this voucher online" toggle at the top right side is enabled. To save the changes, click the "Next Step" button on the bottom right side and the "Edit" button right after.


Step 3: Navigate to Online Bookings
Navigate to the Setup page on the left sidebar menu. Then, under the Catalogue section, you will find the Online Booking tab.

Step 4: Customize the Online Booking Portal
Click on the Customize button on the right-hand side of the Online Booking page.

Remain on the default opening page, which displays the Customize section, and the General tab is opened.
On the left side of the screen, scroll down to locate the "Hide Gift Voucher Purchase" option. Ensure the Gift Vouchers feature is not hidden in the Online Booking portal. If it's not ticked, it will be displayed online.

Step 5: Switch to the Promote Tab
After ensuring the gift vouchers are not hidden for online purchases, navigate to the Promote tab on the top left side of the screen on the online booking customization page. Then, click on the "Booking Portal" sub-tab to reveal the Online Booking link. You can copy it by clicking the "Copy Link" button.

If you make any changes, make sure to click the "Save Changes" on the top right side of the page so the updates apply.

Step 6: Access the Online Booking Portal
Paste the link you copied in a new tab to access the online booking portal. You will view how the configuration you've made in Pabau reflects on the booking page. Click on the gift vouchers icon to access the vouchers you've created.

Step 6: Copy the Vouchers Link
Once you're on the vouchers page, you will view all the vouchers you created in Pabau and made available to sell online. To include all these vouchers on your website, copy the link at the top of your web browser.

This displays how the button could appear once it is added to your website. You always have different styling options for the button itself.
Once you click on the button, your clients will be redirected to the vouchers page, where they can proceed to purchase.

We will include instructions on how to insert the voucher link in some website builders below.
Adding a Link to a Button Element on Wix
-
Click on a button element and select the Edit button
-
(Optional) Rename the button
-
For the Link to, select the object to link to:
-
Web address:
-
URL – insert any URL; this also allows linking to specific sections within your website
-
Phone number – insert any phone number, including the country code
-
Email – insert any email address
-
-
File download – upload a file from your local device
-
Section – link to a particular section within your website
-
Another page within your website – select the page to link to
-
-
(Optional) Open in new tab
-
(Optional) Make link nofollow
-
Click outside the settings box to close it; the changes are saved automatically:

Adding a Link to a Button Element on WordPress
To add a link to your button:
- Click on a button, and a toolbar will appear above it.
- Click the Link icon in the toolbar. The icon looks like an actual link you would find in a metal chain.
- Search for an existing page on your site or type/paste a URL.
- Click Apply.
.gif?width=670&height=372&name=linking-a-button-2%20(1).gif)
Adding a Link to a Button Element on Squarespace
-
Click on a "Text Block" or a "Text Box."
-
Fill in the text for your hyperlink.
-
Highlight the text.
-
Select "Link" and add the URL.
-
Click "Save."

By following these steps, you can include a button to lead your clients to purchase vouchers you have created in Pabau.
How to Access and Use Your Package Widget Code
The packages widget displays the packages and their prices as configured in the Packages feature under Setup. It highlights the savings visitors can enjoy by purchasing a package rather than booking multiple individual sessions of the same service.
NOTE: For details on creating and managing packages, see this article.
Here’s an example of the widget's appearance:

When visitors click the "Add to Cart" button, they'll be redirected to a payment screen with their selected package pre-selected.
NOTE: To use this feature, your Pabau account must be integrated with Stripe.
The widget’s color scheme will match the colors you selected in your online booking settings, which you can customize by navigating to Setup, then Client Portal, followed by Customize, and finally Appearance.

To obtain the widget code, please follow these steps:
Step 1: Navigate to Setup
Go to the Setup section in the left sidebar menu and select "Online Booking" under Services.
Step 2: Customize the Widget
In the Online Bookings feature, click on "Customize," then navigate to the "Promote" tab.


Step 3: Select Packages
In the "Packages" sub-tab, choose a service related to the package. The default option is "All services," meaning the widget will show packages for all services. If you select a specific service, the widget will display only the packages related to that service.

Step 4: Copy the Code
Click on "Copy Code." You or your website developer can then paste this code into your website to embed the widget.

If you need assistance, please contact us at customercare@pabau.com for help with embedding the widget.
By following these steps, you'll have the package widget seamlessly integrated into your website, making it easier for visitors to view and purchase your packages.
How to Add Forms to Your Website
Want to let clients fill out forms directly from your website? Whether it's for lead capture, online consultations, or client registration, adding a form is easy. Just follow the steps below to copy the code you need to embed it into your site.
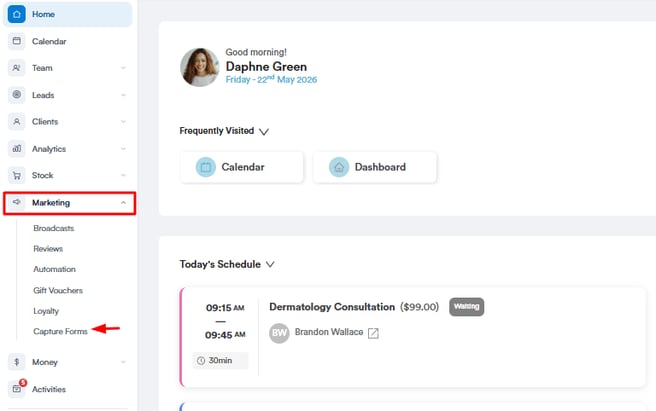
Step 1: Access "Capture Forms"
Start by logging into your Pabau account using your login credentials. Then, navigate to the Marketing section located on the left sidebar menu and click to expand it. The "Capture Forms" tab will be revealed.
Step 2: Access The Forms Tab
Navigate to the "Forms" tab on the top left corner to view your created forms. On the form you want to embed to your website, click the "Actions" button to view all available options.

Step 3: Publish & Share
The actions button will reveal the "Publish & Share" option. Click to view the share options.

Step 4: Embed Full Form
By default, the "Embed Full Form" tab will open. This provides you with the code needed to embed the form on your website.

The forms can be published in two formats: With or Without design (no theme) and can be shared in different ways, depending on the configuration you assigned.

Step 5: Embed Pop-Up Form
In this tab, you can create pop-ups designed to capture your visitors' attention.
You’ll have full control to customize elements like colors, borders, corner radius, backgrounds, button placement, and more.

When you're ready, click the "Generate code" button to open a modal where you can copy the HTML code to insert into your web page.


Once you've copied the code, paste it into the HTML of your website where you want the form to appear.
This could be:
-
A contact page
-
A booking page
-
Or a dedicated landing page
If you're using a website builder (like Wix, WordPress, Squarespace, etc.), look for an option to embed custom HTML or add code, then paste the code there.
Step 6: Share Form Link
In this tab, you’ll find a direct link to your form that you can easily copy and share with clients.
This link is perfect for sending via email, SMS, or messaging apps — no need for embedding code or technical setup.

Step 7: Send By Email
In this tab, you can customise and send your form via email. You’ll be able to define the recipient email addresses, sender name, reply-to email address, email subject, and email body.
This is a great way to send personalized invitations or reminders directly to your clients' inboxes.

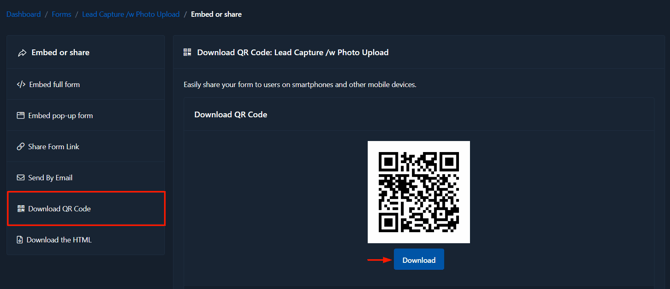
Step 8: Download QR Code
In this tab, you’ll find a QR code that links directly to the friendly URL of your form. You can easily click the “Download” button to save the QR code as an image, making it simple to print or share digitally with your clients — for example, on posters, flyers, or in your clinic.
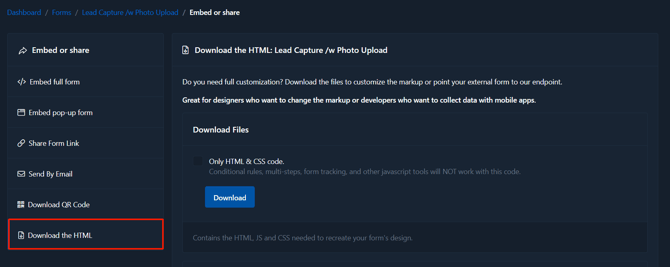
Step 9: Download the HTML
How to Add Memberships to Your Website
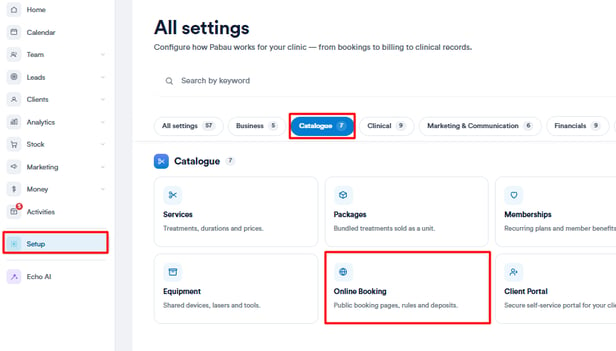
Step 1: Navigate to Setup
Start by logging into your Pabau account using your login credentials, then navigate to the Setup button located at the bottom of the left sidebar menu to access the Setup page. The Client Portal tab is listed under the "Catalogue" section.

Step 2: Access Client Portal Setup
Navigate to the "Customize" button on the bottom right corner of the screen to access the Setup options.

Step 3: Switch to the Memberships Tab
On the Client Portal Setup page, switch to the “Memberships” tab at the top of the screen to access related settings. Make sure the “Memberships” toggle is enabled to allow clients to purchase memberships online.

Then, switch to the "Membership link" sub-tab.

Step 4: Copy Link
Copy the link provided and paste it wherever you'd like — your website buttons, blog posts, email signature, or anywhere else online.
This link takes clients directly to your online booking membership menu, making it easy for them to purchase a membership in just a few clicks.

By following these steps, you can easily add membership plans to your website.
Step 1: Get the Link to Your Online Booking Platform
Before adding the "Book now" button, you need to obtain the URL to your online booking platform:
Log in to your Pabau account and in the left sidebar menu, go to Setup, then click on " Online Booking" under Catalogue.
Click on Customize, go to the Promote tab, and open the "Booking portal" sub-tab.
Copy the URL displayed on this page; you'll use it for the button.

You can also use the URL to add it to communication templates or email newsletters.
How to Implement Your Online Booking Platform on Your Website
Step 2: Implementing the "Book Now" Button
Depending on your website setup, there are two ways to proceed:
For Custom Code Websites: If your website is custom-built, you'll need to add a line of code to your website's body. Use the following code:
<button href="replace this piece of text with the link to your online booking portal">Book now</button>
This code creates a button that, when clicked, redirects clients to your online booking platform.
For Content Management System (CMS) Websites: If your website uses a CMS, implement a Button component with the link to your online booking platform as the directory.
Using Pabau's Custom Buttons
Pabau offers pre-styled buttons with additional customization options. Here's how to use them:
1. In the Promote tab of the Online Booking settings, go to the Button sub-tab.
2. Highlight the desired button and click on "View instructions" to adjust the behavior of the button if desired.

With that done, now it's time to implement the button itself. In the "Copy Embed Code" menu, you'll find the code for the button.
Start by copying the code from the second box. If your website is custom code, paste it where you'd like the button to be, or if your website is CSM, put it in an HTML component.
<div id="pabau-book-now"> </div>
Then, copy the content of the first box, and paste it after the "<div id="pabau-book-now">" in the first code. The final result should look like this:
<div id="pabau-book-now">
<script id="pabau-script" src="https://pabau.com/widgets/online-bookings/book-now-button.js?company_slug=cosmetic-clinic-demo&btnStyle=1"></script>
</div>
With these steps completed, you've successfully integrated the "Book now" button, providing a seamless booking experience for your clients.
NOTE: You can also learn about this topic by watching a lesson on Pabau Academy.
In addition, we suggest reading our Online Bookings article for a more in-depth exploration of this topic.
For more guides, refer to related articles below, select additional guides, or use the search bar at the top of the page. These guides will help you get the most out of your Pabau account.
Additionally, to help you fully utilize and understand your Pabau account, we recommend exploring additional guides and resources offered at the Pabau Academy. It offers in-depth video tutorials and lessons, offering a holistic learning experience that can equip you with the essential skills for achieving success with Pabau.