Table of Contents:
1. Overview of Clients and Client Card
2. How to Create a Client
3. How to Edit a Client
4. How to Delete a Client
5. How to Assign a Label to a Client
6. How to Remove a Label from a Client
7. How to Add a Client Relationship
8. How to Remove a Client Relationship
9. How to Deactivate a Client
10. How to Create a New Summary View
11. How to Manage Summary Views
Overview of Clients and Client Card
This article guides you through accessing your clients and provides a general overview of the client card in Pabau. Discover how to efficiently search for clients, view your entire client list, and understand the client card's intricate details.
Search up Clients
You can search for a client by using the search bar at the top of the screen. Type in the client's name, phone number, email, or client ID.

For advanced searches, click the advanced search button on the bottom right.
Click on the desired client card.
View All Your Clients
In the left sidebar menu, navigate to Clients, then choose Clients again.
Customize the display of client information by rearranging and adding data fields by clicking on "Edit Columns".
Easily manage multiple clients through the tick boxes on the left.
Utilize the filter option for specific searches.
Understanding the Client Card
The client card contains all client data and is divided into sections.
On the left, the "Details" tab provides client status, labels, and basic details.
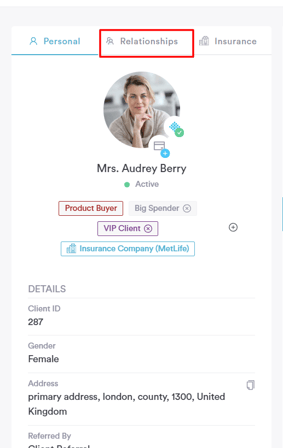
The second tab showcases client relations. To learn more about relations, check out our "How to Add a Client Relationship" article.

In the center of the client card, multiple tabs categorize client data for convenient access and management.
Summary: Provides a customizable, log-in-specific overview of crucial client information.
Appointments: Displays appointments related to the client, with further organization into sub-tabs.
Financials: Breaks down payments made by the client, segmented into sub-tabs for clarity.
Packages: Lists packages bought by the client, distinguishing between active and expired ones. Notably, it details the sessions used.
Communications: Houses notifications sent to the client, including both sent and scheduled messages.
EMR (Electronic Medical Records): Expands into a dropdown list containing medical forms, prescriptions, documents, and photos.
Gift Vouchers: Displays vouchers linked to the client, categorized as active or expired, similar to packages.
Activities: Records client-related tasks and activities.
In the top right section of the client card, you'll find the following tabs:
Medical History: Hover over to view the client's last medical history form update date. Click to access, edit, or send update requests to the client.
Notes: Records client-specific notes and previews appointment notes.
Staff Alerts: Alerts about client conditions that might affect treatments, such as allergies or a fear of needles.

Initiate various actions related to the client through the blue plus icon situated in the bottom left corner of the card.
This feature enhances the versatility of client management within Pabau, providing a centralized and comprehensive platform for effective client interaction and organization.
NOTE: You can also learn about this topic by watching a lesson on Pabau Academy.
How to Create a Client
This article guides you through the process of creating a client in Pabau. There are multiple methods available for client creation, ensuring flexibility in your workflow.
1. Create Button:
Log in to your Pabau account and navigate to the Create button at the top of the screen. Alternatively, use the hotkeys Shift + C.
2. Clients Page:
On the Clients page, locate the "Create Client" button.

3. Search Bar:
Click "Add New" when using the search bar.

4. Calendar:
When booking an appointment, you can either search for an existing client or create a new one instantly.

Regardless of the method chosen, the client creation process remains the same.
General Section:
- Input basic client details, including preferred salutation, name, surname, gender, and date of birth.
- Assign a preferred language and apply labels from the top right corner.
- Add contact information such as email address and phone number.
More Section:
- If additional information, like the name of the client's GP, is needed, it can be added under the "More" section.
- Any extra fields created will also be stored under "More."
Final Steps:
- Click "Create" in the top right corner to complete the client creation process.
How to Edit a Client
This article provides a guide on how to edit client details in Pabau. There are two convenient methods to update client information – directly from the client card or through the client list.
1. Through the Client Card:
Log in to your Pabau account and navigate to the client card of the client whose information you want to edit by using the search bar at the top of the screen.

- Edit Specific Field:
In the Details section of the card, hover over the field you wish to edit, and the edit option will appear.
- Edit All Fields:
Hover over "Details" to reveal the option to edit all fields.
- Adjust Client Photo:
Click on the client's avatar. In the pop-up, adjust the existing photo.
Upload a new photo by clicking "Upload file."
Delete the current photo through the red button in the upper left corner.
2. Through the Client List:
In the left sidebar menu, go to Clients, then click on Clients again.
- Edit Specific Field:
Hover over the field you want to edit in the client list, and an edit option will appear. Click on it and make the necessary changes.
- Confirm Changes:
Click on "Save" to confirm the edits.
NOTE: Not all fields can be edited from the client list. A field must be visible on the list for editing to be possible.
By following these steps, you can effortlessly update and manage client information in Pabau, ensuring your records are always accurate and up to date.
How to Delete a Client
This article guides you through the process of deleting a client in Pabau. There are two straightforward methods to delete a client, either from the client card or directly from the client page.
1. From the Client Card:
Log in to your Pabau account and navigate to the client card of the client you want to delete by using the search bar at the top of the screen.

- Access Three-Dot Menu:
Hover over the "Details" tab on the card. A three-dot button will appear in the top right corner. Click on it and select "Delete client". Click on "Delete" to confirm the deletion.
2. From the Clients Page:
In the left sidebar menu, go to Clients, then click on Clients again.
After selecting at least one client, options will appear above the client list. Click on the checkbox next to the client(s) you wish to delete, then click on the trash bin icon.
In the prompt, click "Yes, delete" to confirm.
By following these steps, you can efficiently manage your client database in Pabau, ensuring accurate and organized records. Be cautious while deleting clients, as this action is irreversible, and all associated data will be permanently removed.
How to Assign a Label to a Client
This article guides you through the process of assigning labels to clients in Pabau.
Labels help you categorize your clients and leads. You can also use labels to send targeted campaigns.
Here's how you can easily assign labels:
Step 1: Navigate to the Client Card
Log in to your Pabau account and navigate to the client card of the client you want to assign a label to by using the search bar at the top of the screen.

Step 2: Locate Labels Section
Look for the labels section right underneath the client avatar.
Assign a New Label: If your client doesn't have any labels assigned, click on "Add label" to assign a new label.
Assign an Existing Label: If your client already has a label, hover over the existing label to reveal the plus button.
Click on the plus button and select the label you want to assign.

Create a New Label: While assigning labels, you can also create a new one on the spot if needed.

NOTE: Ensure to choose labels that best represent the characteristics or categories you want to associate with your clients.
You can also create new labels by following the steps in this article.
By following these steps, you can efficiently utilize labels to enhance your client management in Pabau, streamlining communication and marketing efforts.
How to Remove a Label from a Client
This article covers how you can remove labels from a client.
Step 1: Navigate to the Client Card
Log in to your Pabau account and navigate to the client card of the client from whom you want to remove a label using the search bar at the top of the screen.

Step 2: Hover over their labels to reveal the plus button
Click on the plus button. Labels assigned to that client will have a checkmark on their far right. Click on the label you wish to remove.

The label is now removed.
How to Add a Client Relationship
This article covers adding a relationship to a client card in Pabau. Client relationships are managed directly from the client card.
Step 1: Navigate to the Client Card
Log in to your Pabau account and navigate to the client card of the client you want to add a relationship to by using the search bar at the top of the screen.

Step 2: Navigate to the Relationships Tab
At the top of the client card, click on the ''Relationships'' tab next to Personal to access and manage the client's linked contacts and connections.

Step 3: Add Relationship
Click on the "Add" button to initiate the process of adding a relationship.

In the "Add Relationship" menu, select the type of relationship you want to add. Based on your selection, the steps will vary from this point onward.
Relationship-Specific Steps:
Family Member:
Type in the name of the contact and their relationship, then click "Add" to finalize.
Emergency Contact and Next of Kin:
GP (General Practitioner):
Pharmacy:
This option allows you to add a pharmacy related to this particular client. Search by name or postcode, then click on the pharmacy, or create a new pharmacy manually by clicking "Add Pharmacy."

Insurance Provider:
Then, you'll also need to add your client's membership number. Complete the set-up by adding the desired pricing list.
Company:
How to Remove a Client Relationship
Step 1: Navigate to the Client Card
Log in to your Pabau account and navigate to the client card of the client you want to remove a relationship from by using the search bar at the top of the screen.

Step 2: Navigate to the Relationships Tab
At the top of the client card, click on the ''Relationships'' tab next to Personal to access and manage the client's linked contacts and connections.
Step 3: Remove the Relationship
Hover over the relationship you want to delete. This action will reveal the delete button associated with the relationship.

Click on "Remove Relationship" to initiate the removal process.
The relationship is now successfully removed from the client card.
How to Deactivate a Client
This article provides detailed steps on how to archive a client without removing them from your account in Pabau.
Step 1: Navigate to the Client Card
Log in to your Pabau account and navigate to the client card of the client you want to deactivate by using the search bar at the top of the screen.

Step 2: Access Client Status Indicator
Below the client's avatar on the client card, find the indicator that shows whether the client is currently active or inactive. Click on this indicator to proceed.
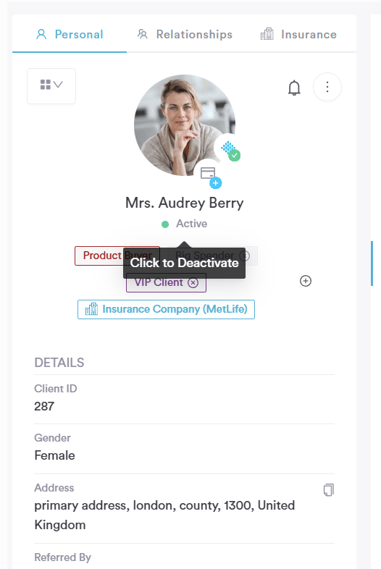
Step 3: Confirm Deactivation
A prompt will appear seeking confirmation for deactivating the client. Click on "OK" to confirm the deactivation process.
The client is now marked as inactive. You can re-activate their client card at any time by clicking on the indicator once more.
Inactive clients won't be displayed when using the search bar. To find them, perform an advanced search and tick the checkbox for "Show inactive clients."
In the Clients feature, both active and inactive clients will be visible. However, inactive clients will have a red border on their avatar, serving as an indicator of their inactive status.
How to Create a New Summary View
The Summary section in the client card allows you to highlight the most vital client information for your practice. It's log-in-specific and easily adjustable. This article guides you through the process of creating different views for the Summary section in the client card.
Step 1: Navigate to the Client Card
Open any client card by using the search bar at the top of the screen.

Locate the Summary tab and click on the button positioned on the right side of the tab.

Click on "Add new view" to initiate the process.
Step 2: Choose and Arrange Widgets
On the left side of the screen, you'll find a selection of widgets to build your view. Click on the widgets you want to add, and use the three-line icon on the far left of each widget to drag and drop them, arranging their order.
As you make changes, your view will be displayed on the right side of the screen.
Step 3: Name and Save Your View
Once you've customized the view, name it in the upper left corner of the screen. Click on "Save" in the upper right corner to confirm and save your newly created view.
-
To switch between different views, click on the button on the right side of the Summary tab.
-
Hovering over a view will reveal the "Set as default view" button. Mark your preferred view to always default to that one.

By following these steps, you can efficiently create customized Summary views tailored to your specific needs.
How to Manage Summary Views
This article provides a guide on how to edit or delete views in the Summary tab on the client card.
Step 1: Navigate to the Client Card
Open any client card by using the search bar at the top of the screen.

Locate the Summary tab and click on the button positioned on the right side of the tab.
Hover over a view to reveal the "Edit" option.

Step 2: Edit a View
Once the "Edit" option is visible, click on it to make changes to the view. The editing process is similar to creating a new view.
After making the desired changes, click on "Save" in the upper right corner to confirm and save your modifications.
Step 3: Delete a View
To delete a view, ensure that there are two or more views available. The "Delete" button won't be accessible unless multiple views exist.
Click on the "Delete" button located in the upper right corner of the view editing page to remove the selected view.

In the prompt, click on "Yes, Remove View" to confirm the action.
For more guides, refer to related articles below, select additional guides, or use the search bar at the top of the page. These guides will help you get the most out of your Pabau account.
Additionally, to help you fully utilize and understand your Pabau account, we recommend exploring additional guides and resources offered at the Pabau Academy. It offers in-depth video tutorials and lessons, offering a holistic learning experience that can equip you with the essential skills for achieving success with Pabau.