Table of Contents:
1.How to Register on the Client Portal
2.How to Login to the Client Portal
3.How to Reset Your Password From the Client Portal
4.How to Book an Appointment via Online Bookings
5.How to Confirm Your Appointment via Email or SMS
6.How to Cancel Your Appointment
7.How to Reschedule Your Appointment
8.How to Check Your Documents
9.How to View Your Purchased Packages
10.How to View Your Loyalty Points
11.How to View and Manage Your Payments in the Client Portal
12.How to Purchase a Package via Online Bookings
13.How to Book an Appointment Using a Package in the Client Portal
14.How to Purchase a Gift Voucher for Someone Else
15.How to Pay an Unpaid Invoice via the Client Portal
16.How to Save Your Card on File for Future Payments
17.How to Leave a Review via Email or SMS
17.1How to Leave a Review Through the Client Portal
18.How to Complete a Medical Form Prior to Your Appointment
19.How to Update Your Personal Information
How to Register on the Client Portal
The Client Portal offers you 24/7 access to your appointments, medical records, and payment history, making it easier to manage your healthcare. You can quickly book, reschedule, or cancel appointments, securely store important documents, and easily make payments - all in one place for a streamlined experience.
Step 1: Navigate to the Registration Page
To begin, visit the online booking link provided by the clinic. This will direct you to the registration page where you can create your account.

Step 2: Enter Your Personal Information
Now that you're on the registration page, fill in the required information such as your name, contact details, and password to create your account. Some clinics may ask for additional details depending on their setup.

Step 3: Create an Account
Choose a username and password to create your account. This will allow you to access the portal for future appointments and updates. Then, click on ''Register'' at the bottom to complete your sign-up.

Step 4: Verify Your Email
After submitting your information, you may receive a verification email. Open the email and click on the verification link to confirm your account.

Step 5: Complete Your Profile
You're now registered! Once your account is verified, return to the portal to fill in any additional information the clinic may require.

Now that you are registered to the portal, you can start booking appointments, view your documents, manage upcoming visits, and much more — all in one place.
How to Login to the Client Portal
Finding and Accessing the Client Portal
There are a few easy ways to access the Client Portal:
-
Clinic Website (Online Booking)
Visit your clinic’s website and look for a “Book Now”, “Patient Portal”, or “Online Booking” button. Clicking it will open the clinic’s dedicated Pabau Client Portal (Pabau Connect) where you can log in. -
Email or SMS Notification
If you’ve booked an appointment online or have one coming up, you may receive an email or text from your clinic with a direct link to the portal. Look for a button such as “Complete Forms” or “Manage Booking” — clicking it will take you straight to your secure client area. -
Direct Portal Link:
Some clinics may provide a unique URL that leads directly to their portal. If you’ve received one, simply open it in your browser.
Whichever method you use, you’ll be taken to the clinic’s Client Portal page where you can log in and manage your details.
Step 1: Access the Client Portal
Once you’ve opened the Client Portal, you’ll land on the login page.

Step 2: Enter Your Details
On the login page, enter your email address and password, then click “Log in” to access your account.

NOTE: If you're logging in for the first time, use the same email address you provided when you first registered with the clinic. This ensures your online account links with your existing records.
Step 3: You're In!
Once logged in, you’ll land on your Client Dashboard, where you can:
-
View upcoming and past appointments
-
Complete medical forms
-
Read pre-care and aftercare instructions
-
Manage your profile

Now that you know how to log in, you’re all set to start managing your appointments, completing forms, and staying informed with ease through the Client Portal.
How to Reset Your Password From the Client Portal
Step 1: Navigate to the Login Page
Navigate to the Client Portal login page where you would normally sign in with your email and password.

Step 2: Initiate the Password Reset Process
Once you’ve accessed the login page, click the “Forgot your password” link below the login fields to begin the password reset process.

Step 3: Enter Your Registered Email Address
After clicking the "Forgot Password" link, a reset form will appear. Enter the email address associated with your client portal account, and submit the form to receive instructions on how to reset your password.

Step 4: Check Your Email for Reset Instructions
Once you've submitted the password reset form, check your inbox for an email with a link to reset your password. Click on the link provided in the email. If you don’t see it in your inbox, be sure to check your spam or junk folder.

After clicking the link in the email, you'll be prompted to confirm the password reset. Click on "Reset Password" to proceed.

Step 5: Set Your New Password
Once redirected, you'll be prompted to create a new password. Ensure your password is strong—use a combination of uppercase and lowercase letters, numbers, and special characters. After entering your new password, click ''Change my password'' to confirm the change.

After successfully resetting your password, you’ll be redirected to the login page. Use your new password to sign in to your account and access the client portal.
Now that you know how to reset your password, you can easily regain access to your account whenever needed.
How to Book an Appointment via Online Bookings
Step 1: Navigate to the Client Portal
To begin, navigate to the Client Portal login page. Enter your registered email address and password to sign in.

Step 2: Access the Booking Page
After logging into your Client Portal, click the "Book Appointment" button located at the top right corner of the screen, next to your profile icon. This will redirect you to the Online Booking page where you can begin scheduling your appointment.

Step 3: Choose a Treatment Category
Once you're redirected to the online booking page, you’ll see a list of treatment categories (e.g., Facials, Consultations, Laser). Click on the category that best matches the service you'd like to book.

Step 4: Select the Service You Want to Book
After choosing a category, you’ll see a list of available services. Browse through and select the one you’d like to book by clicking on it. Once selected, click ''Next'' at the bottom right corner to continue.

Step 5: Choose Your Appointment Date and Time
Now that you've selected your service, you'll be asked to choose the date and time for your appointment. Pick a slot that works best for you from the available options.

NOTE: If the clinic has multiple locations, you will first be asked to select your preferred location. If applicable, you can also choose your preferred practitioner before proceeding to the calendar. Please note that these options may not always be available, depending on the clinic's settings.
Step 6: Review and Confirm Your Appointment Details
After selecting your preferred date, time, and any additional options carefully review the appointment details. If necessary, you may include any additional notes or special instructions for the clinic. Once you have verified all information, click ''Confirm'' to finalize your appointment.

Now that your appointment has been successfully booked, you’ll receive a confirmation email with all the details. If you need to make any changes or cancellations, you can easily manage your booking through your client portal.

Now that you know how to book an appointment, you can easily schedule your future visits whenever needed.
How to Confirm Your Appointment via Email or SMS
Step 1: Look Out for a Confirmation Message
Once you've booked your appointment, the clinic will send you a confirmation message via email or SMS. This message includes your appointment details and a link you can use to confirm the booking.

Step 2: Review Your Appointment
Open the message and click the “Confirm Appointment” link. You’ll be taken to a confirmation page where you can review your booking details. Once you're there, your appointment is confirmed!

Now that you’ve confirmed your appointment, the clinic will be notified and prepare for your visit.
How to Cancel Your Appointment
Step 1: Access the Client Portal
Navigate to the Client Portal login page. Enter your registered email and password to log in to your account.

Step 2: Locate Your Appointment
Once you are logged into the Client Portal, go to the ''Appointments'' section from your dashboard or the menu.

Step 3: Select the Appointment You Want to Cancel
In the ''Appointments'' section, you'll see a list of your upcoming bookings. If the clinic allows cancellations through the portal, you'll see a ''Cancel'' button next to the appointment. Click it to begin the cancellation process.

NOTE: Depending on the clinic’s policy, you may be required to cancel within a certain timeframe. If the ''Cancel'' option isn’t available in your Client Portal, please contact the clinic directly to make any changes to your appointment.
Step 4: Confirm the Cancellation
After clicking ''Cancel'', a confirmation prompt will appear. Review the details, then click ''Yes'' or to finalize the cancellation of your appointment.

Once your appointment has been successfully canceled, you’ll see a confirmation message on the screen. You may also receive an email or SMS confirming the cancellation, depending on the clinic’s settings.
Now that your appointment is canceled, you can rebook at your convenience or contact the clinic if you need further assistance.
How to Reschedule Your Appointment
Step 1: Access the Client Portal
Log into your Client Portal using your credentials. Once you're logged in, you'll be directed to your dashboard where you can manage your upcoming appointments.

Step 2: Navigate to the Appointments Section
From the dashboard or menu, click on the "Appointments" tab. This will take you to the list of your upcoming appointments.

Step 3: Select the Appointment You Want to Reschedule
Browse through your list of scheduled appointments and locate the one you'd like to reschedule. You will see a ''Reschedule'' button next to the appointment. Click on it to open the appointment details.

NOTE: If you do not see the "Reschedule" button on your appointment, it may be due to the clinic's settings. The option to reschedule appointments may not be enabled by the clinic. In this case, please contact the clinic directly to make changes to your appointment.
Step 4: Select a New Appointment Time
After clicking the "Reschedule" button, you’ll be redirected to the calendar. Here, you can select a new date and time that works best for you. Choose your preferred slot from the available options and proceed to the next step.

Step 5: Confirm Your Rescheduled Appointment
After selecting your new date and time, you will be asked to confirm the rescheduling. Click "Yes" to finalize the change to your appointment.

After confirming the rescheduling, your appointment will be updated in the system. You will receive a confirmation notification with the new date and time for your rescheduled appointment. You can view the updated details in your appointment section within the Client Portal.

NOTE: Depending on the clinic's settings, you may receive a confirmation via email or SMS. If the clinic hasn't enabled this feature, you'll still be able to view the updated appointment details directly in your Client Portal.
Now that you know how to reschedule your appointment, you can easily manage your appointments in the future.
How to Check Your Documents
Step 1: Access the Client Portal
Start by logging into your Client Portal using your registered email and password. This will bring you to your main dashboard where all your details and features are available.

NOTE: If you do not see the "Documents" section in your Client Portal, it may be due to the clinic's settings. Some clinics may not have this feature enabled for patient visibility. Please contact the clinic if you need further assistance.
Step 2: Navigate to the Documents Section
Once logged in, find and click on the "Documents" tab. This section contains all the documents associated with your appointments and treatments.

Step 3: View Your Documents
In the "Documents" section, you'll see a list of available documents shared from the clinic. Click on the document you'd like to view. These might include medical records, test results, or other important files related to your care.

Note: You will be notified via email or SMS when a new document is available in your Client Portal, depending on the clinic’s settings. If you don’t receive a notification, the clinic may not have this feature enabled.
Additionally, if you need a physical copy of any document, you can easily download or print it. Look for the "Download" or "Print" option next to the document.

Now that you know how to check your documents, you can easily stay up-to-date with any important information shared by the clinic.
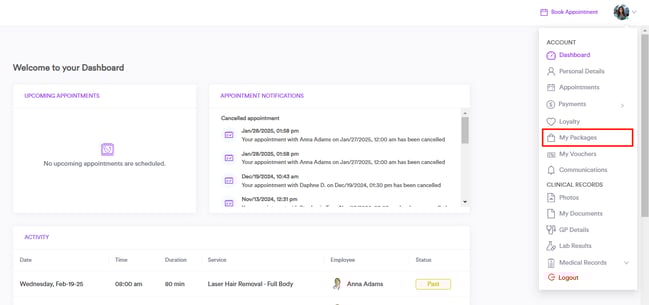
How to View Your Purchased Packages
Step 1: Access the Client Portal
Log into your Client Portal using your credentials. Once you're logged in, you'll be directed to your dashboard where you can manage and view your purchased packages.

Step 2: Navigate to the "My Packages" Section
From your dashboard, click on "My Packages" to view the list of packages you've purchased and their remaining sessions.

NOTE: If the Packages section is not visible in your account, it may be due to the clinic's settings or preferences. In such cases, please contact the clinic directly to inquire about package availability or access.
Step 3: View Package Details
Click on a package to see more information, such as the services included, how many sessions are remaining, and the expiration date (if applicable).

If the clinic has enabled it, you’ll also see a Book button right from the package, allowing you to quickly schedule your next session.
NOTE: To learn more about how to purchase a package or book a session from an existing package, please refer to this article.
Now that you know how to view your packages, you can easily keep track of your sessions and make the most out of what’s available to you.
How to View Your Loyalty Points
Loyalty points are a great way to earn rewards for your visits and purchases. If the clinic has enabled this feature, you can easily check your balance at any time.
Step 1: Access the Client Portal
Start by logging into your patient account using the clinic’s online booking link. You may have received this link by email or SMS from the clinic. Use your email address and password to sign in. If you don’t have an account yet, you’ll need to register first.

Step 2: Access the Loyalty Section
Once logged in, click on your profile icon in the top-right corner of the screen. From the dropdown menu, select “Loyalty” to view your available points.

NOTE: If you do not see the ''Loyalty'' section in your profile, it means that this feature has not been enabled by the clinic. For more information, please contact the clinic directly.
Step 3: Review Your Loyalty Points
In the ''Loyalty'' section, you’ll see a full breakdown of your points. This includes the total amount spent, the total points earned, and a detailed history showing when and how points were added.
Each entry includes the date, time, and the reason points were awarded—such as booking an appointment or purchasing a service.

Now that you know how to view your loyalty points, you can easily keep track of your rewards and make the most of the benefits offered by the clinic.
How to View and Manage Your Payments in the Client Portal
This helps you stay on top of your billing, easily pay outstanding balances, and keep your payment records organised—all in one place.
Step 1: Access the Client Portal
Start by logging into your patient account using the clinic’s online booking link. You may have received this link by email or SMS from the clinic. Use your email address and password to sign in. If you don’t have an account yet, you’ll need to register first.

Step 2: Navigate to Payments
Once logged in, click your profile icon in the top-right corner of the screen, then select “Payments” from the dropdown menu.
Next, click on “Billing History” to view a full list of your past and current invoices.

NOTE: If the ''Payments'' section is not visible in your Client Portal, it is likely due to the clinic’s settings. For further assistance, please contact the clinic directly.
Step 3: Review Your Invoices and Payment History
In the ''Payments'' section, you’ll see a list of all your invoices. Each entry includes key details such as:
-
Invoice number
- Location (the specific clinic where you had your appointment or received the service)
-
Date of issue
-
Amount
-
Status (Paid, Partially Paid, or Unpaid)
-
Payment method used (e.g., card, cash, online)

To view more details or make a payment, click directly on the invoice you wish to manage.
NOTE: If you’d like to learn how to pay for an unpaid invoice, please refer to this article.
Now that you know how to access and manage your payments, you can easily keep track of your invoices and stay on top of your billing through the Client Portal.
How to Purchase a Package via Online Bookings
Step 1: Access the Client Portal
To begin, log into your Client Portal using your credentials (email and password). Once logged in, you'll be directed to your dashboard.

Step 2: Navigate to the Appointment Booking Page
After you access the portal, you will see the ''Book Appointment'' button in the top right corner of the portal. Click on it to access the clinic’s online booking system.

Note: To learn how to book an appointment using a package through the Client Portal, please refer to this article.
Step 3: Book a Package or Course
Once you access the online booking portal, you'll see a variety of options including categories, available packages or courses, gift vouchers, and the option to add funds to your account. Scroll down the page to find the packages listed. These packages offer bundled services at a discounted rate, and you can select the one that suits your needs.

Click on the box with the number of sessions you'd like to book located under the package name, and then proceed to ''Add to Cart.''

Step 3: Process Payment
Once you've selected a package, you'll be directed to the payment page. If you already have an account, simply choose the "Pay with card" option to enter your card details.
If you’ve saved a card previously, it will appear at the top of the page as your default payment method. If applicable, you can also add a tip, depending on the clinic’s settings.

NOTE: To learn how to securely save your card on file for future payments, please refer to this article.
Once your payment has been processed, you can find your purchased packages in the "My Packages" section of your Client Portal.
NOTE: If the "Packages" section is not visible in your Client Portal, it may depend on the clinic's settings. Please contact the clinic directly for further assistance.
Now that you know how to purchase a package, you can easily manage and book your sessions whenever needed.
How to Book an Appointment Using a Package in the Client Portal
Step 1: Access Client Portal
Start by accessing the online booking portal. Click the ''Login'' button at the top right corner of the page and enter your login details. If you don't have an account, proceed to create an account.

Step 2: Navigate to "My Packages"
Once you're logged in, click on your avatar at the top right corner of the screen. This will reveal all the features available based on the practice's settings. Proceed to select "My Packages."
Step 3: Book Appointment
Select "My Packages" to view all your purchased packages. On the far right of the package name, you'll find the option to book a session. Click the "Book" button to proceed.

Next, proceed to book the appointment as you normally would. To learn how you can book an appointment in the online booking portal, refer to this article.

By following these steps, you can easily book a session from a package through the client portal.
How to Purchase a Gift Voucher for Someone Else
Step 1: Access the Online Booking Portal
Access the online booking system either through the ''Book Now'' button on the clinic’s website or by logging into your Client Portal.

Step 2: Purchase a Gift Voucher
Once you're in the online booking portal, scroll down to the bottom of the page where you'll find the Gift Vouchers section. Here, you can browse the available voucher options and choose the one you'd like to purchase for someone else.

Step 3: Choose the Gift Voucher
On the next screen, you’ll see the “Gift to someone special” option. Select this to continue gifting the voucher.
You will see a list of available vouchers with different monetary values. Select the voucher amount that suits you. When you select a voucher in the online booking portal, a blue check mark will appear on the far right side, indicating your selection.

Click "Next" on the bottom right to proceed.

Then, enter the recipient’s name, email address, and a personalized message (optional). This ensures the voucher is sent directly to them with a nice personal touch.

Step 5: Process Payment
If you already have an account, you'll be taken to the payment page. Select the “Pay with card” option to enter your payment details. If you’ve previously saved a card, it will appear at the top for easy access. You may also have the option to add a tip, depending on the clinic's settings.

NOTE: To learn how to save your card for future payments, please refer to this article.
Once the payment is processed, your recipient will receive an email or SMS with the gift voucher details, including how to redeem it. You can also share the voucher code with them if needed.
Now that you know how to purchase a gift voucher for someone else, you can easily treat a friend or loved one to a special experience they’ll truly appreciate.
How to Pay an Unpaid Invoice via the Client Portal
Step 1: Access the Client Portal
Log into your Client Portal using your credentials. Once logged in, you will be directed to your dashboard.

Step 2: Navigate to the "Payments" Section
From your dashboard or the menu, navigate to the "Payments" tab and click on "Billing History." This will take you to the section where you can view all your current and past invoices.

NOTE: If you do not see the invoice section or the "Pay Now" option, please contact the clinic directly as it may depend on the clinic's settings.
Step 3: Locate the Unpaid Invoice
Look for any unpaid invoices that appear under the Billing History. You will see details of the invoice such as the amount, date, and the payment method.

NOTE: If you do not see the Payment section or the "Pay Now" button in your Client Portal, it may be due to the clinic's settings. The option to pay through the portal may not be enabled. In this case, please contact the clinic directly for assistance with your payment.
Step 4: View Invoice Details
After selecting the unpaid invoice, the invoice details will open, showing the total amount due. Next, click on "Invoice Details" to proceed.

Step 5: Initiate Payment
Once you've selected the invoice details, you'll be able to review more information such as the service, employee name, taxes, and other appointment details. To proceed, click on the "Pay with Card" button to continue with the payment process.
Step 6: Choose Your Payment Method
You will be directed to the payment page where you can choose your preferred method of payment (credit/debit card, online payment system, etc.). If you have a saved payment method, it will be displayed as an option.
Fill in any required payment details and click "Submit" or "Pay" to complete your payment.
To learn how to save your card for future payments, please refer to this article.
Now that you know how to pay an unpaid invoice, you can easily manage and settle any outstanding payments directly through your Client Portal.
How to Save Your Card on File for Future Payments
Step 1: Log in to Your Account
Start by logging into your patient account using the clinic’s online booking link. You may have received this link by email or SMS from the clinic. Use your email address and password to sign in. If you don’t have an account yet, you’ll need to register first.

Step 2: Choose to Save Your Card During a Payment
When making a payment, either through a secure link sent by the clinic or during online booking, you’ll have the option to save your card for future use. Just tick the box that says “Save this card for future payments” before completing the transaction. This is completely optional and designed to make future payments faster and easier.

NOTE: If you do not see the option to save your card during payment, it may be disabled by the clinic. For clarification or assistance, please contact the clinic directly.
Step 3: Save Your Card When Paying an Unpaid Invoice
You can also save your card when paying an unpaid invoice from your account. After logging in, click on your profile icon in the top-right corner and select ''Payments." Then go to the ''Billing History'' section to view your invoices.

If you have any unpaid invoices, you’ll see them listed here. Click on an invoice to open the details.

Under the invoice details, click ''Pay with Card." You’ll be asked whether you want to pay the full amount or enter a custom amount.

After that, you'll be prompted to enter your card details. At this stage, you can tick the box that says “Save this card for future payments” before completing the payment. This securely stores your card on file for next time.

Now that you know how to securely save your card on file, you’ll be able to complete future payments more efficiently and with greater convenience.
How to Leave a Review via Email or SMS
Step 1: Check Your Email or SMS
Once your appointment has been completed, you’ll receive a message by email or SMS asking you to leave a review.

Step 2: Open the Review Link
Tap or click the link provided in the message. This will open a secure review page in your browser—no login required.

Step 3: Rate and Write Your Feedback
On the review page, choose how many stars you want to give (1 is the lowest, 5 is the highest). Then write a quick comment about your experience. When you’re done, click Submit to send your review.

NOTE: If you don’t see the option to leave a review or haven’t received an email or SMS request, it may be because the clinic has not enabled reviews for that appointment. If you're unsure, feel free to contact the clinic directly for more information.
How to Leave a Review Through the Client Portal
Step 1: Access Your Client Portal
Navigate to the clinic’s client portal and log in using your patient account details.

Step 2: Navigate to Your Appointment History
Once logged in, click your profile icon in the top-right corner and select "Appointments" from the dropdown menu. Then, switch to the "Past" tab to view all of your completed appointments.

Step 3: Select the Appointment You’d Like to Rate
Find the completed appointment you'd like to rate. If it’s eligible for feedback, a ''Rate'' button will appear next to it. Click the button to continue.

Step 4: Leave Your Review
You’ll be redirected to the review page. First, select a star rating based on your experience (1 star being the lowest, 5 stars the highest). Then, write a brief comment to share your feedback. Once you're done, click ''Submit'' to complete the review.

Now that you know how to leave a review, you can easily share your experience and help others make informed decisions while also supporting the clinic in delivering great care.
How to Complete a Medical Form Prior to Your Appointment
Completing required forms ahead of your appointment allows the clinic to better understand your medical history, preferences, or treatment goals. This ensures that your provider has accurate information, and allows for a smoother, more personalized experience.
Step 1: Check Your Email or SMS
Once your appointment is booked, you’ll receive a confirmation via email, SMS, or both —depending on the clinic’s settings. This message will include a link to complete any required forms before your visit.

Step 2: Click the “Complete Form” Button
Once you open the email or SMS, click the “Complete Form” button. This will take you to a secure form within the Client Portal, where you can safely enter and submit your information.

After opening the form, you’ll be prompted to either complete it immediately or return to it later. Click “Complete” to begin filling out the form right away.

Step 3: Fill Out and Submit the Form
Once the form is open, enter all the required information carefully. When you’re done, click “Save form” at the bottom of the form to save your responses. The clinic will then be notified that you’ve completed the form.

Alternatively, you can also access your forms by logging into the Client Portal and navigating to the ''Communications'' section. There, you’ll find all emails sent by the clinic. Open the message containing the form and click “Complete Form” to begin. Then, simply follow the same steps outlined above to complete and submit it.

NOTE: If you do not see the Communications section in the Client Portal or the “Complete Form” button within a message, this may be due to the clinic’s settings. Please contact the clinic directly for further assistance.
Now that you know how to complete a medical form before your appointment, you can ensure the clinic has all the necessary information to provide you with the best possible care.
How to Update Your Personal Information
Keeping your personal details up to date ensures seamless communication and accurate records with the clinic. The portal makes it easy to access and modify your information anytime, from anywhere.
Step 1: Access the Client Portal
Start by logging into your patient account using the clinic’s online booking link. You may have received this link by email or SMS from the clinic. Use your email address and password to sign in. If you don’t have an account yet, you’ll need to register first.

Step 2: Access Your Personal Details
Once logged in, click on your profile icon in the top-right corner of the portal.
From the dropdown menu, select "Personal Details" to open your personal information page.

Step 3: Review and Edit Your Information
On the "Personal Details" page, the information available to you may vary depending on how the clinic has configured it, but you’ll be able to review and update any of the details that are visible, such as:
- Profile photo: Upload or update your photo so clinic staff can easily recognize you.
-
Full name: Make sure your legal name is correct for identification and documentation purposes.
-
Date of birth: Used to verify your identity and ensure accurate medical records.
-
Phone number: Keep this up to date so the clinic can reach you for confirmations, reminders, or follow-ups.
-
Email address: Your main point of contact for appointment confirmations, updates, and messages from the clinic.
-
Address: Important for billing, correspondence, and in some cases, regulatory compliance.
-
Emergency contact details: Provide a trusted contact the clinic can reach out to in case of a medical emergency.
-
Medical history (if enabled by the clinic): Share relevant medical conditions, allergies, or past treatments to help your provider deliver safe, informed care.
Click into any field you’d like to change, update the information, and click ''Save'' to apply your changes.

Now that you know how to update your information in the Client Portal, take a moment to ensure your details are accurate and up to date—so the clinic can continue to provide you with the best possible care.
For more detailed information on managing your account and utilizing all features, feel free to use the search bar above to explore a wide range of helpful guides.