
Table of Contents:
1. How to Create Case Types
2. How to Create a New Case
3. How to Manage Cases
4. How to Set Up a Case Form
5. How to Delete Cases
Cases is a dedicated feature in Pabau that helps your clinic stay compliant, organized, and responsive when handling medical complaints, clinical incidents, or internal escalations. With customizable workflows, progress tracking, and secure documentation, Cases ensures every issue is handled with transparency and professionalism.
How to Create Case Types
Step 1: Navigate to Setup
Start by logging into your Pabau account using your login credentials. Then, navigate to the Setup page located in the bottom left corner of the screen.

Step 2: Access Case Types
Now, expand the "Objects" section. This will reveal the "Case Types" sub-tab.

Step 3: Create a New Case Type
On the Case Types page, navigate to the top right corner and click the 'Create Case Type' button to get started.

Once you click “Create Case Type,” you can start filling out the following fields:
-
Name: Enter a clear, descriptive name for the case type so it’s easily identifiable in your system.
-
Case Code: Enter a unique code for the case type. This helps with quick reference and reporting.
-
Icon: Choose an icon to visually represent this case type, making it easier to spot in lists or dashboards.
-
Reporting Categories: Two empty fields are provided to start with. To add more categories, click “+ Add item to list.” Categories help organize cases and make reporting and analysis easier.
-
Stages: Two empty fields are provided. Click “+ Add item to list” to add additional stages. Stages define the workflow of the case and help track its progress.
-
Outcomes: Two empty fields are provided. To add more outcomes, click “+ Add item to list.” Outcomes ensure consistent tracking of how cases are resolved or escalated.

Step 4: Save Changes
To finalize, navigate to the top right corner of the screen and click the 'Create' button.

By following these steps, you can easily create case types in Pabau.
How to Create a New Case
Step 1: Navigate to the Clients Tab
Start by logging into your Pabau account using your login credentials. Then, navigate to the left sidebar menu and click the 'Clients' tab to expand it. This will reveal the 'Cases' sub-tab.

Step 2: Create New Case
Once you access the Cases page, you’ll see any cases that have been created so far. To create a new case, go to the top-right corner of the screen and click the 'Create Case' button.

A pop-up window will appear where you can proceed to fill out the following fields:
-
Case Type * – Select the type of case by searching and choosing from your created case types.
-
Client * – Search for and select the client this case relates to.
-
Case Owner * – Assign a staff member responsible for managing the case by searching and selecting their name.
-
Case Date * – Enter the date the case was created or reported (format: m/d/Y).
-
Reported By – Enter the name of the person who reported the case.
-
Description – Provide a detailed description of the case, including relevant details or observations.

Once you've filled out all the required information, click the save button in the bottom right corner of the window.

Step 3: Review Case
You will be redirected to the case you just created, where you can add and view more information.

By following these steps, you can easily create a new case in Pabau.
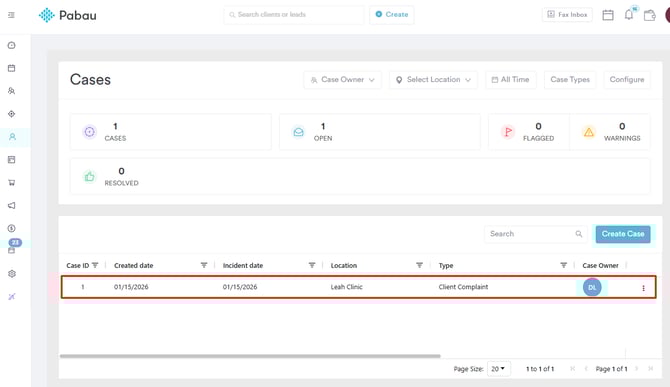
How to Manage Cases
Step 1: Navigate to the Clients Tab
Start by logging into your Pabau account using your login credentials. Then, navigate to the left sidebar menu and click the 'Clients' tab to expand it. This will reveal the 'Cases' sub-tab.
Step 2: View Case Details
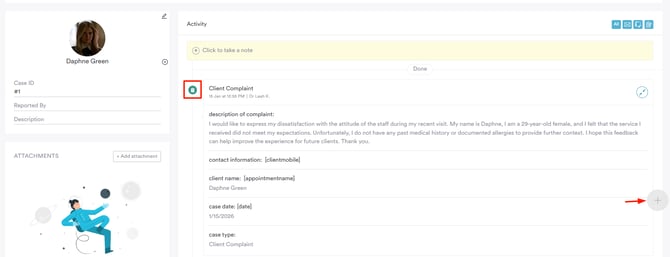
When you access the Cases page, you’ll see all cases created so far. Click on any case to view its details.
When you open a case, you’ll get a full view of its details. The case number appears at the top left, and the case owner is shown at the top right of the screen.
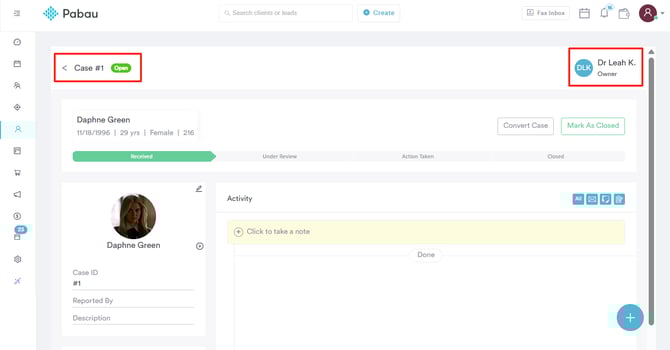
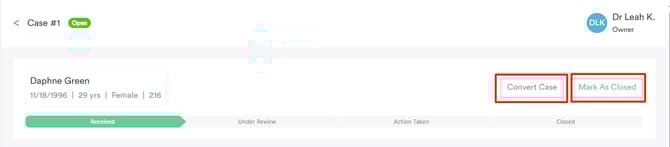
Right below, on the top-right side of the screen, you’ll see two options:
-
Convert Case: Use this option to turn the case into another type of record or workflow if it needs to be reclassified. For example, a client complaint case could be converted into an internal escalation or follow-up task.
-
Mark as Closed: Click this when the case has been fully resolved. This updates the case status, ensuring it’s no longer active but still saved for records and reporting.
Step 3: Update Case Stage
To update the case stage, simply click the appropriate stage name from the options displayed at the top of the screen. The case will move to the selected stage automatically.
The stages shown are based on the case type assigned to the case.

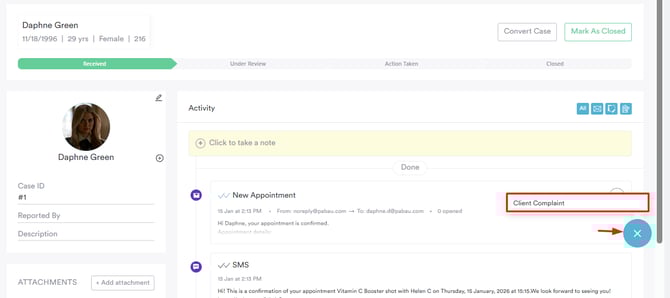
Step 4: Add Note
To add notes about the case, click the plus sign (+) on the client’s Activity screen and start entering any relevant information.
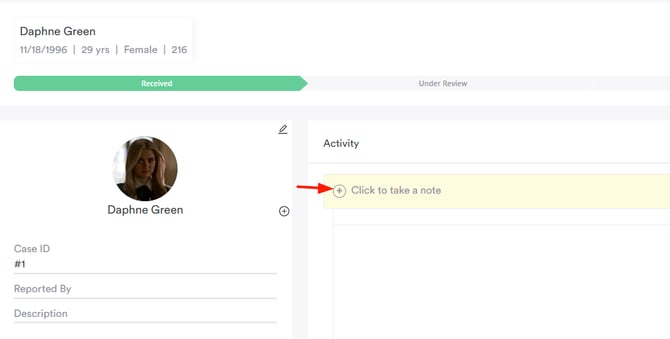
Any activities happening in the client card will also reflect on this screen.

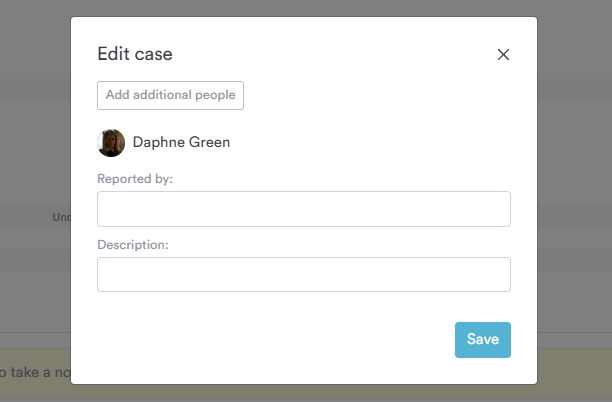
Step 5: Edit Case
To edit case information, click the pen icon in the top-right corner of the client’s image, and a pop-up window will open.
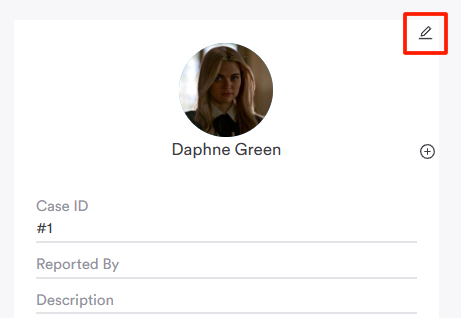
From here, you can:
-
Add additional clients involved
-
Enter or update the Reported By information
-
Enter or update the Case Description
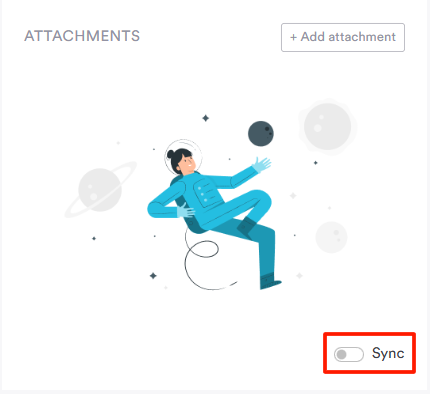
Step 6: Add Attachments
When you scroll down, you’ll find the option to add attachments related to the case on the left-hand side.
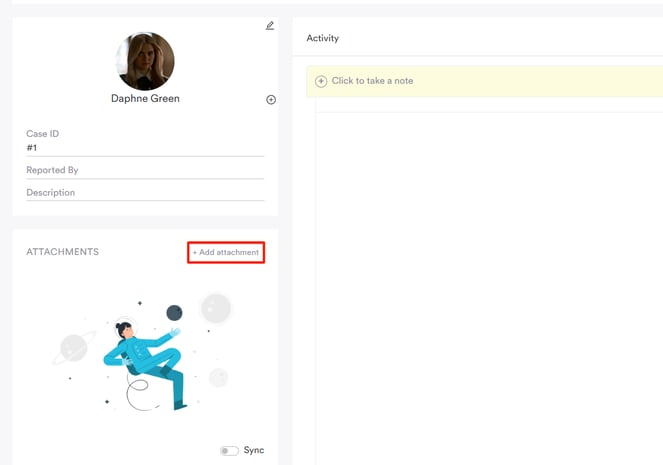
Clicking 'Add Attachment' opens a pop-up window where you can choose to upload a file either from the client record or directly from your device.
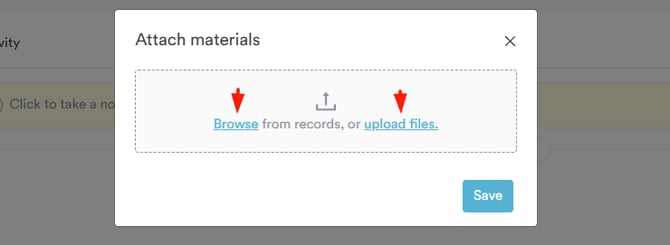
After selecting the file, click the 'Attach' button to finalize.
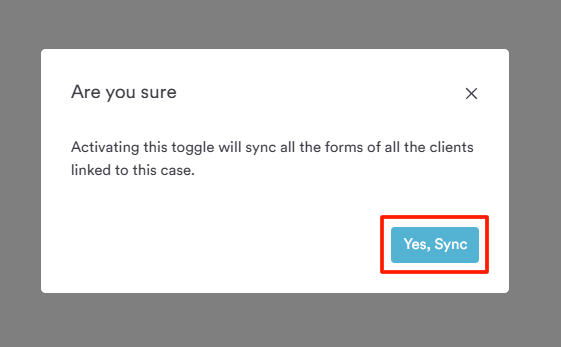
If you want attachments to be automatically added to the case, enable the Sync toggle.
A confirmation pop-up will appear, as activating this option will sync all documents linked to the case.
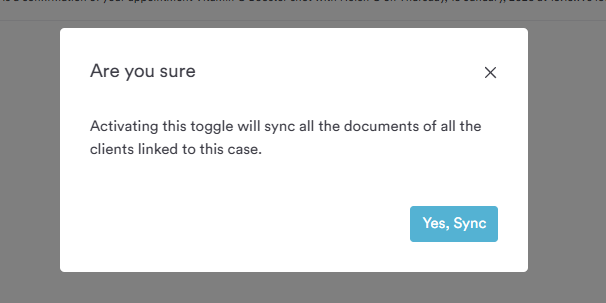
To finalize, click 'Yes, Sync.'
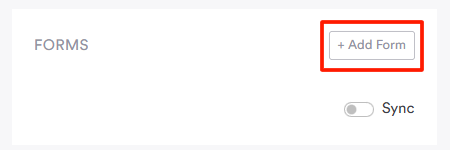
Step 7: Add Forms
Below the attachments section, you’ll also see the option to attach forms. To add a form to the case, click the 'Add Forms' button.
A pop-up window will open where you can select which form to attach to the case from the client record. Clicking the Search form field opens a dropdown showing all forms saved on the client card.

Once you've selected the form, click the 'Save' button to attach the form.
To automatically attach any forms saved in the client card to this case, enable the Sync toggle.
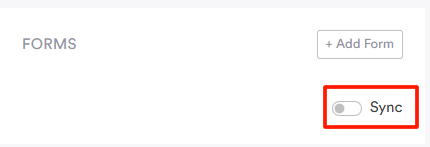
A confirmation prompt will appear. Click 'Yes, Sync' to finalize and automatically attach the forms to the case.
Step 8: Link Appointments
Below the forms section, you’ll find the Appointments section. Here, you can link any relevant appointments to the case by clicking the '+ Add Appointment' button.

A pop-up window will appear where you can search for relevant appointments by clicking the Search appointment field. A dropdown will display all appointments for that client—simply select the one you want to link.
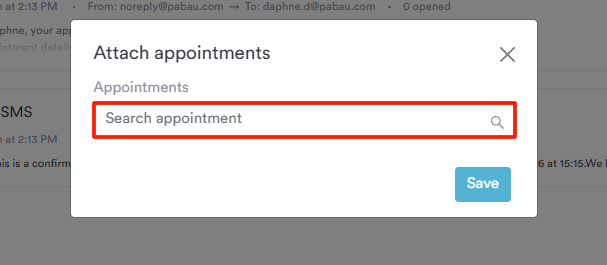
Click 'Save' to attach the form.
Step 9: Fill Out Case Form
At the bottom-right of the screen, click the blue plus sign (+) to access available case forms. Select the form you want to fill out from the list of forms you’ve created in the system.
Clicking the form will redirect you to a new page where you can fill out the case information. Once you’ve entered all the details, click 'Save Form' to finalize.
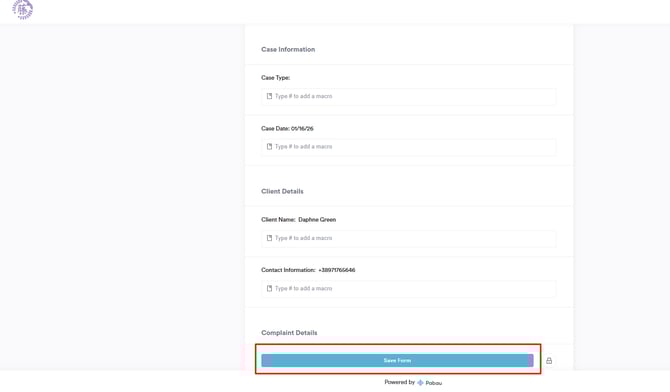
After saving the form, return to the case, and it will be recorded in the Activity section. The blue plus sign icon will now appear greyed out, indicating that the form has been added.
By following these steps, you can manage your cases in Pabau.
How to Set Up a Case Form
Case forms in Pabau allow your clinic to collect all the necessary information for a case in a structured and consistent way. Whether you’re handling client complaints, medical incidents, or internal escalations, case forms ensure that every detail is captured, making it easier to track, manage, and resolve cases efficiently. Setting up a case form helps maintain transparency, accountability, and compliance across your clinic while streamlining the workflow for your team.
Step 1: Navigate to Setup
Start by logging into your Pabau account using your login credentials. Then, navigate to the bottom corner of the left sidebar menu and click 'Setup' to access the Setup page. Under the clinical section, find the 'Forms' tab.

Step 2: Create Form
On the Forms page, you'll find all your created medical form templates. To create a new one, navigate to the top right corner of the screen and click the 'Create Form' button.

You will be prompted to select whether you'd like AI to help you create a form or proceed with a blank template. In this case, select 'Blank Template.'

Step 3: Complete General Section
Once the Create Form page opens, complete the following in the General section:
-
Form Name: Enter a clear name for the form.
-
Which service should this form be used for: Link the relevant service.
-
Form Type: Select “Case Form” from the Form Type options.

Step 4: Add Relevant Components
In the Components section, proceed to drag and drop relevant components to the template.
What Should a Case Form Include?
A case form should capture all essential information needed to properly review, investigate, and resolve a case. Using structured form components ensures consistency, clarity, and compliance across your clinic.
Below are common sections and example questions you may want to include when building a case form:
Case Details
Use short answer or date components to capture key information.
-
Date the issue was reported (Date)
-
Who reported the case? (Short answer)
-
Location or department involved (Short answer)
Complaint or Incident Description
Use long answer components for detailed responses.
-
Please describe the issue or complaint in detail (Long answer)
-
What happened, and when did it occur? (Long answer)
Category and Severity
Use dropdown or multiple choice components to standardize responses.
-
Type of case (Dropdown: Complaint, Incident, Feedback, Escalation)
-
Severity level (Multiple choice: Low, Medium, High)
People Involved
Use short answer or multi-select components.
-
Staff members involved (Multi-select)
-
Other individuals involved (if applicable) (Short answer)
Supporting Information
Use file upload or checkbox components.
-
Attach supporting documents or evidence (File upload)
-
Was an appointment related to this case? (Yes/No checkbox)
Resolution and Follow-Up
Use long answer and dropdown components.
-
Actions taken to resolve the case (Long answer)
-
Outcome (Dropdown: Resolved, Escalated, Follow-up Required)
-
Is further action required? (Yes/No checkbox)
Declaration (Optional)
Use checkbox or signature components.
-
I confirm that the information provided is accurate (Checkbox or Signature)
Step 5: Save Form
Once you've filled out all the relevant details, navigate to the top right corner of the screen and click 'Create Form' to finalize.

While the Cases feature allows you to log, track, and manage complaints or incidents, using an official case form ensures that all required information is captured in a consistent and structured way. Case forms act as a standardized record, helping your clinic document key details clearly, support internal reviews, and meet compliance requirements.
How to Delete Cases
Step 1: Navigate to Cases
Start by logging into your Pabau account using your login credentials. Then, navigate to the left sidebar menu and click to expand the 'Clients' tab. Here you can find the 'Cases' sub-tab.

Step 2: Click on the Three Dots
On this page, you’ll see all cases that have been created in your Pabau account. On the far right side of the case, you'll view a three-dot menu. Click to open the available options.

Step 3: Delete Case
When clicking the three-dot menu, the 'Delete' option will be revealed.

By clicking 'Delete,' a pop-up will appear where you will be prompted to confirm if you'd like to permanently delete this case.
Click 'Yes, Remove case' to finalize.

By following these steps, you can easily delete any created case on your Pabau account.
For more guides, refer to related articles below, select additional guides, or use the search bar at the top of the page. These guides will help you get the most out of your Pabau account.
Additionally, to help you fully utilize and understand your Pabau account, we recommend exploring additional guides and resources offered at the Pabau Academy. It offers in-depth video tutorials and lessons, offering a holistic learning experience that can equip you with the essential skills for achieving success with Pabau.