Table of Contents:
1. Stock Optimized
2. Team Report
3. Set Up Feedback Reviews
4. Loyalty Points Campaign
5. Leads Optimized
6. Other Reports
Stock Optimized
Step 1: Navigate to Stock
Start by logging into your Pabau account with your credentials. Then, navigate to the "Stock" tab in the left sidebar menu, click to expand it, and select the "Products" tab.
Step 2: Key Areas to Optimize
To optimize your stock management in Pabau, here’s what you need to do:
Categorize Products
On the Products page, categorize your products by dividing them into relevant categories and groups. This makes it easier to manage, track, and report on stock levels.
If necessary, create custom categories or groups to suit your clinic's specific product types, such as "Skincare," "Supplements," "Medical Equipment," etc.
After creating the products, simply assign each to its respective category for better organization. You can set a category to a product on the "General" tab.

Pricing
To ensure accurate pricing and inventory management, it’s important to add both cost pricing and retail pricing for each product. You can do this easily under the Pricing tab when creating a product.
-
Cost Pricing: This is the price you pay for the product from your supplier or manufacturer. It helps you track your expenses and manage profitability. Ensure to input this price so you can accurately calculate your margin.
-
Retail Pricing: This is the price at which you sell the product to your clients. Setting a retail price is essential for ensuring consistency across your clinic's sales and helping you maintain a competitive pricing strategy.
By adding both cost and retail pricing, you can have a clear understanding of your profit margins and make informed decisions about pricing adjustments.

Stock Quantity Optimized
When editing or creating a product, you'll have the option to add your current stock quantity, just navigate to the "Inventory Levels" tab.

Set minimum and maximum stock quantities for each product. By defining these limits, you ensure that you maintain optimal stock levels for each item.
-
Minimum Stock Quantity: This setting lets you define the minimum number of items you want to keep in stock. When the stock level drops below this number, the system will trigger an alert to notify your team, helping you avoid running out of essential products.
-
Maximum Stock Quantity: Setting a maximum stock quantity ensures that you don't overstock products. This helps keep inventory levels balanced and reduces the risk of unnecessary surplus.
You also have the option to allow negative quantities in stock. Enabling this setting means that even if you run out of a particular product, the system will still allow you to process sales or bookings for that item.
You can also track current stock levels by location. This feature is particularly useful for businesses with multiple locations, as it allows you to monitor and edit stock across each site.
The total stock quantity will be shown under the Quantity section on the Products page.

Suppliers Created
To manage your suppliers, navigate to the Supplier tab. Here, you can check if your suppliers are already created, or add a new supplier if necessary. All of your suppliers will be listed in this section for easy reference.

You can assign suppliers to specific products to easily track who provides what. This helps you maintain clear records of your stock sources, making inventory management more efficient.

By optimizing these key areas in your stock management, you can ensure a more organized, efficient, and reliable inventory system for your clinic.
Team Report
Step 1: Navigate to Analytics
To access the Team report in Pabau, navigate to the Analytics tab on the left sidebar menu and click to expand it. From there, you can select the "Team" report.

Step 2: Review Report
The Team report helps you track financial performance and staff efficiency, making it easier to make smart decisions, spot areas to improve, and manage payroll.
The report is split into four categories:
- Earnings: Total income from services, retail, memberships, gift vouchers, and packages.
- Shifts: Hours worked, staff schedules, and time utilization.
- Performance: Employee productivity, sales contributions, and customer satisfaction metrics.
- KPIs: Key indicators like revenue per hour, average transaction value, and service-to-retail ratios.

For a detailed guide on the Team report, refer to this article.
Set Up Feedback Reviews
Step 1: Navigate to Feedback Survey
Navigate to the Setup page by clicking the "Setup" button at the bottom of the left sidebar menu. Under the Marketing & Communications section, you will find the "Feedback Survey" option.

Step 2: Key Areas to Optimize
Here’s what you need to do to optimize your reviews:
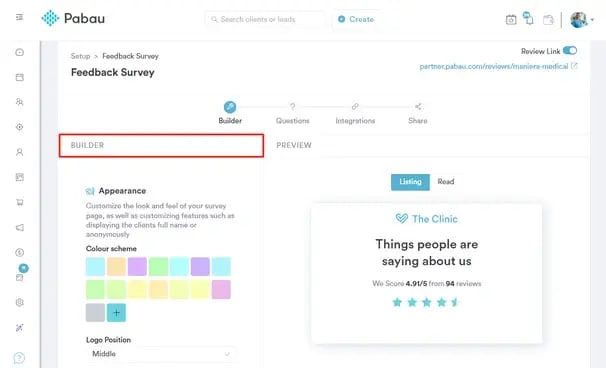
Builder Optimized
In the builder on the left side, customize the appearance of your survey:- Select Color Scheme:
- Logo Placement and Size:
- Display Client Name:
- Notification Settings:
In the builder, on the left side of the Questions page, enter the Survey Name and Survey Subtitle, then choose a survey format: either display all questions at once or reveal them one at a time.
In the Questions section, you can add, edit, or delete survey questions. Use the Question Bank by clicking the checkmark next to a question to add it to your survey. Questions include merge tags, which automatically pull appointment details. Choosing different merge tags adjusts the question’s context.

Google Reviews Setup
With Google Reviews integration, you have full control over how and when clients are redirected to leave a review. Access the option on the "Integrations" step. By entering your direct Google Reviews link, you ensure clients are guided to the right place.
You can also define redirection rules to decide when clients should be prompted to leave a review. Whether you want only those who give a perfect 5-star rating to be redirected or allow anyone with a 3+ rating to share their feedback, the choice is yours.
NOTE: For more details, please refer to this article.

Review Notifications Optimized
Check if your review notifications are enabled by clicking Setup on the bottom of the left sidebar menu. Then, navigate to the Marketing & Communications section and click to expand Communications. From there, open "Client Notifications."
The notification template name is "Request Feedback."

NOTE: To learn more about the Request Feedback notification template, refer to this article.
Loyalty Points Campaign
Loyalty Campaigns are a great way to reward your clients for their continued business by offering them points for purchasing services, products, or leaving reviews.
Step 1: Navigate to Marketing
Navigate to the Marketing tab on the left sidebar menu and click to expand it. This will display the Loyalty tab.

Step 2: Create a Loyalty Campaign
Click the "Customize" button in the bottom right corner, and a pop-up window will appear where you can set how much each point earned is worth. This ensures a clear and fair rewards system for your clients.

After setting the point value, scroll down and click the "+ Add New Campaign" button to begin creating your loyalty campaign.

Step 3: Key Areas To Optimize
There are two types of loyalty campaigns you can create:
- User-Generated Content – Reward customers for their engagement, such as writing a review, registering for Pabau Connect or Client Portal.
- Sales-Based Rewards – Reward customers for their spending by earning points when purchasing services, gift vouchers, packages, or products, or by gaining 1 point for every dollar spent.
You can customize your loyalty campaign by selecting the rule type you want to include. For example, if you choose Sales-Based Rewards and select "Services Purchased," clicking the Add Rule button will prompt you to specify which services should earn points.

NOTE: For more information on creating Loyalty campaigns, refer to this article.
Leads Optimized
The Leads feature helps you track and manage potential clients, making it easier to convert inquiries into bookings.
Step 1: Navigate to Leads
To access Leads, navigate to the Leads tab in the left sidebar menu. Click to expand it, and you'll see the Leads and Pipelines sub-tabs.
Step 2: Key Areas to Optimize
To optimize your leads, focus on creating a lead pipeline (or multiple pipelines) and adding a lead form to capture and manage potential clients effectively.
Create a Lead Pipeline
To create a lead pipeline, navigate to the Leads tab, expand it, and access the Pipelines sub-tab. Then, click the Options button in the top right corner. Here, you'll see various actions you can take, including creating a new lead pipeline.

NOTE: For more information on lead pipelines, refer to this article.
Optimize Lead Form Fields
Customize your lead form by selecting the fields you want to include. Keep in mind that to add custom fields, you'll need to contact support, and the website development team will handle the integration on your website.
First, let the team know which fields you want to include in the lead form on your website. You can also customize the font and border color.

After selecting your lead form fields, our team can either send you the embed code or have our web developer add it to your website for you.
Other Reports
Save time by optimizing your favorite reports for quick access. Plus, create custom reports tailored to your needs using our advanced filters.
Step 1: Navigate to Reports
To access reports, navigate to the "Analytics" tab located on the left sidebar menu, then, click to expand it. This action will reveal the "Reports" tab.
Step 2: Review Pre-Created Reports
Once you're on the reports page, you'll find a selection of pre-created reports, including the Big Spender report and more, giving you instant insights without any setup.
Step 3: Key Areas to Optimize
Here’s how you can make the most of your reports:
Favorite Reports
Easily access the reports you use most by marking them as favorites. Just click the star icon next to the report name, and it will appear in the "Favorites" tab for quick reference.

Create a Custom Report
Need specific data that isn't covered in pre-made reports? Click the "Create Custom Report" button in the top-right corner.

Choose what you want to focus on - clients, invoices, leads, etc.— and apply filters, such as seeing which clients have paid for appointments with packages for example. For more information on creating a custom report, refer to this article.
Enable the Medical Data Report
View all client responses from medical forms in a structured, easy-to-read format for better organization and analysis by activating the Medical Data report.
To do that, navigate to the Setup page and click to expand the "App Marketplace" tab, then click the "App Marketplace" sub-tab.
2
Locate the "Medical Data Report" and click on it. You'll see an option to install the feature in the top-right corner. Once installed, the "Medical Data Report" will appear under the "Analytics" tab in the left sidebar menu.

For more details on running the "Medical Data Report," refer to this guide.
For more guides, refer to related articles below, select additional guides, or use the search bar at the top of the page. These guides will help you get the most out of your Pabau account.
Additionally, to help you fully utilize and understand your Pabau account, we recommend exploring additional guides and resources offered at the Pabau Academy. It offers in-depth video tutorials and lessons, offering a holistic learning experience that can equip you with the essential skills for achieving success with Pabau.