Table of Contents:
1. How to Add a Sender Address
2. How to Edit a Sender Address
3. How to Delete a Sender Address
4. How to Set a Default Sender Address
5. How to Set Up an Enterprise Email
How to Add a Sender Address
When it comes to your client notifications, it's important to have the templates branded properly and include the correct sender to avoid any confusion.
NOTE: You can also learn about this topic by watching a lesson on Pabau Academy.
Step 1: Navigate to Setup
Start by logging in to your Pabau account using your login credentials. Then, navigate to the Setup page in the left sidebar menu. Under the Marketing & Communication section click the Sender Addresses tab.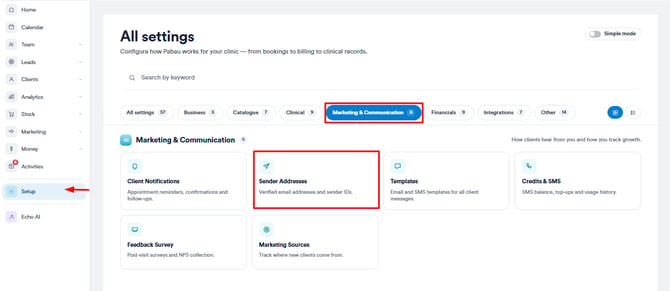
Step 2: Create Sender
Click on the "Create a Sender" button at the top right corner, revealing a drop-down menu where you can select if you want to create an SMS or email sender.
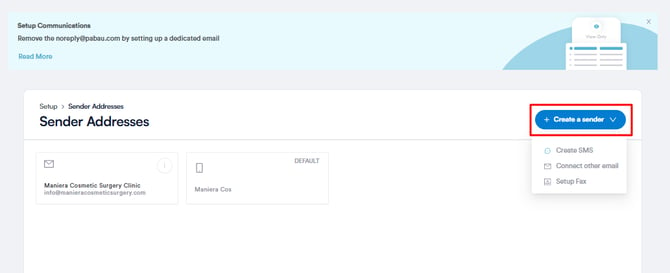
Email Sender
To create an email sender address, select "Email" under the Type section and enter the name that will appear as the sender when clients receive emails.
If you want this email address to be used for automated notifications, enable the "Default Sender" toggle.
Non-default sender addresses can still be manually selected when sending emails from client cards.

In the "From email" field, enter the sender's email address.
NOTE: This address will only be displayed if the enterprise email feature is enabled, which is part of our Marketing Plus add-on, and if your email address is verified by our email delivery provider, SendGrid. Without this feature, emails will be sent from noreply@pabau.com.

After filling out the fields, click on the Create button in the top right corner.
SMS Sender
To create an SMS sender address, select "SMS" as the type and enter the name you want clients to see when they receive an SMS from you. SMS sender address needs to be between 3 and 11 characters (including spaces) and no special characters
NOTE: Keep in mind that local carrier restrictions may prevent your sender name from being displayed. To avoid confusion, make sure to include your business name in the SMS content.
If you want this sender name to be used for automated texts, ensure the "Default Sender" toggle is enabled.

After filling out the fields, make sure to click on the Create button in the top right corner.
By following these steps, you can create sender addresses for email and SMS notifications that the clients receive from your clinic.
How to Edit a Sender Address
Step 1: Navigate to Setup
Start by logging in to your Pabau account using your login credentials. Then, navigate to the Setup page in the left sidebar menu. Under the Marketing & Communication section, click the Sender Addresses tab.
Step 2: Edit Sender
Click on the sender address that you would like to edit.
The process of editing a sender address is the same as creating a sender address. After making the amendments, click the "Save" button to apply the updates.

By following these steps, you can edit an existing sender address in your Pabau account.
How to Delete a Sender Address
Step 1: Navigate to Setup
Start by logging in to your Pabau account using your login credentials. Then, navigate to the Setup page in the left sidebar menu. Under the Marketing & Communication section click the Sender Addresses tab.
Step 2: Delete Sender
Click on the sender address that you would like to delete.
After selecting the sender, turn off the active toggle at the top right corner.

This will display the "Delete" button, which, when clicked, will immediately remove the sender without any confirmation prompt.

By following these steps, you can delete an existing sender address from Pabau.
How to Set a Sender Address as Default
When you designate a sender address as the default, it will be displayed as the SMS or email sender name in client communications such as automated notifications, newsletters, and other automation.
If you're using the Enterprise Email feature, your clients will see the actual email address of your default sender. Otherwise, communications will come from noreply@pabau.com, but the sender name will still match the one you've set as default.
You can still select non-default sender addresses manually for individual emails or SMS from client cards.
Step 1: Access Sender Addresses
To begin, log in to your Pabau account. Next, navigate to Setup in the left sidebar menu. Navigate to Marketing and Communication and choose Sender Addresses.
Step 2: Select the Sender Address to Make Default
Choose the sender address you want to set as the default by clicking on it. In the sender editing modal that opens, toggle the 'Default Sender' option.

Step 3: Save Changes
Once you've selected the default sender, click Save in the top right corner of the page.
NOTE: You can only have one default email sender and one default SMS sender at any given time.
If you want to use another sender address you've previously created, you can find it in the dropdown menu when emailing the client from their client card.

Now your default sender address is set, and it will be used automatically for all relevant client communications.
How to Set Up an Enterprise Email
The Enterprise Email feature allows you to send emails from a dedicated company email address rather than the default no-reply@pabau.com. This adds credibility to your communications, strengthens your brand identity, and fosters trust with your clients.
NOTE: The Enterprise Email feature is available as part of the Marketing Plus add-on. For more details about the features included in Marketing Plus, please read this article.
Step 1: Navigate to Sender Addresses
To begin, log in to your Pabau account. Next, navigate to Setup in the left sidebar menu. Navigate to Marketing & Communication and choose Sender Addresses.
Step 2: Select Your Default Email Sender
The Enterprise Email feature can only be enabled for the default email sender address, so click on your default email sender address to proceed.

In the sender editing modal, enter the business email address that you want to use for client communications into the 'From email' field. Then, click 'Save' in the top right corner to apply the changes.

Step 3: Verify Your Email
After saving, you'll be redirected to the Sender Addresses page. Click the three-dot icon next to your default email sender, then select 'Confirm email'.

An email will be sent to the provided address by our email delivery provider, SendGrid. You will need to verify the email address by clicking the confirmation link in that email.
Step 4: Complete the Setup
Once you've confirmed your email, refresh the Sender Addresses page. A blue checkmark will appear next to your default email sender address, indicating that your Enterprise Email is now set up.
With this, your emails will now be sent from your dedicated business email address, making your communications more professional and brand-consistent.
For more guides, refer to related articles below, select additional guides, or use the search bar at the top of the page. These guides will help you get the most out of your Pabau account.
Additionally, to help you fully utilize and understand your Pabau account, we recommend exploring additional guides and resources offered at the Pabau Academy. It offers in-depth video tutorials and lessons, offering a holistic learning experience that can equip you with the essential skills for achieving success with Pabau.