
1. How to Create and Manage Quotes
2. How to Generate a Quote
3. How to Clone a Quote
4. How to Create Quote Fee Distribution
How to Create and Manage Quotes
In this guide, you'll learn how to create and manage quotes easily with Pabau.
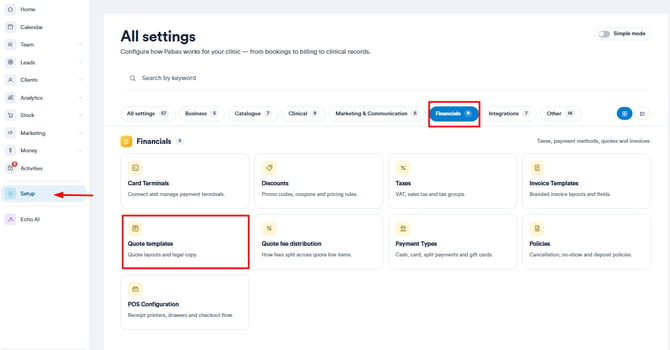
Step 1: Create Quote Templates
To create quotes, you must first set up quote templates in your account. A standard template is available by default, but you can also create additional templates.
Log in to your Pabau account, go to Setup and navigate to the "Financials" section. Click on "Quote Templates."
The existing quote templates will be visible in this section, with the option to order the templates, to see the template name, created, and date modified, as well as a three-dot icon, through which we can edit, clone, or delete the template.

NOTE: To manage quotes, ensure you have the necessary quote-related permissions enabled in your user profile under the Team feature, within the Money permissions group.
To create a template, click the "Create Template" button in the top right.
In the "Appearance" and "Components" sections, you can customize the template’s look and fields.
In the Appearance tab, you can name the template, set it as the default, upload your logo, and adjust its size and position. You can also customize margins and text color, and select the services this template should be applied to, ensuring the correct template is used for each type of quote.

Within the "Components" tab, you can configure various aspects of the quote, including:
- Quote Name: Designate a title for the quote, prominently displayed at its top.
- Body Content: Customize the text within the quote's body, utilizing merge tags for automatic integration of business and client information.
- Line Items Table: Tailor the information displayed for products and services included in the quote.
- Payment Terms: Define your payment terms, and if desired, include "Terms and Conditions" in the last component, which will introduce a dedicated button in this field.
- E-Signature and Print Signature: Incorporate fields for either an electronic or printed signature.
- Download Button: Modify the text on the Download button for a personalized touch.
- Footer Message: Append a custom message to the footer for additional context.
- Fees & Distribution: Adjust the name of the Fees & Distribution section as needed.
- Terms & Conditions: Input your specific Terms and Conditions to ensure clarity and transparency.

Preview the design on the right and click on "Create" to save the template.
Step 3: Setup Fee Distribution
In Setup, go to the "Financials" section, then select "Quote Fee Distribution".
In this section, you'll see the existing fee distributions, with categories on the left and fees in the middle.
-
Category: This is a broad grouping of all the fees associated with a certain treatment or procedure, such as “Surgery Fee Distribution.”
-
Fees: These are the specific charges within that category, like “Doctor Fee,” “Nurse Fee,” and “Clinical Expenses.”
To create a category, click the plus sign on the left. Once the category is created and selected, you can add fees.

Click "New Fee" in the top right corner to add a fee. Enter the fee name and percentage. The total percentage for all fees within the category must add up to 100%.

Once the fees are created, you can add items to each fee or edit or delete the fee by clicking the three-dot icon on the far right of each fee.

Step 4: Create a Quote
To create a quote, navigate to "Money" in the left side-bar menu, then click on "Quote" to access the Quotes page. 
On the Quotes page, you can view existing quotes, or create new ones by clicking on "Create Quote" in the top right corner.

The quote creation process has five steps, starting with selecting the client or lead. If you're creating a quote for a client, you can also choose the appointment this quote is related to.

You can also start the quote creation process from:
- The client card of the client you wish to create a quote for:

- The lead card of the lead you wish to create a quote for:

- The appointment context menu for an existing appointment in the calendar:

Complete the quote template by moving to the next steps by clicking on "Next" in the top right corner.
In the "Details" section, select a quote template, enter the quote name, and choose the quote owner. If the quote is linked to an appointment from the previous step, the location will be locked; otherwise, you can select it manually.
The expiration date is automatically calculated based on the duration you choose (e.g., selecting three months will set the expiration date three months from the creation date).
You can also add buyer comments and payment terms in their respective fields.

In the "Line Items" step, click the "Add Line Item" button on the right and select the items you want to include from your services, products, or packages.

By clicking on the "Manage tax distribution", you can select one of your quote tax distributions created in Quote Tax Distribution.


The final step is the Review step, where you can check the quote before sending it to the client.

Click "Create" in the top right corner to create the quote within your Pabau account.
Step 5: Share Quote with Client
Once you create a quote, a pop-up will appear with a link you can copy and share with the client.
You can either manually send an email with the quote or click the "Send Quote" button to use the default quote-sharing template.
To customize the default template for sending quotes, you can navigate to the Client Notifications section and make the necessary adjustments.

Step 6: Manage Quotes
Once saved, the quote will appear on the "Quotes" page. Next to the quote, the "Action" section will appear.
From here, you can manage the quote by viewing its details, copying the link, downloading, printing, cloning, editing, or deleting it from the system.
Step 7: View Quotes in the Client Card
You can also view the quote in the client card by searching for a client in the search bar.

Type in the name of the client and select them to access the client card. Then, proceed to the "Financials" sub-tab.
The second tab is the "Quotes" sub-tab under the Financials. From there, you can see all the quotes related to the client, including the quote number, status, and sharing options.

Additionally, three dots on the far right provide the same functionalities as the "Action" button in "Quotes".

By following these steps, you can create, and manage quotes within the Pabau platform for a streamlined business process.
How to Generate a Quote
In this guide, you'll learn how to generate and save quotes in Pabau.
Step 1: Navigate to Quotes
Log in to your Pabau account and in the left sidebar menu, click on Money, then select "Quotes" to access the Quotes page.

Step 2: Create a Quote
On the Quotes page, you can view existing quotes, or create new ones by clicking on "Create Quote" in the top right corner.

The quote creation process has five steps, starting with selecting the client or lead. If you're creating a quote for a client, you can also choose the appointment this quote is related to.
You can also start the quote creation process from:
- The client card of the client you wish to create a quote for:

- The lead card of the lead you wish to create a quote for:

- The appointment context menu for an existing appointment in the calendar:

Complete the quote template by moving to the next steps by clicking on "Next" in the top right corner.
In the "Details" section, select a quote template, enter the quote name, and choose the quote owner. If the quote is linked to an appointment from the previous step, the location will be locked; otherwise, you can select it manually.
The expiration date is automatically calculated based on the duration you choose (e.g., selecting three months will set the expiration date three months from the creation date).
You can also add buyer comments and payment terms in their respective fields.

In the "Line Items" step, click the "Add Line Item" button on the right and select the items you want to include from your services, products, or packages.

By clicking on the "Manage fee distribution", you can select one of your quote fee distributions created in Quote Fee Distribution.


The final step is the Review step, where you can check the quote before sending it to the client.

Click "Create" in the top right corner to create the quote within your Pabau account.
Step 3: Share Quote with Client
Once you create a quote, a pop-up will appear with a link you can copy and share with the client.
You can either manually send an email with the quote or click the "Send Quote" button to use the default quote-sharing template.
To customize the default template for sending quotes, you can navigate to the Client Notifications section and make the necessary adjustments.

Step 4: Manage Quotes
Once saved, the quote will appear on the "Quotes" page, and you can also find it in the client card of the client you created the quote for. To find it, go to the Financial tab and select the Quotes sub-tab.

By following these steps, you can easily create quotes in your Pabau account.
How to Clone a Quote
In this article, we will cover how to clone a quote from the client card.
Step 1: Navigate to the Client Card
Log in to your Pabau account, and from the search bar on the top of the page, search for the client and open their client card.

NOTE: To manage quotes, ensure you have the necessary quote-related permissions enabled in your user profile under the Team feature, within the Money permissions group.
Step 2: Open Financials
In the client card, navigate to "Financials" tab and then select the "Quotes" subtab. Here you can see all the quotes created for a client.

Step 3: Clone a Quote
Select the quote you wish to clone, then click the three vertical dots on the right-hand side and choose "Clone" from the available actions.

Once you clone the quote, the quote creation modal will appear, allowing you to edit any details, just like when creating a new quote.

You can see the cloned quote next to the original one on the client card.

By following these steps, you can clone quotes you've created for your clients.
How to Create Quote Fee Distribution
In this article, we'll demonstrate how to create quote fees and customize them.
Step 1: Access Fee Distribution
In Setup, go to the "Financials" section, then select "Quote Fee Distribution".
In this section, you'll see the existing fee distributions, with categories on the left and fees in the middle.
-
Category: This is a broad grouping of all the fees associated with a certain treatment or procedure, such as “Surgery Fee Distribution.”
-
Fees: These are the specific charges within that category, like “Doctor Fee,” “Nurse Fee,” and “Clinical Expenses.”
To create a category, click the plus sign on the left. Once the category is created and selected, you can add fees.

Step 2: Create Fee
Click "New Fee" in the top right corner to add a fee. Enter the fee name and percentage. The total percentage for all fees within the category must add up to 100%.

Step 3: Fee Details

By following these steps, you can customize the quote fees in your Pabau account.
For more guides, refer to related articles below, select additional guides, or use the search bar at the top of the page. These guides will help you get the most out of your Pabau account.
Additionally, to help you fully utilize and understand your Pabau account, we recommend exploring additional guides and resources offered at the Pabau Academy. It offers in-depth video tutorials and lessons, offering a holistic learning experience that can equip you with the essential skills for achieving success with Pabau.