Products and Stock
Learn how to manage consumables, injectables, and retail products, track stock, and streamline your retail sales. This guide covers creating products, setting up suppliers, conducting inventory counts, and building purchase orders.
Table of Contents:
1. How to Create a Product
2. How to Edit a Product
3. How to Delete a Product
4. How to Create Suppliers
5. How to Start a New Inventory Count
6. How to Build a Purchase Order
How to Create a Product
Creating products in Pabau is a crucial aspect of managing your stock efficiently. Follow these detailed steps to add a new product to your inventory:
Step 1: Navigate to Products
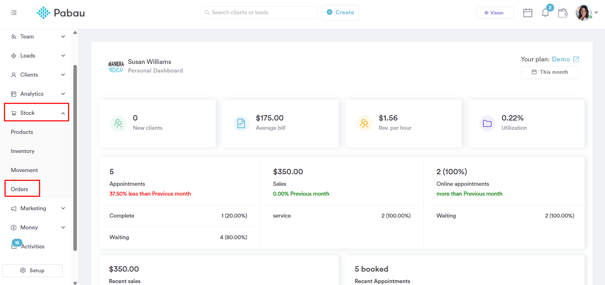
Log in to your Pabau account and navigate to "Stock" in the left sidebar menu, then click on "Products".
Step 2: Create a Category
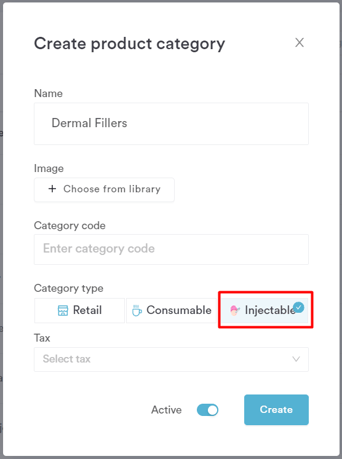
If you don't have any existing products or categories, start by creating a category. Switch to the "Categories" tab in the top left corner, then click on "New Category."

Provide a name for the category and select a category type. Other fields are optional. Click on "Create" to complete the category creation.

Step 3: Create a New Product
Switch to the "Products" tab, then click on "New Product" in the top right corner.
- General Tab: Enter all product details, including name, category, SKU, measure, supplier name, description, and image. The only mandatory fields are Name and Category.
- Pricing Tab: Enter the product's cost price and retail price. Optionally, select the tax rate applied to this product.
- Inventory Levels Tab: Set the minimum and maximum stock levels. Choose if you want to allow a negative quantity in stock. Decide if you want to receive alerts when the stock of the product is low.
- Current Stock Levels by Location: Input the current stock levels by location.
- Save and Complete: After entering all necessary details, click on "Create" to save and complete the product creation.
By following these steps, you can efficiently add and manage products in your Pabau account.
NOTE: You can also learn about this topic by watching a lesson on Pabau Academy.
How to Edit a Product
Ensure your product details are always up-to-date by following these steps to edit a product in Pabau:
Step 1: Navigate to Products
Log in to your Pabau account and navigate to "Stock" in the left sidebar menu, then click on "Products".
Step 2: Locate the Product
Locate the product you wish to edit in the Products list and click on it.
Step 3: Edit Product Details
In the "Edit Product" page, make the necessary changes to the product's details, such as name, category, measure, supplier, pricing, or inventory. The editing process is similar to creating a new product.
Modify the required fields as needed.
Step 4: Save Changes
Once you have made the necessary changes, click on "Save" in the top right corner to save the edits.
By following these steps, you can effortlessly update and modify product details in Pabau, ensuring your inventory management remains accurate and efficient.
How to Delete a Product
Keep your product list streamlined by following these steps to delete a product in Pabau:
Step 1: Navigate to Products
Log in to your Pabau account and navigate to "Stock" in the left sidebar menu, then click on "Products".
Step 2: Locate the Product
Locate the product you wish to delete in the Products list and click on it.
Step 3: Access Edit Product Page
In the "Edit Product" page, toggle the "Active" button located in the top right corner. This action will reveal the "Delete" button.

Step 4: Delete the Product
Click on "Delete" and confirm in the prompt to permanently remove the product from your inventory.
By following these steps, you can efficiently manage your product list in Pabau by removing any items that are no longer needed.
How to Create Suppliers
Adding product suppliers with their company details is essential for efficient purchase order management. Follow these steps to create a supplier in Pabau:
Step 1: Navigate to Products
Log in to your Pabau account and navigate to "Stock" in the left sidebar menu, then click on "Products".
Step 2: Switch to the Suppliers Tab
Switch to the "Suppliers" tab on the left side of the screen, then click on "New Supplier" in the top right corner of the screen.

Step 3: Input Supplier Details
In the "Create Supplier" page, input the supplier's details. Note that the name and account number are mandatory fields. Additionally, enter the supplier's contact information if you plan to generate purchase orders through Pabau.
Step 4: Associate Supplier with Products
After creating the supplier, associate it with the products you purchase from them. To do so, switch back to the "Products" tab.
Click on the product you purchase from the recently created supplier.
In the General tab, select the supplier from the dropdown list that opens after clicking on the "Supplier name" field.

Now you've successfully created a supplier and associated it with specific products, enabling you to streamline your purchase order processes in Pabau.
How to Build a Purchase Order
Efficiently manage your inventory by creating purchase orders in Pabau. Follow these detailed steps:
Step 1: Navigate to Orders
Log in to your Pabau account and navigate to "Stock" in the left sidebar menu, then click on "Orders".

Step 2: View Purchase Orders
On the Orders page, you can view all previously generated purchase orders along with their status – "Processing," "Received," "Part Received" or "Complete."

Step 3: Create a New Order
To create a new order, click on "Create a new order" in the top right corner.

Choose whether to build the order from scratch or receive suggestions based on your current stock levels.

Step 4: Build Order from Scratch
If building from scratch, choose categories containing the products you want to order. In the Products tab, view all products in the selected categories.

You can also use the search bar at the top to quickly find and add specific products to the order.
Step 5: Select Products and Quantities
Click on the plus sign next to each category to expand it and view products. Enter the desired quantity for each product.

Step 6: Place Order
After selecting products and quantities, click on "Place Order." In the "Order details" page, click on "Place order" to complete it. You can also download the order in PDF format.

Step 7: Receive and Complete Order
The order will be displayed in Stock > Orders with a status of "Processing." To mark an order as "Received" and "Complete," click on it, then click on "Receive Order" in the bottom right corner. Confirm and enter the received quantity for each product.

The system will calculate any discrepancies in received quantities.

To mark the order as complete, click on "Complete Order."
How to Start a New Inventory Count
In this article, you will learn how to maintain precise inventory levels by initiating a new inventory count in Pabau.
Step 1: Navigate to Inventory Count
Log in to your Pabau account and navigate to "Stock" in the left sidebar menu, then click on "Inventory".
Step 2: Review Inventory Status
At the top of the Inventory Count page, get an overview of your inventory, including total items, out-of-stock items, low-stock items, and products awaiting arrival.

Step 3: Start a New Count
To start a new count, click on "New Count" in the center of the page, then select "New Stocktake."
Step 4: Choose Count Type
Choose the type of count: retail, consumables, or injectables. Click on "Start Count" to proceed.
Step 5: Fill out Count Information
Provide information in the Count Information fields. Choose between a full count (includes all products of the selected type) or a partial count (specify included products), then click on "Start count" in the top right corner.

Step 6: Perform Count
At the top of the screen, you can search for products by name. You can also filter products by category, with color-coded indicators: gray for fully counted categories, light blue for partially counted, and dark blue for the currently selected category.
Choose to use a barcode scanner or input stock levels manually by toggling the "Use barcode scanner" button.

If manual, enter quantities for each product, click "Count," and repeat for all products. You can search for product by name, or you can click on "Review Stocktake", then on the "Uncounted" tab, to select the next product to count.
Click on "Finish Stocktake" when done.
Step 7: View Inventory Count Details
The completed count will appear in your Inventory Count list. Details such as Count Start Date, performing staff member, location, count result, and any discrepancies will be visible.

By following these steps, you can perform inventory counts in your Pabau account.
For more guides, refer to related articles below, select additional guides, or use the search bar at the top of the page. These guides will help you get the most out of your Pabau account.
Additionally, to help you fully utilize and understand your Pabau account, we recommend exploring additional guides and resources offered at the Pabau Academy. It offers in-depth video tutorials and lessons, offering a holistic learning experience that can equip you with the essential skills for achieving success with Pabau.