Table of Contents:
1. How to Book an Appointment on the Pabau iOS App
2. How to Edit an Appointment on the Pabau iOS App
3. How to Reschedule an Appointment Using the Pabau GO iOS App
4. How to Create a Book Out Using the Pabau GO iOS App
5. How to Cancel an Appointment Using the Pabau GO iOS App
6. How to Complete the Care Pathway
7. How to Perform a Sale from the Pabau GO App
8. How to Check Out a Client via the Calendar on the Pabau Go App
9. How to Manage Leads in the Pabau GO iOS App
10. How to Compare Before and After Photos in the Pabau GO iOS App
Please note: Pabau GO requires an iPhone or iPad running iOS 17 or later. Earlier versions aren't supported.
The Pabau GO app is available exclusively on iOS. If you're using an Android device, you can access Pabau via the web at app.pabau.com.
How to Book an Appointment on the Pabau iOS App
Step 1: Launch the Pabau GO iOS App
Start by launching the Pabau GO app on your iOS device and logging into your Pabau account using your credentials.
.png?width=452&height=688&name=IMG_0327%20(1).png)
Step 2: Access the Calendar
Tap Calendar at the bottom/top of the screen. In the calendar view, you will see your shifts and bookings for the day.

To switch to a different day, use the date picker at the top of the screen. To filter the calendar, tap the hamburger menu in the top left corner.

Here, you can select the locations and employees you want displayed.

Step 3: Select a Time Slot
Tap on an empty slot in the calendar at the time you want to book the appointment.
Step 4: Fill in the Appointment Details
To book a new appointment ensure you have the "Appointments" tab selected at the top of the screen.
- Choose a client: Select the client for the appointment.

- Select a service: Choose the service the client is booking.

- Duration: The appointment will default to the duration set in your service settings, but you can adjust it if necessary.

- Appointment Notes: Add any necessary notes regarding the appointment.

- Under Notifications, choose the notifications you want to send to the client.

Step 5: Save the Appointment
Once all fields are filled, tap "Book Appointment" to complete the booking.
That's it! You've successfully booked an appointment using the Pabau iOS app.
How to Edit an Appointment on the Pabau iOS App
Step 1: Launch the Pabau GO iOS App
Start by launching the Pabau GO app on your iOS device and logging into your Pabau account using your credentials.
.png?width=512&height=779&name=IMG_0327%20(1).png)
Step 2: Access the Calendar
Tap Calendar at the bottom/top of the screen. In the calendar view, you will see your shifts and bookings for the day.
To switch to a different day, use the date picker at the top of the screen. To filter the calendar view tap the icon at the top left corner of the screen.

After you tap the hamburger menu in the top left corner, you can select the locations and employees you want displayed.

Step 3: Select the Appointment
Locate the appointment you wish to edit and tap on it.
Step 4: Modify the Appointment Details
This will open the appointment details menu. You can modify the following:

- Client Details: You can edit the client's details in their client card by clicking on the client name. This will reveal a new window where you can make the necessary changes.

- Change Service: Press on the pen icon next to the service name.

Now you can select a different service, or add additional services to this appointment.

- Appointment Notes Section: Add notes related to the appointment by pressing inside the Notes section.

Changes to the appointment are applied as you make them. That’s how you can easily edit an appointment using the Pabau iOS app.
How to Reschedule an Appointment Using the Pabau GO iOS App
Step 1: Launch the Pabau GO iOS App
Start by launching the Pabau GO app on your iOS device and logging into your Pabau account using your credentials.
.png?width=455&height=693&name=IMG_0327%20(1).png)
Step 2: Access the Calendar
Tap Calendar from the navigation menu. In the calendar view, you will see your shifts and bookings for the day.
.png?width=415&height=632&name=IMG_0333%20(1).png)
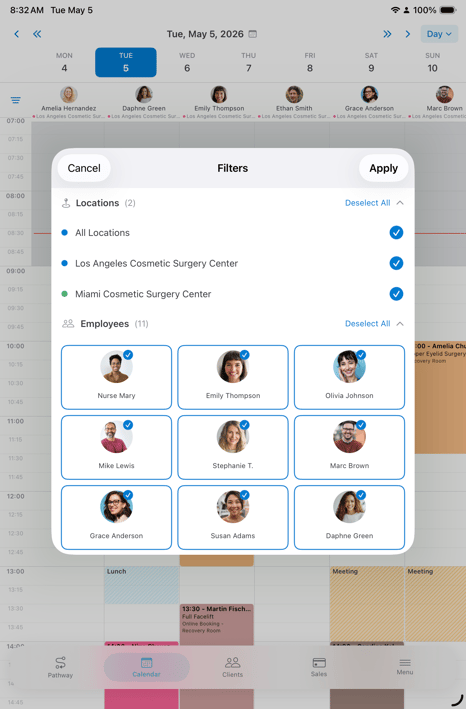
To switch to a different day, use the date picker at the top of the screen. To filter the calendar, tap the hamburger menu in the top left corner.

Here, you can select the locations and employees you want displayed.
Step 3: Select the Appointment to Reschedule
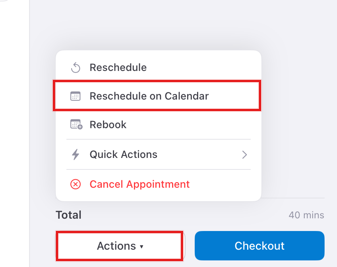
Locate the appointment you wish to reschedule and tap on it. In the appointment editing menu, tap the "Actions" button on the bottom. This will reveal some available actions including "Reschedule" and "Reschedule on Calendar"
-
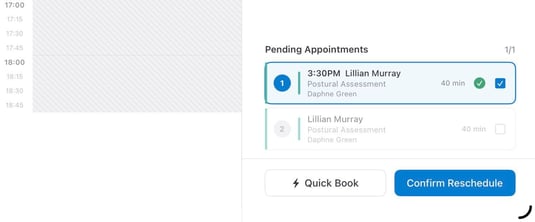
If you tap on "Reschedule" this will open a window on the right side of the screen where you can choose the date, time and location to reschedule.
.png?width=510&height=776&name=IMG_0358%20(1).png)
To finalize tap "Confirm Reschedule."
-
If you tap "Reschedule on Calendar" this will close the editing menu and display the calendar in full.
The appointment will now appear on the "Reschedule Queue" on the bottom of the screen.
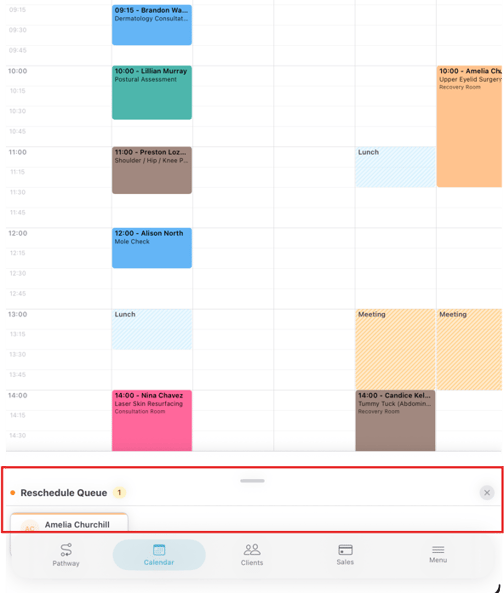
Drag and drop the appointment on the preferred available slot. If you need to move it to a different day, use the date picker at the top to navigate to the correct date.

That’s it! The appointment is now rescheduled to the new date and time.
How to Create a Book Out Using the Pabau GO iOS App
The book out or block out functionality allows you to block out time in your calendar, or the calendar of your staff members, so they cannot be booked during that time period.
Step 1: Launch the Pabau GO iOS App
Start by launching the Pabau GO app on your iOS device and logging into your Pabau account using your credentials.
.png?width=399&height=607&name=IMG_0327%20(1).png)
Step 2: Access the Calendar
Tap Calendar from the navigation menu. In the calendar view, you will see your shifts and bookings for the day.
To switch to a different day, use the date picker at the top of the screen. To filter the calendar, tap the hamburger menu in the top left corner.
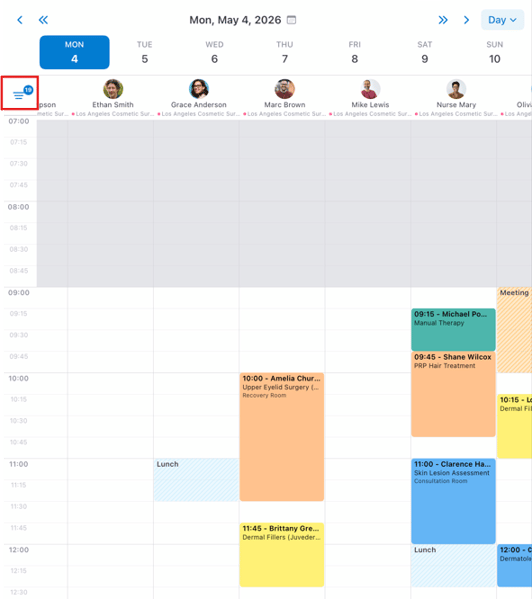
Here, you can select the locations and employees you want displayed.

Step 3: Add a Book Out
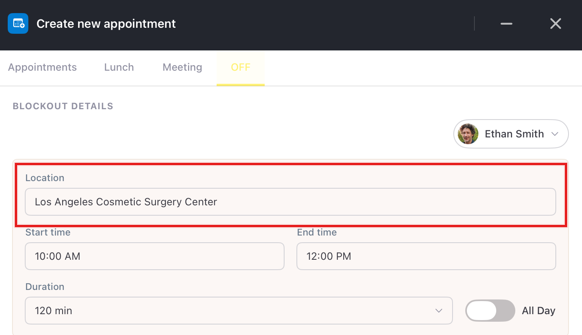
Tap on the timeslot where you want the book out to start, then switch to the "OFF" tab.
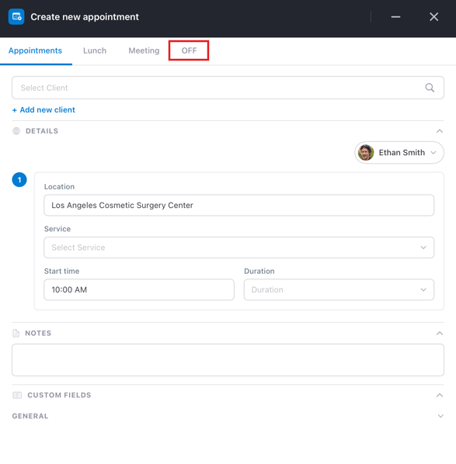
In the Add Bookout modal:
- To block out the entire day, switch the "All day" toggle on
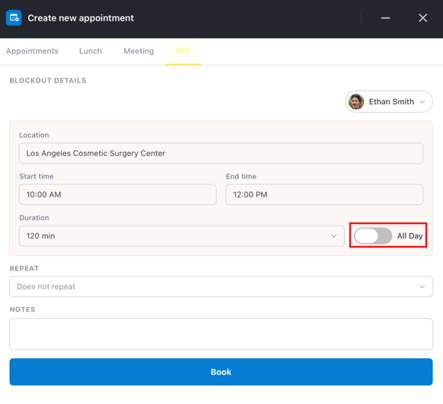
- If the block out is for a shorter period, select the duration in the "Duration" field
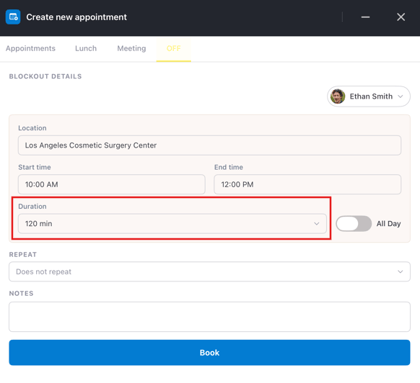
- In the "Location" field, select a different location if necessary (note: this will only work if the staff member has a shift at the second location at the same time)
Step 4: Save the Book Out
To complete the creation of the book out, tap "Book" in the bottom of the modal.

The time slot you selected will now be blocked, and if you're using online bookings, clients will not see any availability for the staff member during the blocked time.
How to Cancel an Appointment Using the Pabau GO iOS App
Step 1: Launch the Pabau GO iOS App
Start by launching the Pabau GO app on your iOS device and logging into your Pabau account using your credentials.
.png?width=409&height=623&name=IMG_0327%20(1).png)
Step 2: Access the Calendar
Tap Calendar from the navigation menu. In the calendar view, you will see your shifts and bookings for the day.
To switch to a different day, use the date picker at the top of the screen. To filter the calendar, tap the hamburger menu in the top left corner.
Here, you can select the locations and employees you want displayed.

Step 3: Select the Appointment to Cancel
Locate the appointment you wish to cancel and tap on it to open the appointment editing menu. In this menu, tap the "Actions" button. This will reveal the "Cancel Appointment" option.

Step 4: Select a Cancellation Reason
You will be prompted to select one of the cancellation reasons that are pre-configured in your account. Tap on the relevant reason.

Step 5: Confirm the Cancellation
Once the reason is selected, click the "Proceed" button on the bottom of the screen and the appointment will automatically be removed from your calendar.

How to Complete the Care Pathway
The client journey consists of five steps that you go through when your clients arrive for their treatments, plus a checkout step.
The first three steps are completed by the client: checking personal details, filling out the medical history questionnaire, and signing any relevant consent forms for the booked services.
As the practitioner, you will then complete the final two steps: taking photos and creating a treatment note. Additionally, you can process a payment from within the journey.
NOTE: To use Pabau GO, ensure that you have a PIN code set up for your account, as you will need it at various points during the client journey and when logging in. To create a PIN code, follow the steps provided in this guide.
Step 1: Start the Client Journey (Pathway)
To initiate a client journey, open the app and navigate to the Journey tab. Here, you can view all the appointments scheduled for the day, and you can select a different day using the date picker at the top of the screen. The list displays clients' names, booked services, appointment statuses, and payment statuses.

Step 2: Access the Appointment
Tap on one of the appointments then, slide to start the pathway.

Step 3: Check In
The first step is checking the client in by selecting the consent form and treatment note that the client needs to sign.

Then, click the "Save & Continue" button so you can hand over the iPad to the client.

The client will need to fill out the following steps:
-
Check Details: Tapping this option allows the client to provide or update their personal details. Once they finish, they need to tap "Save" on the bottom of the screen. The details will be updated in the client card, and the status of this step will change to "Completed".
-
Medical History: This step will display the default medical history questionnaire you've set up in your account for the client to complete.
-
Patient Consent: The client can sign the consent form you've selected on this step.

Now the client can hand you the tablet to continue the pathway. A passcode will be required to prevent clients from continuing to the next steps.

Step 3: Complete Staff Steps
Now you can proceed on the next two steps of the journey: Photos and Treatment Note.

-
Photos: On this step, you have the option to take a photo by tapping on "Camera" which will activate the device camera, allowing you to take photos.

You also have the option to upload photos by tapping the "Upload" option which will open your gallery.

When finished, tap "Done" in the bottom to move to the next step.
If you don't want to upload any photos, you can just tap on the treatment note option to continue with the next step.

-
Treatment Notes: This step will display the treatment form linked in the check in process. Complete the form and save it.

Step 4: Add Additional Forms
If you need to add more forms, tap the plus sign in the top right corner of the screen.

You will be prompted to select the form type, then you can select which form you'd like to add and fill out.

By following these steps, you can efficiently guide clients through their journey on the Pabau GO app.
How to Perform a Sale from the Pabau GO App
Step 1: Log into Your Pabau Account
Launch the Pabau GO app on your iOS device and log in. Once you're in, tap on "Sales" at the bottom of the screen.

Step 2: Select a Client
The first thing you need to do is select a client by typing their name in the search bar. Alternatively, you can process a payment for a walk-in client.

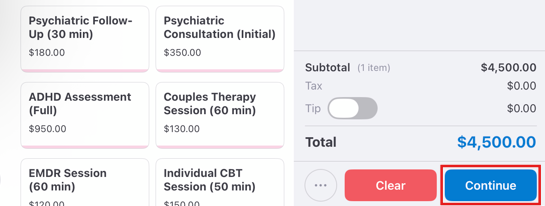
Step 3: Choose Items to Add to the Invoice
After selecting a client, you'll be taken to the item selection menu. Choose from Products, Services, Packages, or Gift Vouchers. If the client wants to add money to their account, select Account.
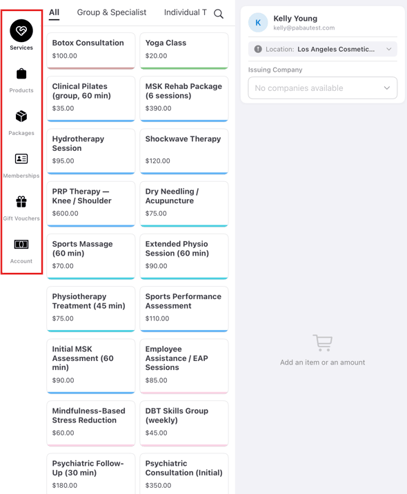
For each item type, you'll first see its categories. After choosing a category, select the specific items or services to add to the cart. They will appear on the right hand side.
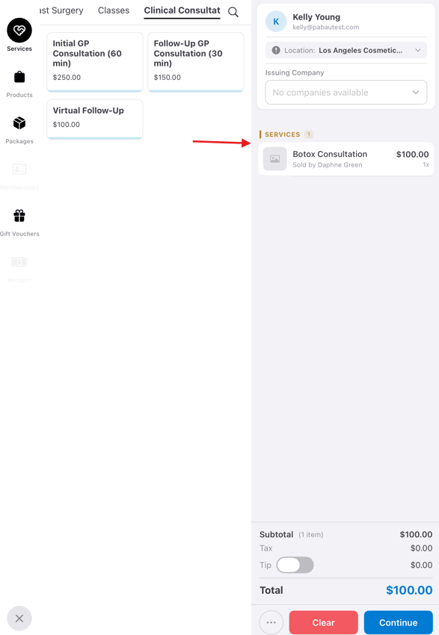
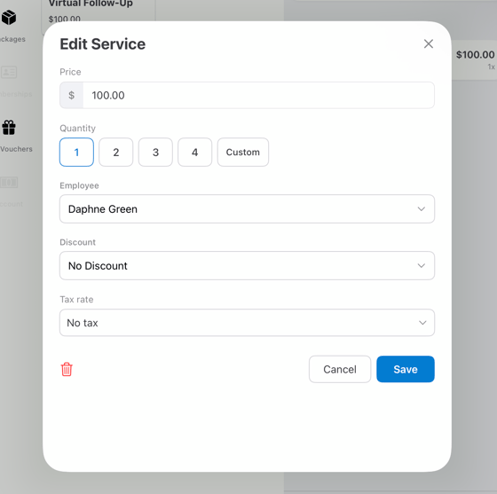
Step 4: Review and Edit Cart Items
Once you've finished adding items, click on Cart. Here, you'll see the list of items in your cart. You can adjust the quantity, tax, discount, or the employee raising the invoice by selecting an item and editing the details.
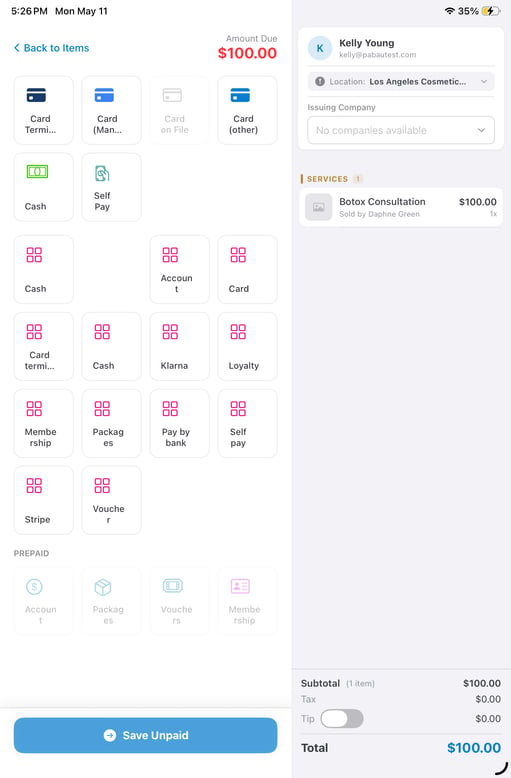
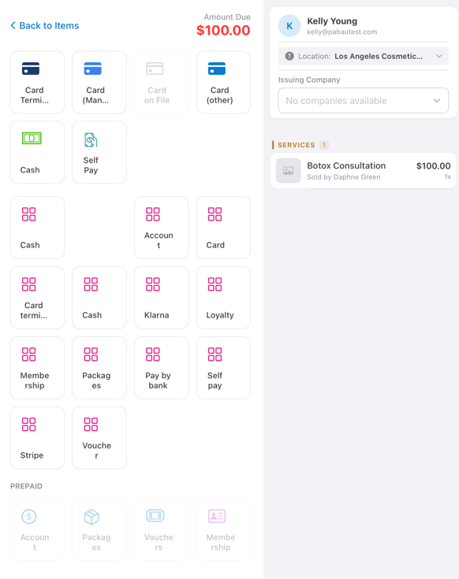
Step 5: Finalize the Payment
When everything is set, tap Continue to proceed to payment. Choose the payment method, or select from pre-paid options. You can also split the payment across multiple methods, or leave the invoice unpaid or part-paid if needed.
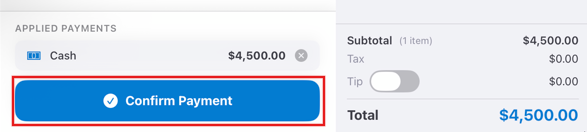
Step 6: Complete the Transaction
If the client is paying in full, tap "Confirm payment" in the bottom right corner to finalize the sale. You will be directed to the Checkout completed screen.
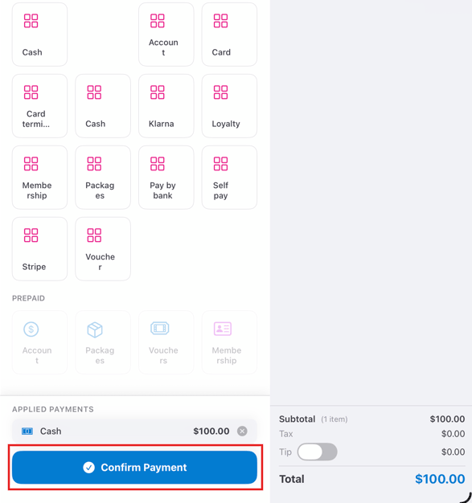
If you’ve left the invoice part-paid or unpaid, it will still be created but marked accordingly as Part-paid or Unpaid.
With these simple steps, you'll be able to successfully complete a sale using the Pabau GO app.
How to Check Out a Client via the Calendar on the Pabau GO App
Step 1: Log into Your Pabau Account
Open the Pabau GO app on your iOS device and log in. Once logged in, tap "Calendar" at the bottom of the screen. Use the calendar date picker at the top to navigate to the day when the appointment you want to check out is scheduled.

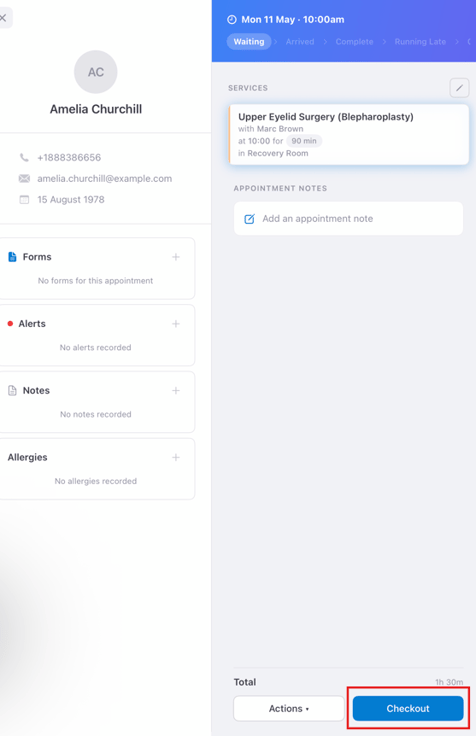
Step 2: Open the Appointment Menu
Once you locate the appointment, tap on it to open the appointment menu. To proceed to the Point of Sale, tap the cart icon.
Step 3: Review and Adjust Cart Items
You will be directed to the Point of Sale cart, where the client and services are pre-selected based on the appointment details. If needed, adjust the biller, tax, or discount by tapping on the individual items.
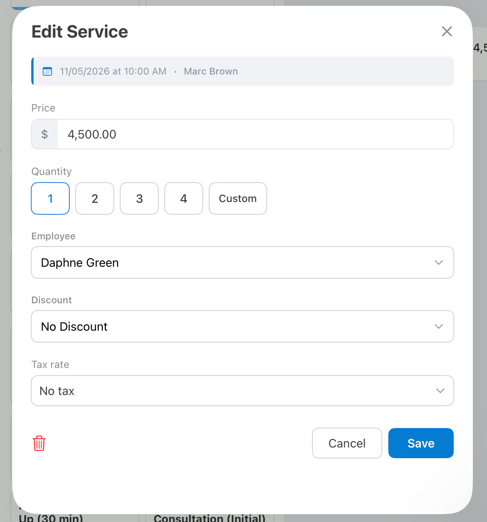
When everything is set, tap "Continue" to proceed.
Step 4: Choose a Payment Method
On the payment method screen, select the payment method, or choose from pre-paid options. You can also split the payment across multiple methods, or leave the invoice unpaid or part-paid if necessary.
Step 5: Finalize the Sale
If the client is paying in full, tap "Confirm payment" in the bottom right corner to complete the transaction. You will then be taken to the "Checkout completed" screen. If the invoice is part-paid or unpaid, it will still be created and marked as Part-paid or Unpaid.
By following these steps, you can easily check out a client through the calendar on the Pabau GO app.
How to Manage Leads in the Pabau GO iOS App
The Leads feature in Pabau helps you manage prospects by capturing their information, tracking their progress through customizable pipelines, and nurturing them with automated communications. Previously available only on the desktop version, this feature is now also available in the Pabau GO iOS app.
NOTE: To learn more about Leads in Pabau, refer to this article.
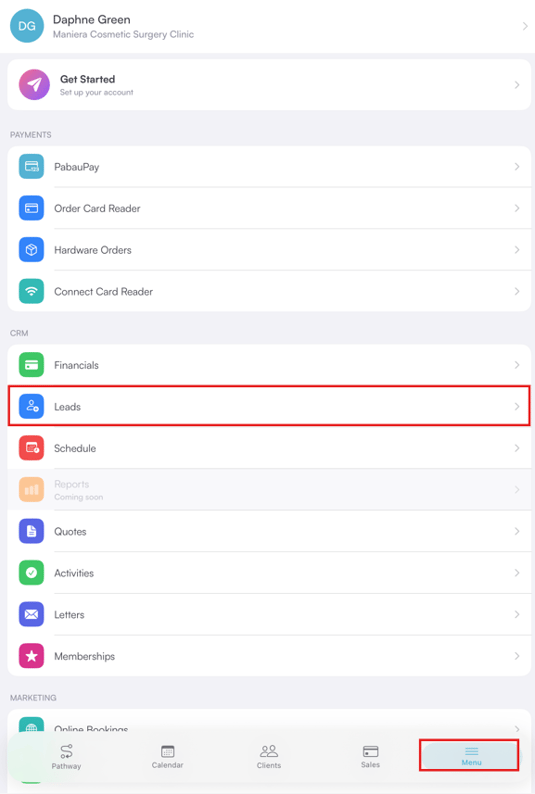
Step 1: Navigate to Menu
Once you open the Pabau GO app on your iOS device, tap the 'Menu' icon. This will reveal the 'Leads' tab along with all other options.
Step 2: Review Leads
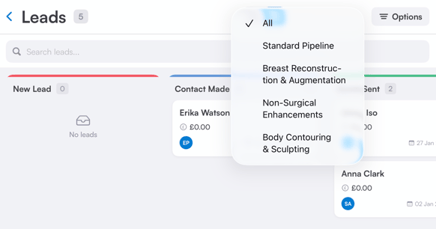
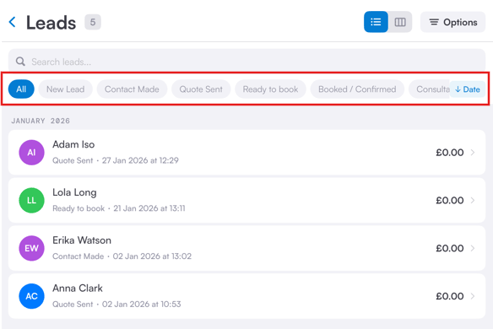
On the 'Leads' page, all your leads will be listed. Switch to Kanban view and tap on the "All" option to view all existing pipelines.
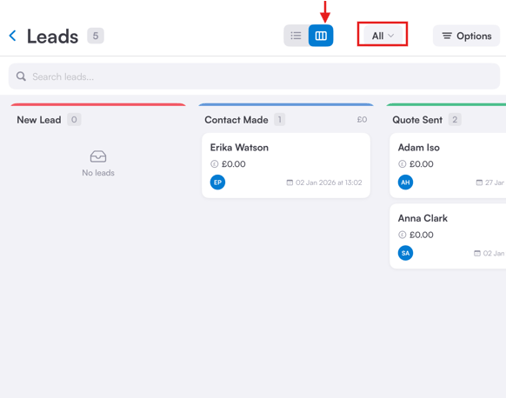
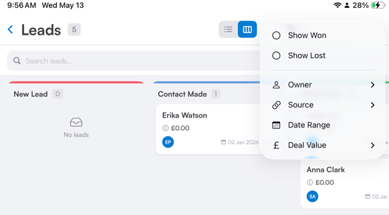
Right next to the pipeline stage name you have the "Options" button. By clicking this icon, you can filter your leads by won and lost leads, owner, source, date range and deal value.
![]()
At the top of the page, you have the option to use the search bar to search for specific leads.
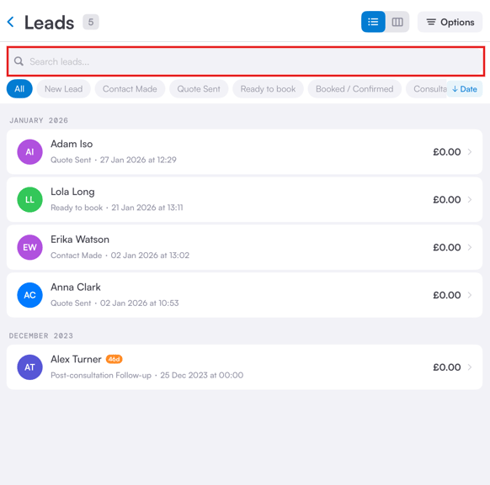
Right below, you'll find lead status filters such as Open, Contacted, Won, or Lost. Tapping any status will filter the list to show only leads with that status, such as only Open leads.
Step 3: Edit Lead
To edit a lead, simply tap on their name to open their Lead Card, where you'll see all their details, such as name, email, date of birth, lead status, lead source, and more.
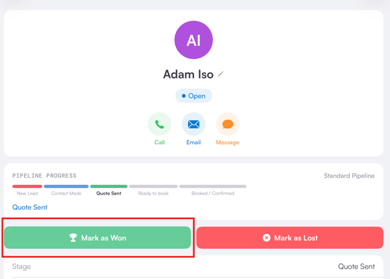
In the app, you can update the lead stage at the top of the lead profile by tapping the stage name.

In the app, you can also convert a lead into a client. When you select the 'Mark as Won' status — the system will automatically create a client card for them.
Step 4: Deactivate Lead
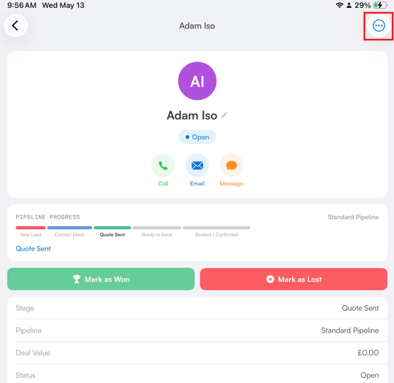
To deactivate a lead, navigate to the top right corner of the screen and click the three dot menu. This will reveal the "Deactivate" option.

By following these steps, you can edit and manage your leads in the Pabau GO iOS app.
How to Compare Before and After Photos in the Pabau GO iOS App
Step 1: Navigate to Clients
In your Pabau GO app, tap on “Clients” in the menu, at the bottom of your screen.

Step 2: Select Client
At this stage, you’ll see your full client list. You can scroll through it or use the search bar at the top to quickly find a client by typing in their name. Once you see their name, tap on it, then select "View Profile" to open their client card.

Step 3: Switch to the Photos Tab
To view uploaded photos for that specific client, tap the "Photos" sub-tab under EMR.

Step 4: Select Photos
To select photos, simply tap on an image — it will open the image and list all uploaded images on the left side of the screen.
Then, proceed to tap the "Single Photo" option listed at the top right corner. This will reveal all available types of photo comparison tools.

Step 4: Side by Side Comparison
Select the “Side by Side” option to compare the images next to each other. Then, drag and drop the photos from the left side of the screen.

By following these steps, you can compare before and after photos of clients in your Pabau GO iOS app.
For more guides, refer to related articles below, select additional guides, or use the search bar at the top of the page. These guides will help you get the most out of your Pabau account.
Additionally, to help you fully utilize and understand your Pabau account, we recommend exploring additional guides and resources offered at the Pabau Academy. It offers in-depth video tutorials and lessons, offering a holistic learning experience that can equip you with the essential skills for achieving success with Pabau.