Overview of Clients and Client Card
This guide shows you how to access clients in Pabau, search your client list, and navigate the details in each client card.
Searching for clients
You can search for a client by using the search bar at the top of the screen. Type in the client's name, phone number, email, or client ID.

For advanced searches, click the advanced search button on the bottom right.
Click on the desired client card.
View all clients
In the left sidebar menu, navigate to Clients, then choose Clients again, to see all of your clients in one place.
Customize the display of client information by rearranging and adding data fields by clicking on "Edit Columns".
You can delete or email multiple clients by selecting the checkboxes to the left of each client row.
Use the filtering option to create client views, grouping clients who meet specific conditions. The search bar allows you to find clients based on the data included in the columns you've added to the client table.
Understanding the client card
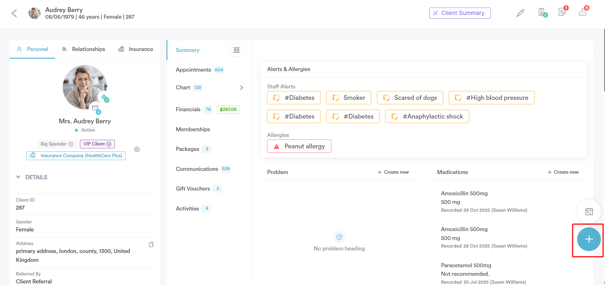
The client card contains all client data and is divided into sections. Under the client’s name at the top, it shows the DOB, age, gender, and client ID.
On the left, the "Details" tab provides client status, labels, and basic details.-3.png?width=595&height=276&name=Screenshot%20(1)-3.png)
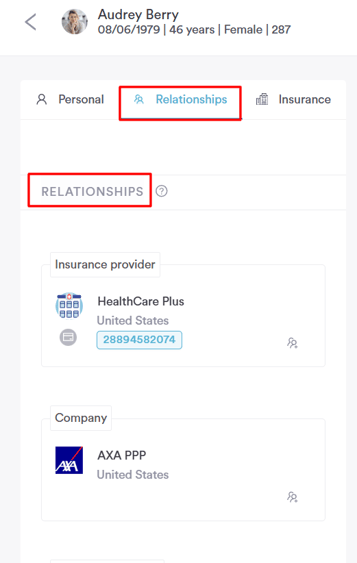
The second tab, which can be accessed by clicking on the ''Relationships'' tab next to Personal showcases client relationships. To learn more about relationships, check out our How to Add a Client Relationship guide.

In the center of the client card, multiple tabs categorize client data for convenient access and management.
Summary: Provides a customizable, log-in-specific overview of crucial client information.
Appointments: Displays appointments related to the client, with further organization into sub-tabs.
EMR (Electronic Medical Records)/Chart: Expands into a dropdown list containing medical forms, prescriptions, documents, and photos.
Financials: Breaks down payments made by the client, segmented into sub-tabs for clarity.
Memberships: Shows all of the membership plans purchased by the client.
Packages: Lists packages bought by the client, distinguishing between active and expired ones. Notably, it details the sessions used.
Communications: Houses notifications sent to the client, including both sent and scheduled messages.
Gift Vouchers: Displays vouchers linked to the client, categorized as active or expired, similar to packages.
Activities: Records client-related tasks and activities.
In the top right section of the client card, you'll find the following tabs:
Medical History: Hover over to view the client's last medical history form update date. Click to access, edit, or send update requests to the client.
Notes: Records client-specific notes and previews appointment notes.
Staff Alerts: Alerts about client conditions that might affect treatments, such as allergies or a fear of needles.

Initiate various actions related to the client through the Create button, represented by a blue plus icon and situated in the bottom left corner of the card.
Clicking on the calendar icon right above the Create button will redirect you to the calendar, where you can book an appointment for this client.
This feature makes it easier to manage clients in Pabau, giving you a simple, all-in-one place for organizing and interacting with clients.
NOTE: You can also learn about this topic by watching a lesson on Pabau Academy.
In addition, we suggest reading our Clients article for a more in-depth exploration of this topic.
For more guides, refer to related articles below, select additional guides, or use the search bar at the top of the page. These guides will help you get the most out of your Pabau account.
Additionally, to help you fully utilize and understand your Pabau account, we recommend exploring additional guides and resources offered at the Pabau Academy. It offers in-depth video tutorials and lessons, offering a holistic learning experience that can equip you with the essential skills for achieving success with Pabau.