
Why do you need leads permissions?
Not every staff member needs to manage the sales pipeline, so these permissions let you restrict lead handling to sales or reception staff, while keeping other roles focused on their own areas.
Step 1: Navigate to Roles
Log in to your Pabau account, and in the left sidebar menu, click on "Team" to expand it, then click on "Team" again from the submenu.
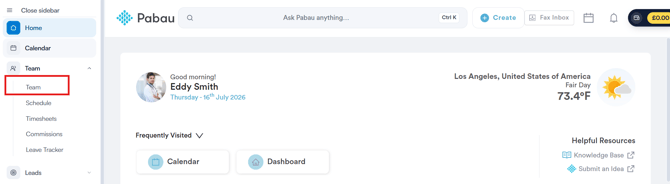
This opens the Team page, showing four tabs: People, Roles, Teams, and Visibility. Click on the "Roles" tab.
Step 2: Open the Leads Category
On the Roles page, you'll see a "Features" table listing every permission category down the left side, with each of your roles shown as its own column.
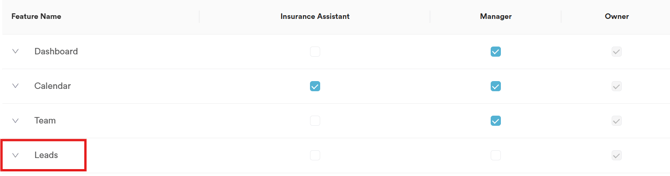
Find "Leads" in the Feature Name column and click the arrow beside it to expand the category. This reveals its individual permissions, listed as separate rows underneath.
Each checkbox in the table turns that permission on or off for that role. Ticking the "Leads" row enables all of its permissions at once, while ticking an individual row only affects that one.
NOTE: The "Owner" role's checkboxes appear greyed out, since the Owner role always has full access and can't be restricted.
Step 3: Understand What Each Permission Does
- Can access leads page – Allows the staff member to open the Leads page.
- Can create leads – Allows the staff member to add new leads.
- Can edit leads – Allows the staff member to update the details of an existing lead.
- Can delete leads – Allows the staff member to remove a lead.
- Can mark leads as won – Allows the staff member to mark a lead as won.
- Can mark leads as lost – Allows the staff member to mark a lead as lost.
- Can access pipeline page – Allows the staff member to open the Pipeline page, where leads are tracked through each stage.
If any of these are disabled, the staff member simply won't be able to perform that specific action.
These are useful when setting up a new role, letting you start from a sensible default rather than ticking each permission individually.
By following these steps, you can control exactly what leads-level access each role has in Pabau.
A few things to be aware of:
- Permissions apply to the role, not the individual — so if you set a permission for the Receptionist role, every staff member with that role gets the same access.
- If you don't see the right role for what you're setting up, you can create a new one and set its permissions from scratch.
Was this guide helpful? Let us know by voting below - your feedback helps us write clearer articles.
For more guides, browse the related articles below or use the search bar at the top of the page. You can also watch our video learning series, the Pabau Academy, or visit the Support page for additional help.