With Pabau’s lead broadcast feature, you can stay in touch with your prospects through simple email and SMS campaigns. Keep them informed and engaged, helping you nurture relationships and guide them towards becoming clients. Plus, easily track your campaign’s success to see what works best for your audience.
Table of Contents:
1.How to Create an Email Campaign for Leads
2.How to Create an SMS Campaign for Leads
3.How to Create Lead Groups for Targeted Marketing Campaigns
How to Create an Email Campaign for Leads
In this article, we'll guide you through the steps on how to create an email campaign for leads.
Step 1: Navigate to Broadcasts
Log in to your Pabau account, and in the left sidebar menu, click on Marketing, then click on Broadcasts.

Step 2: Review Existing Campaigns
On the left side, view existing newsletter campaigns categorized by status - Ongoing, Draft, and Completed. In the center, see campaign details such as status, name, subject, sent date, recipients, and performance statistics.

Step 3: Initiate a New Email Campaign
To start a new email campaign, click "Create Campaign" in the top right corner. In the "Select a channel" window, choose "Email".

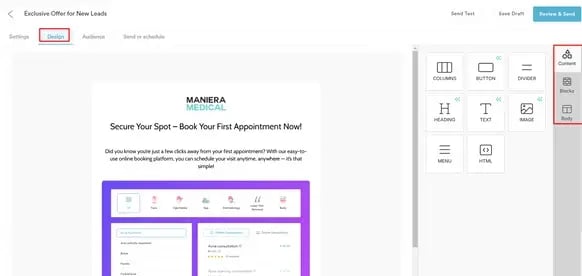
Step 4: Campaign Creation Sections
The newsletter creation page is divided into four parts: Settings, Design, Audience, and Send or Schedule.
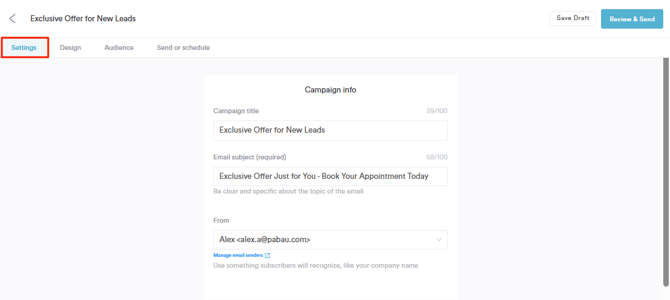
Settings Tab: Provide the campaign title (for internal purposes) and the email subject (visible to leads). Choose the campaign type: Standard (one-time) or Automated.
Design Tab: Choose a preexisting template or code your own.
- If using a preexisting template, click on the desired template, then click "Next" in the top right corner.

Add a new component (columns, heading, text, image button, divider, HTML code, or a menu) by closing the editing menu (clicking the X button or outside the template).
Example text for email campaign to leads
Here’s a suggested example for your lead email campaign text.
Subject: Don't Miss Out on Our Exclusive Offer, Client/Lead First Name! 🎉
Email Body:
Hi [Client/Lead First Name],
We hope you're doing well! 🌟
We’re excited to offer you a special promotion on our services at [Company Name]. As a valued lead, we want to make sure you don’t miss out on this opportunity.
🎁 Exclusive Offer Just For You
Enjoy a 30% discount on our top services, including [service name] and [service name 2]. Book your appointment today and save!
📅 Book Your Appointment Now!
Booking is easy with our online platform. Click the link below to secure your spot.
[Insert Booking Link]
This exclusive offer is only available for a limited time, so don't wait! If you have any questions, feel free to reply to this email, and we'll be happy to assist you.
Best regards,
[Your Company Name] Team
Audience Tab: Once you access the Audience tab, a popup will appear asking you to choose the audience: Clients or Leads. After selecting "Leads," you'll be able to decide who will receive your email campaign.

You can choose to send it to all leads, or filter them based on specific criteria, such as lead status or other custom attributes.

If you wish to send it only to a specific group of leads, click on "Lead groups" and select the group you need.

To create a new lead group, follow the steps provided in this article.
Send or Schedule Tab: Decide to send the campaign immediately by clicking "Send Campaign Now," or schedule it by expanding the "Schedule campaign" field and selecting the date and time.
Confirm by clicking "Scheduled" or cancel the schedule by clicking "Cancel Schedule."
To send a test email, click "Send Test" in the top right corner.
Step 5: Campaign Completion
The campaign will appear in the Newsletter tab on the Broadcasts page, initially marked as "Processing" until sent, then changing to "Sent" status.
By following these steps, you'll be able to successfully create and launch your lead campaign.
How to Create an SMS Campaign for Leads
In this article, we’ll guide you through the steps to create and send an SMS campaign to your leads.
Step 1: Navigate to Broadcasts
Start by logging into your Pabau account using your login credentials. Then, navigate to the left sidebar menu and click to expand the Marketing tab: the Broadcasts sub-tab will be revealed.
Step 2: Access SMS Campaigns
In the "Broadcasts" section, locate the SMS campaigns by switching to the SMS tab next to Newsletters on the right. Here, you can view the status, name, sent date, recipient count, open rate, and click-rate statistics for each campaign.

![]()
Step 3: Create a New SMS Campaign
Click on "Create Campaign" in the top right corner. In the "Select a channel" prompt, choose "SMS."

Step 4: Campaign Creation Page
The SMS campaign creation page is divided into four parts: Settings, Design, Audience, and Send or Schedule.
Settings Tab: Here, you can add a campaign title for internal purposes. The "From" field is prepopulated with information from the Sender Address section.
Choose between a standard one-time campaign or an automated one.

Design Tab: Type the message you want to send to leads. Preview the message in the center of the screen. Under "Links," choose to add a link to the text message, either from the pre-built links to your Online Bookings portal or a custom link.

Audience Tab: Once you click on the Audience tab, a popup will appear asking you to choose the audience you wish to send the SMS campaign to: Clients or Leads. After selecting "Leads," you'll be able to decide who will receive your email campaign.

You can choose to send it to all leads, or filter them based on specific criteria, such as lead status or other custom attributes.

If you wish to send it only to a specific group of leads, click on "Lead groups" and select the group you need.
.webp?width=406&height=473&name=image-png-Mar-26-2025-02-36-33-9260-PM%20(1).webp)
To create a new lead group, follow the steps provided in this article.
Send or Schedule Tab: Review the total cost of the campaign and the payment method. To send the campaign immediately, click on "Send Campaign Now."

To schedule it for a later time, expand the "Schedule campaign" field. Choose the date and time for the campaign to be sent and click on the blue "Scheduled" button to complete the scheduling.

By following these steps, you can easily create and send targeted SMS campaigns to your leads, helping you connect with the right prospects at the perfect moment.
How to Create Lead Groups for Targeted Marketing Campaigns
In this article, we'll show you how to create lead groups to help you target your marketing campaigns more effectively.
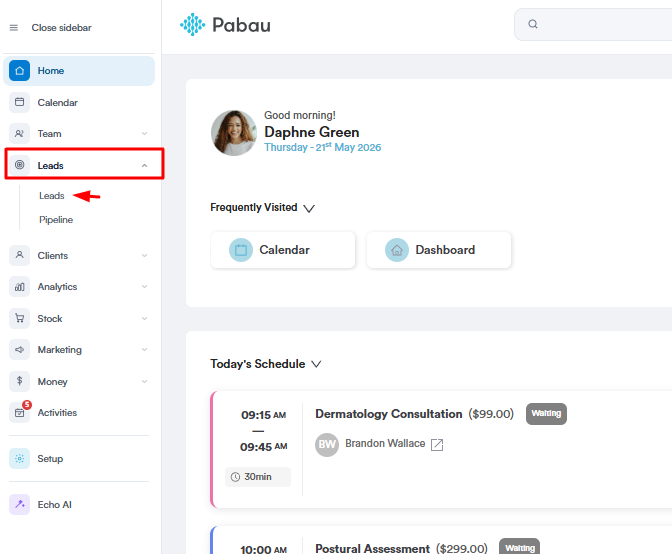
Step 1: Navigate to Leads
Log in to your Pabau account, and in the left sidebar menu, click on Leads, then select Leads again from the dropdown menu.
Click on "Filter By" located next to the search bar in the top right corner of the Leads feature. Then, select "Add new view."

Step 3: Create Lead View Conditions
In the "Create View" menu, set conditions for leads who should be included in the list. For example:
- In the first section, we have a filter for the lead stage "Contact 1st Attempt," which displays all leads that have had an initial contact attempt made.
- The purpose of the "Contact 1st Attempt" stage is to help you track leads that have been initially reached out to. It allows you to easily see which leads have been contacted for the first time, helping you manage follow-up actions and move them through the next stages of your lead management process.

- In the second section, "And match ANY of these conditions," additional conditions can be added to further refine the leads list. Leads will be included if they match any of these conditions, even if they don’t meet all the criteria.
By following this example, you can create different lead groups based on your needs, such as follow-ups for won leads, converted leads, lost leads, and more.
Step 4: Name and Visibility
Add a name for the lead view that reflects the conditions set. Choose whether the view will be visible only to the creator or to all users in the account.

Step 5: Save the View
Once satisfied with the conditions and settings, save the view by clicking on "Save" in the bottom right corner of the "Create View" menu.
By following these steps, you've successfully created a lead group or view in Pabau. This lead view can now be used for targeted marketing campaigns, such as reaching out to specific leads for follow-up or sending offers to leads based on their status.
Step 6: Use the Lead Group in Campaigns
You can now use this lead view when choosing the audience for your newsletter or SMS campaigns. To do so:
- In the left sidebar menu, click on Marketing, then click on Leads.
- Start creating a new email campaign, or create a new SMS campaign.
- After completing the fields in the Settings and Design tabs, proceed to the "Audiences" tab.
- When selecting the audience, choose "Leads."
- Click on "Lead Groups" and select the lead group you just created.
- Proceed to send the campaign.

By following these steps, your campaign will reach only the leads included in the lead group, allowing you to precisely target your audience for maximum impact and engagement. Regularly update lead views to align with changing marketing strategies and business goals.
For more guides, refer to related articles below, select additional guides, or use the search bar at the top of the page. These guides will help you get the most out of your Pabau account.
Additionally, to help you fully utilize and understand your Pabau account, we recommend exploring additional guides and resources offered at the Pabau Academy. It offers in-depth video tutorials and lessons, offering a holistic learning experience that can equip you with the essential skills for achieving success with Pabau.