Table of Contents:
1. Set Up Online Bookings
2. Configure Client Portal
3. Optimize Templates
Set Up Online Bookings
Online booking is a game-changer for both your clinic and clients. Optimizing this feature ensures clients can easily schedule appointments 24/7. With a user-friendly booking system, you’ll improve client satisfaction, and keep your calendar full.
Step 1: Navigate to Online Booking
Start by logging into your Pabau account using your login details, then, navigate to Setup located on the bottom of the left sidebar menu. Under the Services section you'll find the "Online Booking" tab.
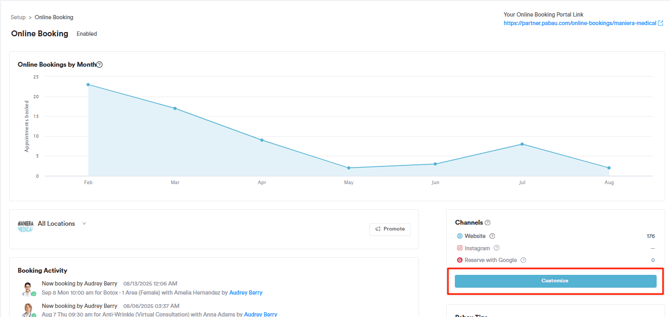
Step 2: Customize Online Booking
To start setting up your online booking portal, click the "Customize" button on the right-hand side.
Step 3: Key Areas to Optimize
Here’s what you need to optimize to make sure your online booking portal works efficiently and provides the best experience for your clients:
Set Up General Details
Here are the key settings you need to optimize in the General tab to ensure your online booking portal is set up correctly:
- Header & Footer Messages: Personalize your booking portal by adding custom messages. If no footer message is added, the default will be: "Do you have any questions? Please call [your business number set in Business Details]."
- Privacy Policy & Terms: If no custom links are added, the client registration page will display Pabau’s Privacy Policy and Terms & Conditions by default.
- Require Form Completion: Enable this option if you want clients to complete a medical form (such as a questionnaire) during the booking process, rather than after their appointment is scheduled.
- New Booking Notifications: Choose to receive email notifications for each online booking using the business email set in Business Details.

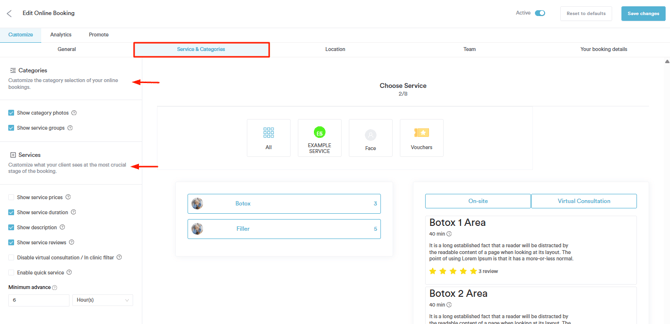
Set Up Services & Categories
The Service & Categories tab includes several checkboxes divided into two sections based on their impact:
- Categories
Choose if you want to display category photos and service groups. - Services
Indicate whether you wish to show service prices, duration, description, and reviews.
The "Minimum advance" dropdown menu enables you to set the earliest time clients can schedule a booking. This feature establishes the minimum time interval required between the current time and the soonest appointment available, ensuring that clients book their services with adequate notice.
Location Optimization
In the Location tab, you can enable clients to search for your clinics by postcode and set their most visited location as the default.
NOTE: This tab will not be available if you have only one location.

Customize the team member selection process
In the Team tab, you can select whether to show or hide employee surnames, five-star reviews, employee photos, and job titles.
Additionally, you can skip the employee step. In this case, the client will not be able to choose whom they want to see and will view the availability of all employees.
You also have the option to display employee profiles. When enabled, clients can read the biographies of staff members, as configured in the Team feature.

By optimizing your online booking system, you make it easier for clients to schedule appointments while keeping your calendar organized.
Set up the Reserve with Google integration
Reserve with Google allows your business to appear in Google Search and Google Maps results, with booking buttons that enable clients to book appointments directly.
To integrate Reserve with Google in Pabau, switch to the 'Promote tab' on the Customize Online Bookings page then navigate to the 'Reserve with Google' sub-tab to proceed.
To activate Reserve with Google, navigate to the toggle on the right-hand side and click to enable it. A location is eligible if it belongs to the company, is listed in the account's location settings, is active, and is bookable online. Make sure the location is set up correctly in the Locations page.

By following these steps, you can activate Reserve with Google for your online bookings.
Configure Client Portal
Your client portal is a key touchpoint for your clients, giving them access to their records, bookings, and more. Optimizing it ensures a smooth experience while keeping your clinic in control of what information is collected and what features clients can use.
Step 1: Navigate to Client Portal
Navigate to Setup located on the bottom of the left sidebar menu. Under the Services section you'll find the "Client Portal" tab.
Step 2: Key Areas to Optimize
To make the most of your client portal, it's important to fine-tune key settings that affect how clients register, what information they provide, and what they can access. Here's what to set up:
Review Registration Fields
Choose which fields should be visible or mandatory when clients register, ensuring you collect the necessary information from the start. In the "Customize" tab, you can personalize your client portal by adding your brand colors and selecting which registration fields to include.
For each field, you can decide whether it should be visible only or required, ensuring you collect the right information from clients during registration.

Control Client Access
Determine what features logged-in users can access, such as appointment history, invoices, or secure messaging by switching to the "Features" tab.
On the left-hand side, you’ll see a list of all available features. To enable a feature for clients, simply click on its name — the button will update to show that it is enabled. This allows you to control what clients can view and interact with in their portal.
The features will be displayed on the screen as a preview of how they will appear in the client portal.

Make sure to click the "Save Changes" button in the top right corner to apply your updates.
Optimize Templates
Optimizing your Precare and Aftercare templates ensures that clients receive the right information at the right time. Precare instructions help clients prepare for their appointments, while Aftercare guides support their recovery and treatment results. Setting these up properly keeps clients informed, improves compliance, and enhances their overall experience with your clinic.
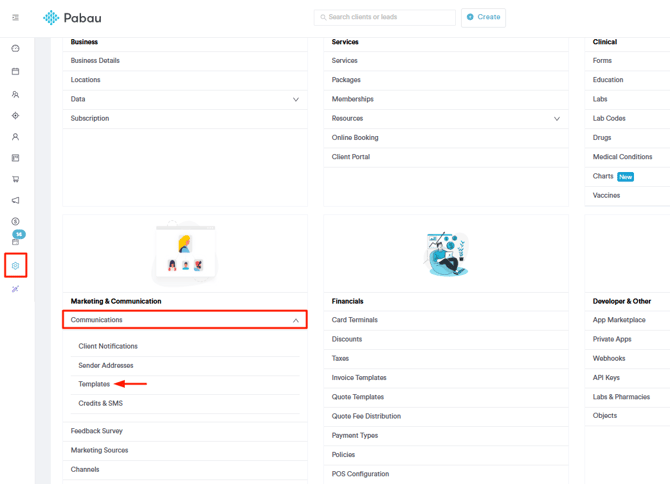
Step 1: Navigate to Templates
Access the Setup page by clicking the "Setup" button in the bottom corner of the left sidebar menu. Once there, navigate to the Marketing & Communications section. Click the Communications tab to expand it and reveal more options. From there, select the "Templates" option to access and manage your templates.
Step 2: Key Areas to Optimize
Here are the key areas you should focus on to ensure your templates are set up correctly:
Fill Out Information
Make sure the content is clear and includes all necessary details. On the name field, the name of the template should be entered. This is for internal use only. In the next field, you can choose the template type.
For Precare email templates, it's important to include instructions clients need to follow before their appointment, such as fasting requirements or skincare prep.
For Aftercare email templates, it's important to include post-treatment guidelines, restrictions, and follow-up recommendations.

Link Services
To ensure clients receive the correct information, in the related services field, select all of the services from the dropdown menu that this template should apply to.
Simply tick on the service name to include it. Make sure to click the "Save Template" button in the bottom left corner to apply and save your changes.

Optimizing features like online bookings, the client portal, and precare & aftercare ensures smoother clinic operations, reduces manual tasks, and enhances client satisfaction.
For more guides, refer to related articles below, select additional guides, or use the search bar at the top of the page. These guides will help you get the most out of your Pabau account.
Additionally, to help you fully utilize and understand your Pabau account, we recommend exploring additional guides and resources offered at the Pabau Academy. It offers in-depth video tutorials and lessons, offering a holistic learning experience that can equip you with the essential skills for achieving success with Pabau.