Custom visuals help you mark treatment areas, log what was used, and keep a detailed clinical record—all directly inside the client’s chart.
For a full overview of the drawing tool functionality and setup, refer to our main article here.
Step 1: Open the Client Card
Start by logging into your Pabau account. Open the client card of the client whose treatment you’d like to document. You can search for a client by using the search bar at the top of the screen. Type in the client's name, phone number, email, or client ID.

Step 2: Open a Treatment Note
Click on the "plus icon" in the bottom-right corner of the screen and select "Treatment note" from the menu.
Choose the treatment form that already includes a chart image where the drawing tool can be used.

Step 3: Open the Drawing Tool
Inside the treatment form, locate the drawing icon above the chart image.
Click it to open the drawing canvas.

Step 4: Use Drawing and Injection Tools
On the drawing screen, you can document the treatment in detail using the available tools:
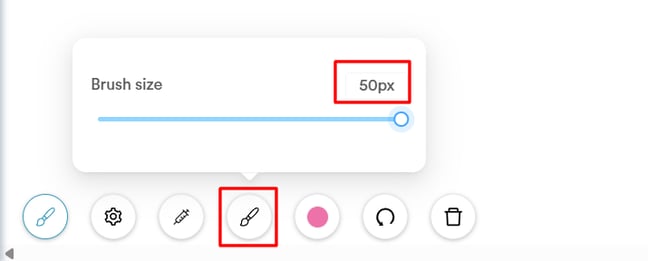
- Draw Mode
Choose a color, adjust brush size and opacity, and draw directly on the image.

The brush size slider extends up to 50px, allowing you to highlight larger areas more clearly when precision is less critical than visibility.
- Injection Tool
Click the syringe icon, select a medicine from your clinic’s system, and apply it to the relevant treatment area.
Common areas include:
-
Brow, Cheeks, Chin, Forehead, Jawline, Lips, Nasolabial, Nose, Peri oral, Tear trough, Temple, Zygoma
You can also add the units used for each area, which will be shown in the treatment summary.


-
Medicine Summary Panel
On the left side, you’ll see an automatic log of which medicines were used. -
Add Photos
Click the plus icon to capture the chart and include it in the client’s record.

Step 5: Add Before/After Labels and Text
If you're working with real photos (e.g., before/after images), you can add labels and text:
-
On the left-hand side, choose label style: no background, with borders, or with a solid background.
-
Use the Before/After buttons to tag each image appropriately.
-
At the bottom, you can also add text, select font, adjust size, and format with bold, italic, or underline.


Step 6: Change the Chart Image
On the right-hand side, you’ll find a selection of available images.
You can switch the background image for your drawing by selecting any chart image uploaded in the system.

NOTE: Want to upload more chart images? Learn how to upload and manage images in forms.
Step 7: Save the Chart
When you’re done marking and annotating the image, click "Save" at the top right. Everything will be stored in the client’s chart and available for future reference.
For more guides, refer to related articles below, select additional guides, or use the search bar at the top of the page. These guides will help you get the most out of your Pabau account.
Additionally, to help you fully utilize and understand your Pabau account, we recommend exploring additional guides and resources offered at the Pabau Academy. It offers in-depth video tutorials and lessons, offering a holistic learning experience that can equip you with the essential skills for achieving success with Pabau.