
Linked Fields allow you to mirror client responses across your system, ensuring that any answers provided in a medical form are automatically updated in the client card for future reference. This feature helps maintain accurate client records and streamlines data management.
Step 1: Navigate to Forms
Log into your Pabau account and go to Setup. From there, click on Forms under the Clinical section.
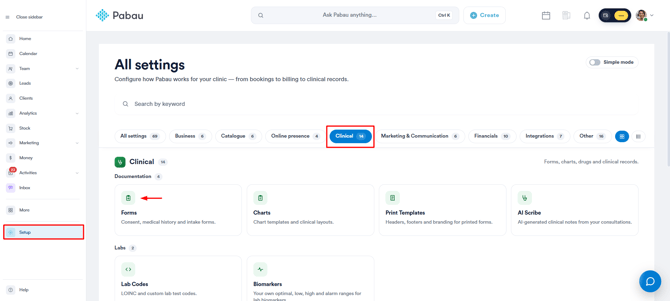
Step 2: Access a Form
In Forms, you can create a new form or modify an existing one. To edit a form, go to the Edit Form section and open the Components tab.
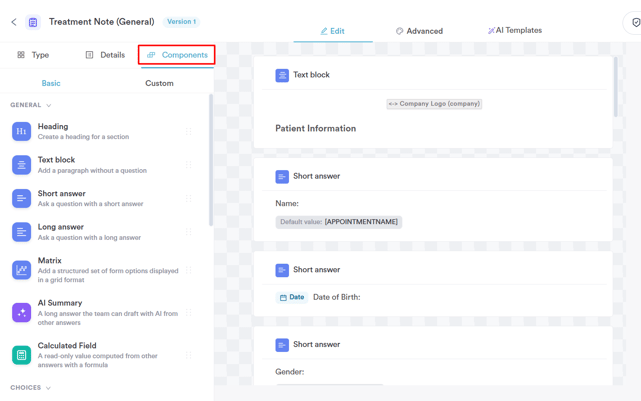
NOTE: If you need guidance on creating or editing forms, please refer to this article.
Step 3: Choose a Component
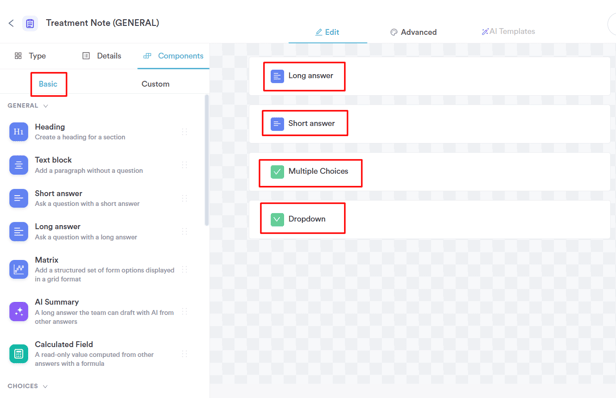
In the Components module, add the component with drag and drop to the builder menu, where you want to apply linked fields. Linked fields can be added to the following components:
- Long Answer
- Short Answer
- Multiple Choices
- Dropdown
Step 4: Add a Linked Field
Click on the component where you want to add a linked field. In this case, we will choose "Multiple choice" as an example.
A settings panel will appear on the right side of the page.
Enter the question for this field, for example, Gender, fill in the options as well, then click on "Show advanced settings" to reveal the linked field option.
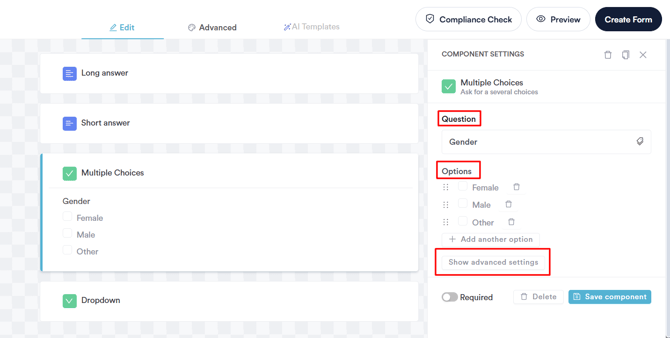
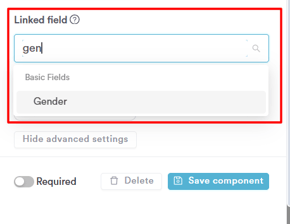
Under the Linked Field section, click on the "Select field" dropdown menu and choose the linked field that corresponds with your question. In this example, you would select Gender from the list and click on it.
Step 5: Save the Component
Once you have added the linked field, click on "Save Component".
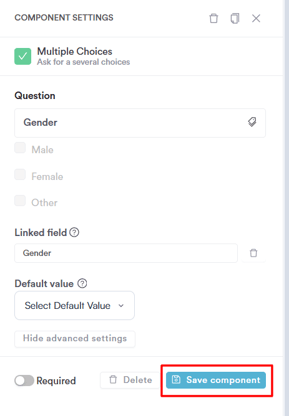
You can apply linked fields to multiple components within the same form. After finalizing your form design, click on "Save Form" in the top-right corner of the page.
When you send a form with linked fields, the client’s answers will be automatically transferred to their client card. For example, if the form includes a Gender field, the selected answer will be stored under the Details section of the client card.
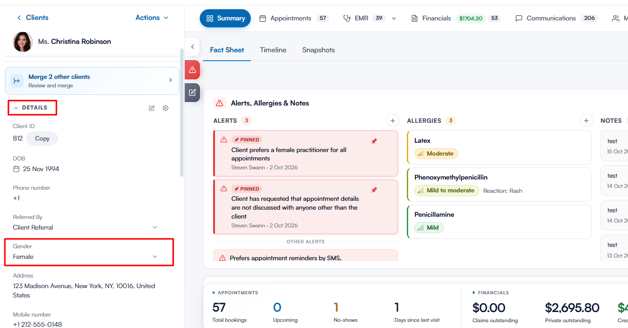
Linked fields improve client management by ensuring that key information is automatically stored in the client card. You can use them for various fields to centralize and streamline client data storage.
TIP: You can combine linked fields and default values for seamless data updates.
If a form's component includes a Last Name field with both a default value and a linked field, any changes made by the client will automatically update their client card.
For example, if a client updates their last name in the form at any point, the change will be mirrored in their record without requiring manual entry.
You can refer to this article for more insights on how to create default values.
By following these steps, you will successfully add default values to your medical form, making the process more efficient for both you and your clients.
What happens if a client clears a linked answer?
It depends on which kind of field the question is linked to:
- A built-in client card field (for example First Name, Last Name, address, Date of Birth, Mobile Phone or Gender): a blank answer is ignored, so the client card keeps the value it already had. This stops an empty answer from wiping a name or phone number.
- A custom field you created: a blank answer clears that field on the client card.
Answers that do not fit the client card field are also skipped rather than saved, for example a phone number that is not a number or a date of birth in the future. To remove a value from a built-in field, edit it directly on the client card.
NOTE: When a client fills in a form online, an answer linked to Email does not change the email on their client card. Changing the email address needs to be done on the client card.
Where this comes from: the value on the client card is written when the form is submitted. A later blank answer only changes it for custom fields.
Was this guide helpful? Let us know by voting below - your feedback helps us write clearer articles.
For more guides, browse the related articles below or use the search bar at the top of the page. You can also watch our video learning series, the Pabau Academy, or visit the Support page for additional help.