Table of Contents:
1. Where to Track Form Submissions
2. How to Filter Form Submissions
3. How to Configure Columns
4. How to Bulk Edit Submissions
Where to Track Form Submissions
Once your forms are live and collecting responses, you’ll want to keep track of who’s submitted them and when. Here’s how you can view and manage form submissions:
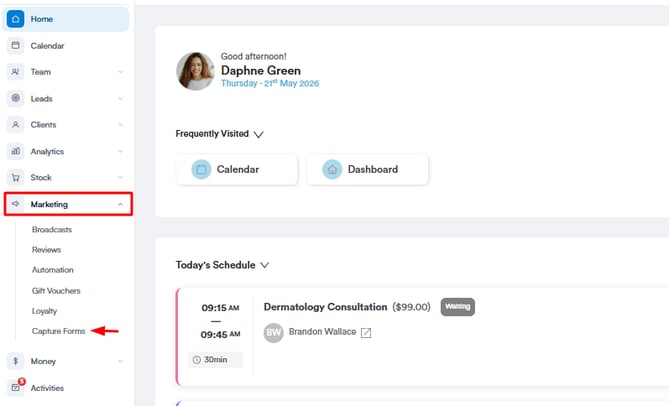
Step 1: Access "Capture Forms"
Start by logging into your Pabau account using your login credentials. Then, navigate to the Marketing section located on the left sidebar menu and click to expand it. The "Capture Forms" tab will be revealed.
Step 2: Navigate to the Forms Tab
Navigate to the "Forms" tab on the top left corner to view your created forms. On the form you want to view the submissions, click the "Actions" button to view all available options.
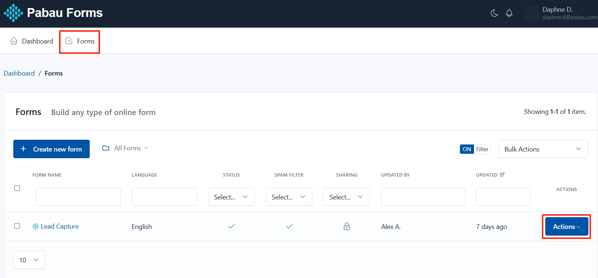
Step 3: View Submissions
The actions button will reveal the "Submissions" option. Click to view the form submissions.

You’ll see all the submissions listed here. Each column gives you a quick overview of the form entries:
-
Submission # – The order in which submissions were received (starting from the most recent).
-
ID – A unique identifier automatically assigned to each submission.
-
DOI Status – Stands for “Double Opt-In”; this shows whether the client has confirmed their email (used mainly for consent tracking).
-
First Name – The first name of the person who filled out the form.
-
Submitted – The exact date and time the form was submitted.
-
Actions – Allows you to view or delete the submission.

To view the details of a specific submission, simply click on it to open and review the full entry.

Here you can also view the client or lead’s phone number, email address, and any additional fields you’ve included in the form.
The available actions at this stage include:
-
Comment – Leave an internal note visible only to your team.
-
Print – Print a copy of the submission.
-
Delete – Permanently remove the submission from your records.

By following these steps, you can view all your submissions.
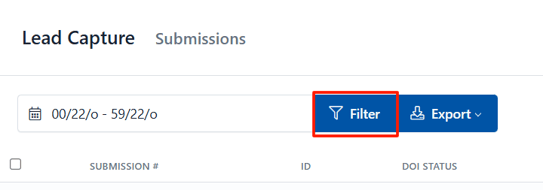
How to Filter Submissions
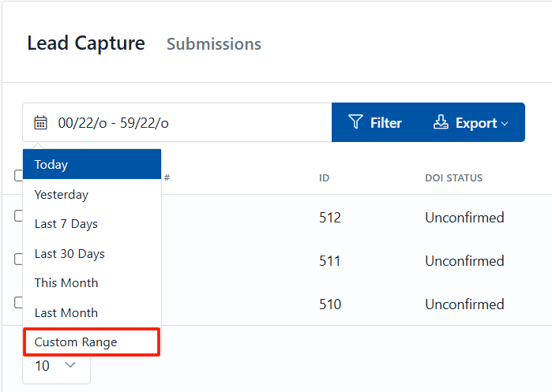
You can filter submissions by the date they were submitted. To do this, click on the Date field to select the date range you want to view.

You can filter submissions by the date they were submitted. Click on the Date field to get started— here, you can choose from preset options like Yesterday, Last 7 Days, and more. If you need a specific time frame, select the Custom Range option to pick exact start and end dates.
How to Configure Columns

This action will reveal a dropdown where you can enable or disable the toggles next to each column name to control which fields are visible in the table view.

The columns will update automatically as you toggle them on or off — no need to refresh or save.
How to Bulk Edit Submissions
To start bulk editing, tick the checkboxes on the far left side of each entry to select the submissions you want to update. To select all submissions at once, tick the checkbox at the top of the list.

Then, click the checkmark icon in the top right corner of the submissions page.

This action will reveal a dropdown with three bulk edit options:
-
Mark as Read – Marks the selected submissions as viewed, helping you keep track of what’s already been reviewed.
-
Mark as Unread – Marks the selected submissions as new or not yet viewed, useful for flagging entries that need attention.
-
Delete – Permanently removes the selected submissions from your records. Use this with care, as deleted submissions cannot be recovered.

By clicking any of these options, the selected action will be applied to all the entries you’ve chosen.
For more guides, refer to related articles below, select additional guides, or use the search bar at the top of the page. These guides will help you get the most out of your Pabau account.
Additionally, to help you fully utilize and understand your Pabau account, we recommend exploring additional guides and resources offered at the Pabau Academy. It offers in-depth video tutorials and lessons, offering a holistic learning experience that can equip you with the essential skills for achieving success with Pabau.