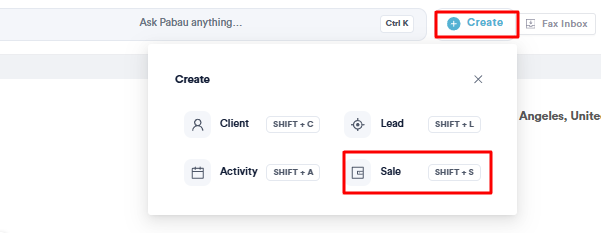
Step 1: Create a Sale
Log in to your Pabau account at the top of the screen next to the search bar, and click on the 'Create' button. Then choose 'Sale' to be directed to the Point of Sale.
Step 2: Select Client
The first step is to select the client. To do this, type your client's name into the main search bar, which is located at the top right corner. Once the search results appear, select the correct client from the list.

Step 3: Select Service
Next, on the left-hand menu, click "Services." Browse through the service categories and click on the service(s) you want to sell.

You can add multiple services, and they’ll appear in the client’s cart on the right-hand side of the screen. Once you've added all the services, review the total below the cart. Click 'Continue' to proceed to the payment options.

Step 4: Finalize Payment
At this stage, you can either select a payment method for the invoice or leave it as unpaid. The button in the bottom right corner will change based on your choice:
- If you do not add a payment method (leaving the invoice unpaid), the button will be labeled 'Save as Unpaid'.
- If you add a payment method (e.g., by entering card information, recording a cash payment, or selecting another available option), the button will be labeled 'Confirm Payment'.
Click this button in the bottom right corner to proceed with the chosen action.

Step 5: Email Invoice
On the Checkout Completed screen, you’ll see the transaction details and the invoice status. To send the invoice via email to the client, click the mail icon.

A pop-up will appear showing the client's email address.
-
If it’s correct, simply click the “Quick Send” button to send it.
-
If you need to send it to a different email, you can easily edit the address before sending.
-
To select a different invoice template, click the "Choose template" button.
-
The invoice has been successfully sent to the client via email.

Step 6: Navigate to the Client Card
To confirm that the client has received the invoice via email. Click the client's name on the checkout completed screen to access their client card

Step 7: Switch to the Communications Tab
Click on the “Communications” tab to view all messages sent to the client. This includes both sent and scheduled notifications.

By following these steps, you can successfully email the invoice to the client.
For more guides, refer to related articles below, select additional guides, or use the search bar at the top of the page. These guides will help you get the most out of your Pabau account.
Additionally, to help you fully utilize and understand your Pabau account, we recommend exploring additional guides and resources offered at the Pabau Academy. It offers in-depth video tutorials and lessons, offering a holistic learning experience that can equip you with the essential skills for achieving success with Pabau.