Step 1: Locate the Client
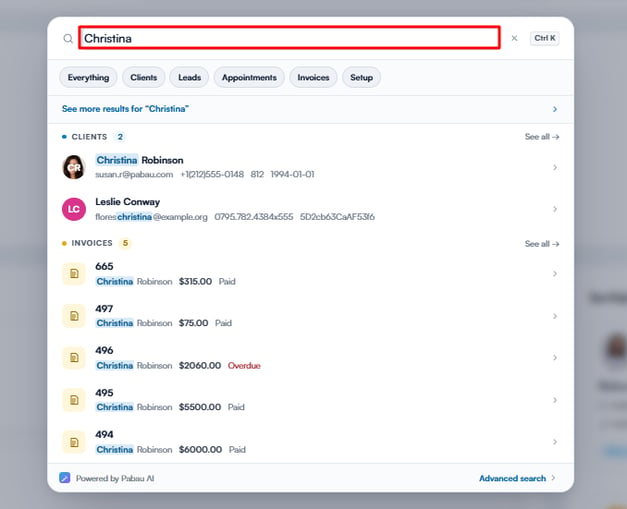
Start by searching for the client you wish to send an email to. Use the search bar at the top of the screen for quick access.
NOTE: For more information on how to manage the client card, please refer to this article.
Step 2: Access Email Communication
Once you've located the client, click on the blue plus sign button in the bottom right corner of the client card. From the menu that appears, choose "Communication" and then select "Email." Note that this option is available only for clients for whom you have an email address.

Click the details tab to expand it and it will reveal the following options:
- Sender email - The email address the message is being sent from.
- Subject - The subject line of the email, visible to clients.
- Client email - The recipient's email address.
- Appointment - The appointment you’ve linked with this email.
- Invoice - The invoice you’ve included in the email.


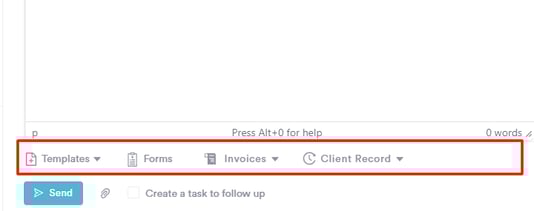
Below the text box, you have the following options:
-
Templates - Attach any of the email templates you’ve created in the system, such as pre cares, aftercares, recalls, and more. Clicking this will open a list of all available templates. Simply select one, and it will instantly appear in the text box, where you can make any changes before sending.
-
Forms - Instantly access your consent forms and questionnaires stored in the system. You can also search for forms using the search bar. Then, simply select a form, and it will be linked directly within the email for the client to complete. Clicking the link will lead them to the client portal where they can fill out the information.
-
Invoices - Access the client’s invoices, and when you click on one, a link will be inserted into the text box. This link takes the client to the client portal where they can view the invoice details and make a payment.
-
Client record - Insert information stored in the client card, including appointments, medical history, allergies, medications, invoices, and forms. Just select the relevant data, and it will be added to the email.
Step 3: Attach Multiple Files
To attach any files or photos to the email, click the paperclip icon.

A pop-up window will appear, giving you three options for adding attachments:
-
Photo Gallery: Upload images directly from the photo library in the client card.
-
Browse Pabau: Access any documents, photos, or files previously uploaded to the client’s card.
-
Upload from Computer: Select files stored on your computer to attach.
To upload multiple documents, select the "Browse Pabau" option.

From here, you can upload forms, prescriptions, documents, treatment notes, and more by simply selecting the items you want to attach.
Once the desired documents are selected, click the "Attach" button on the bottom right corner of the window to include them in the email.

The attachments will show at the bottom of the compose email screen, confirming they've been attached.

Step 4: View the Sent Email
When the email is sent, it will appear in the "Communications" tab of the client card.

By following these steps, you can easily send emails to your clients and effectively manage your client communications.
For more guides, refer to related articles below, select additional guides, or use the search bar at the top of the page. These guides will help you get the most out of your Pabau account.
Additionally, to help you fully utilize and understand your Pabau account, we recommend exploring additional guides and resources offered at the Pabau Academy. It offers in-depth video tutorials and lessons, offering a holistic learning experience that can equip you with the essential skills for achieving success with Pabau.