
Table of Contents:
1. Automatically Send Aftercare Instructions
2. Create Educational Content and Send It from the Client Card
Ensuring your clients are well-informed about post-treatment care is key to their satisfaction and the success of their treatments. Here are the two ways to send aftercare in Pabau:
Automatically Send Aftercare Instructions
To send aftercare instructions automatically once an appointment is marked as Complete, start by creating educational content or aftercare templates, then link them with the relevant service in the Client Pathway.
To associate aftercare instructions with a service, follow these steps:
Step 1: Navigate to Services
Log in to your Pabau account and go to "Setup" in the left sidebar menu. Click on "Services" under Catalogue.

Step 2: Select a Service
Find the service you want to add aftercare instructions to and click on it to open the edit service screen.
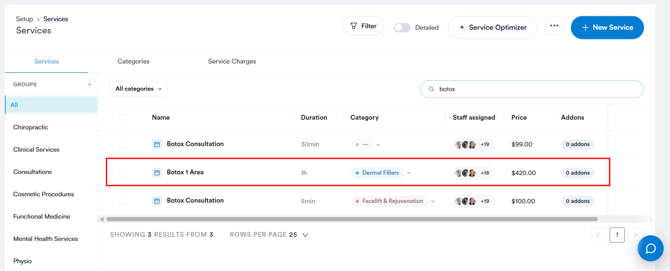
Step 3: Switch to the "Forms" Tab
Go to the “Forms” tab. Here, you’ll see three sections: Precare for messages sent once the service is booked, Forms for forms the client needs to complete, and Aftercare for messages sent after the appointment. Scroll down to the Aftercare section to add your aftercare instructions. 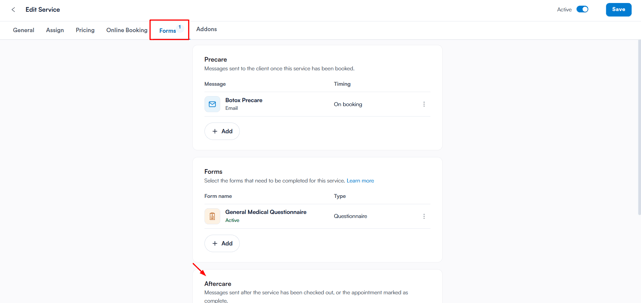
Step 4: Add Aftercare
In the Aftercare section, click “+ Add”. 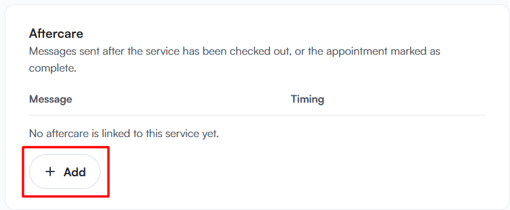
The “Add aftercare” window will open, with three tabs to choose from:
- Aftercare packs: the aftercare content you’ve created in your account
- Email: your email templates. For more information on creating email templates, see this article.
- Pabau library: ready-made templates from the Pabau library
Use the search bar to find a template quickly, then click on it to select it.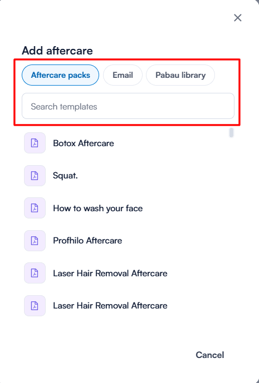
Next, choose when the aftercare should be sent:
- Immediately after: sent as soon as the appointment is marked as Complete
- A number of days after completion: enter the number of days to wait before it’s sent
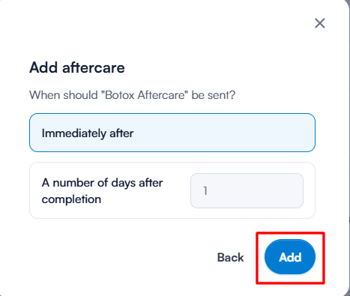
Click “Add” to link the aftercare to the service.
Step 5: Save Changes
Save the changes by clicking "Save" in the top right corner.
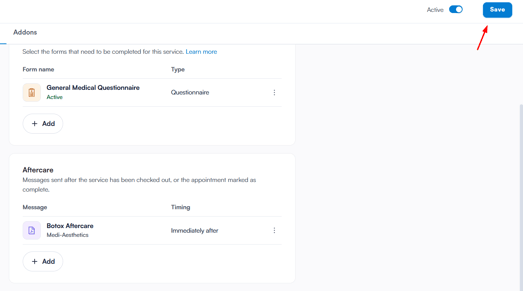
Step 6: View Aftercare
Now, every time you mark a client’s appointment as Complete they'll either receive a link to your client portal to view aftercare instructions if you created them under Education, or an aftercare email if you've set up an email template under Client Pathway.
NOTE: Aftercare is only sent when the appointment status is set to Complete. Checking out or taking payment on its own will not send it. If a client hasn’t received their aftercare, check that their appointment has been marked as Complete.
This makes the process smooth and ensures clients receive the information they need.
Create Educational Content and Send It from the Client Card
Begin by creating informative educational content that incorporates essential aftercare information. To facilitate the sharing of educational content directly from the client card, take the following steps:
Step 1: Navigate to the Client Card
Once your educational content is ready, navigate to the client card by using the search bar at the top of the screen. When you access the client card, click the "Create" button, represented as a blue plus sign.
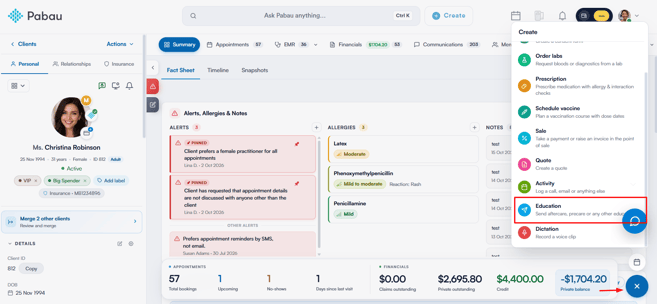
Step 2: Select Education Content
Choose the "Education" option from the menu, and select the specific educational content you wish to send to the client.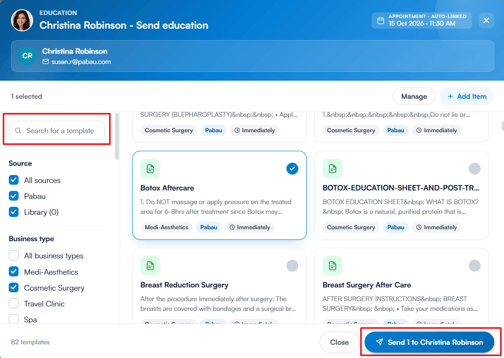
Upon completion, the patient will receive an email containing a link your client portal, providing them with access to the educational content.
By incorporating these actions into your workflow, you can provide clients with valuable information directly from the client card, fostering a professional and informed client experience.
For more guides, refer to related articles below, select additional guides, or use the search bar at the top of the page. These guides will help you get the most out of your Pabau account.
Additionally, to help you fully utilize and understand your Pabau account, we recommend exploring additional guides and resources offered at the Pabau Academy.