
This report is particularly handy for clients with multiple appointments, allowing you to generate and print a comprehensive list of all their scheduled visits.
Step 1: Navigate to Analytics
First, log into your Pabau account. From the left sidebar menu, navigate to Analytics, then click on Reports. On the "Try our new suite of reports" banner, click "Try it now" to open the new reports view.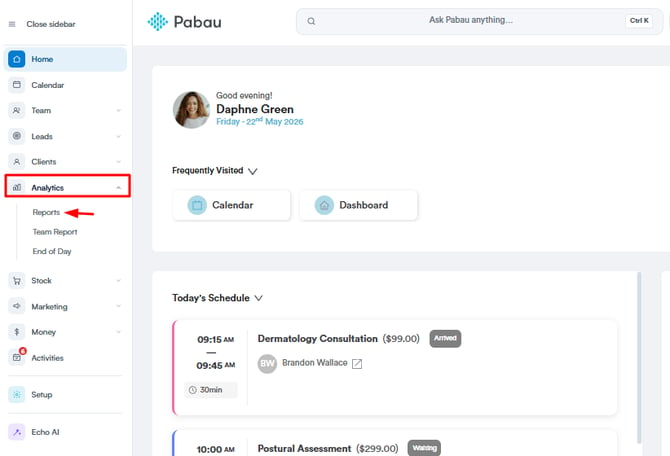
Step 2: Choose or Create a Report
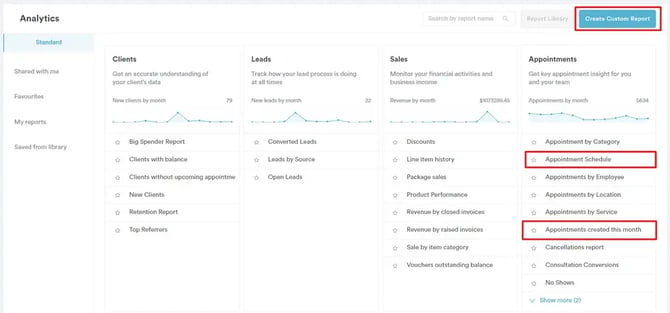
You can either use one of the pre-built reports, such as "Appointment Schedule" or "Appointments created this month", as the basis of your report, or create a custom report from scratch. You'll find the pre-built reports in the Appointments section of the reports view, or by using the search bar. They open in the report viewer, where you can adjust the filters — and once you change something, a "Save as" button appears, letting you save your own copy.
To create a custom report, click "Build a custom report", select Appointments as the data object, then click "Start from scratch".
Step 3: Apply Filters
Each filter in the report consists of four elements: object, field, operator, and value.
The object defines what you're looking at, the field specifies the attribute you're interested in, the operator dictates how the field should relate to the value, and the value is the specific data point you're using for comparison.
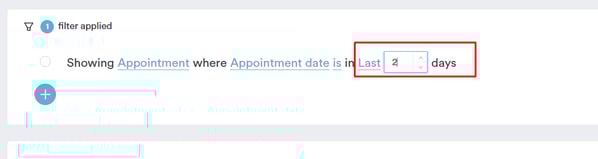
Each of these elements can be customized by clicking on them and choosing a different option. The results at the bottom of the screen refresh automatically as you adjust the filters.
Example: In a custom appointment report, you might set the filters to show:
- Appointments occurring this month.
- Appointments for a specific client, such as Nicole Davies.
Your filters might look like this:

- Object: Appointments, Field: Appointment Date, Operator: Is, Value: This Month
- Object: Client, Field: Client Name, Operator: Is, Value: Nicole Davies
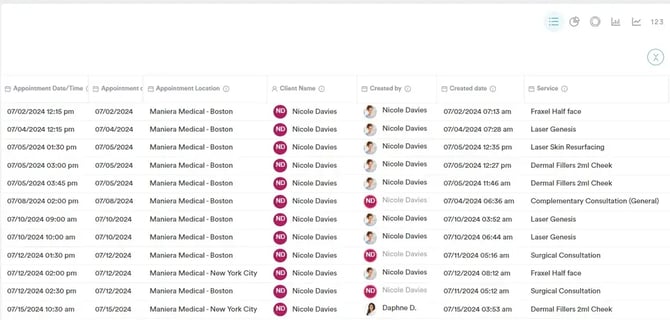
At the bottom of the screen, you'll see the data that matches these filters, such as all of Nicole Davies' appointments for the current month.
Step 4: Customize and Save the Report
You can further customize the report by selecting specific services or employees, and by adding or removing columns using the Fields sidebar on the left — search for a field to add it as a column, and drag fields to reorder them.
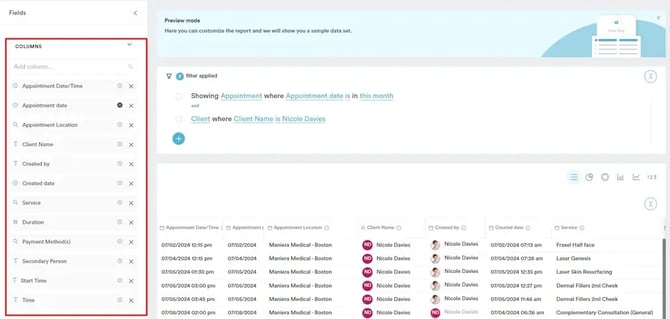
Add a name for the report at the top of the page (you can also add a short description and choose a folder), then click on "Save Report" to save it.
.webp?width=670&height=319&name=image-png-Jul-23-2024-09-11-08-0293-AM%20(1).webp)
Once a custom report is saved, you will find it under "My reports" in the left sidebar of the reports view.
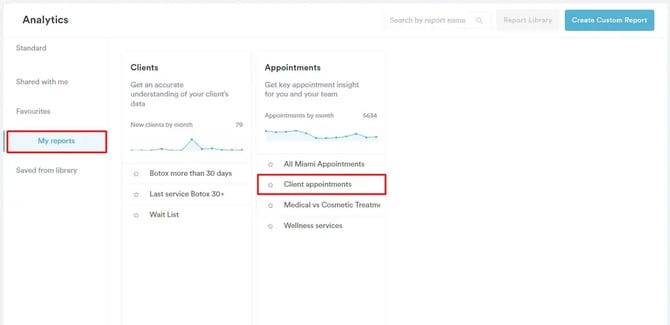
Step 5: Print and Export the Report
To print the report, click the three-dot icon in the top-right corner of the screen and select "Print report (Snapshot)" — this opens your browser's print dialog with the report laid out for printing. The same menu also lets you add the report to your favourites, clone it, export it, or delete it.
To export the report, select "Export" from the three-dot menu, then choose a format in the window that appears — Excel (.xlsx), CSV (.csv), or PDF (.pdf) — and click "Export".
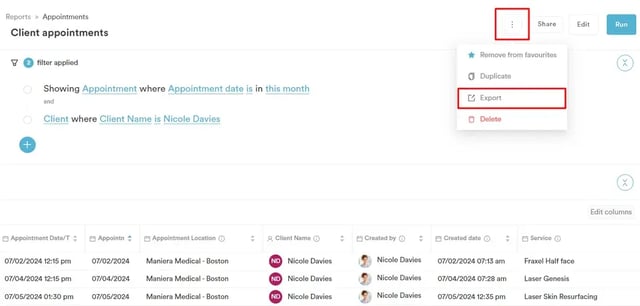
The export is processed in the background — a notification will confirm it has started, with a link to the Exports page, where you can download the file once it's ready. The file isn't downloaded straight to your device.
By following these steps, you can easily generate, customize, and print detailed appointment reports for your clients.
For more guides, refer to related articles below, select additional guides, or use the search bar at the top of the page. These guides will help you get the most out of your Pabau account.
Additionally, to help you fully utilize and understand your Pabau account, we recommend exploring additional guides and resources offered at the Pabau Academy. It offers in-depth video tutorials and lessons, offering a holistic learning experience that can equip you with the essential skills for achieving success with Pabau.