In Pabau, you can easily raise partially paid invoices to reflect instalments, or split payments. Whether a client is paying part of the total upfront or settling the balance over time, Pabau helps you keep everything accurate and organized.
There are two main ways to raise a part-paid invoice:
1. From the Calendar (Appointment-Based Invoicing)
If the partial payment is tied to a specific appointment, you can generate the invoice directly from the calendar.
2. From the Point of Sale (POS)
If you’re selling a service, product, or package outside of an appointment, you can create the invoice from the POS screen. Add the items to the cart as usual, then proceed to checkout and enter the partial amount paid by the client.
How to Raise a Part-Paid Invoice from the Calendar
Step 1: Navigate to the Calendar
Start by logging into your Pabau account. Then, navigate to the Calendar from the left sidebar menu to view your scheduled appointments.

Step 2: Select Appointment
Next, locate the appointment you want to raise an invoice for and click on it to view the available actions.

Step 3: Proceed to Checkout
To proceed with the payment, click the "Checkout" button.

The client’s name and the services linked to the appointment will automatically appear on the right-hand side.

If there's nothing more you'd like to add to the invoice, click the Continue button on the bottom right corner.

Step 4: Select Payment Method
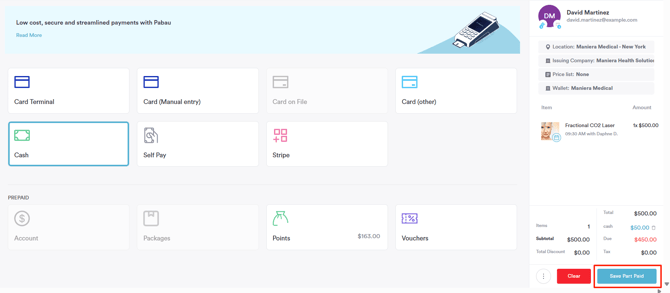
At this stage, all available payment methods will be displayed. Select the client’s preferred payment method to continue.

Once you select a payment method, a pop-up will appear allowing you to enter the amount the client wishes to pay.
- By default, the full invoice amount will be selected unless you adjust it before clicking Collect.
- You can either choose from the predefined amounts or enter a custom value in the Amount field.

Once you've adjusted the amount, click the Collect button to proceed.
Step 5: Save as Part-Paid
After selecting the amount the client will pay, the details on the right-hand side will update automatically, and the button in the bottom-right corner will change to Save as Part-Paid. Click this button to finalize the transaction.
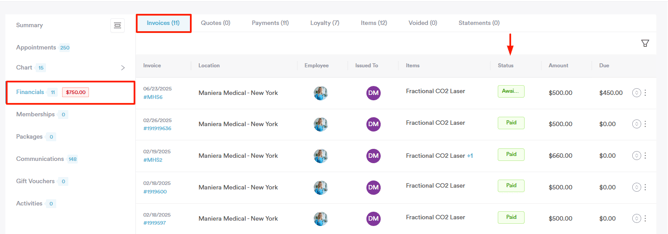
Step 6: Navigate to the Client Card
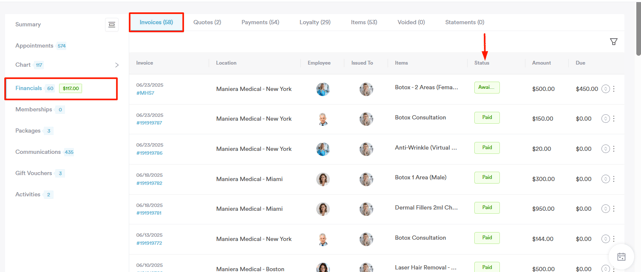
To view the part-paid invoice, go to the client’s card and switch to the Financials tab. Under the Invoices sub-tab, you’ll see the most recent invoice marked as Awaiting Payment.
How to Raise a Part-Paid Invoice from the Point of Sale (POS)
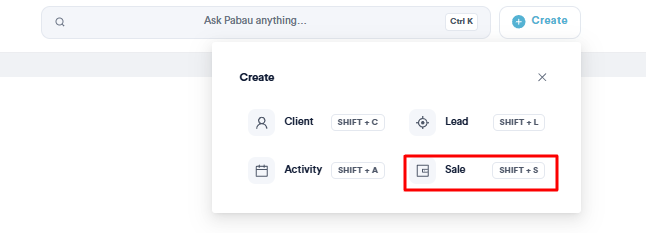
Step 1: Navigate to the Create Button
Navigate to the Create button located at the top of the screen next to the search bar. It will reveal 4 available options. Proceed to click Sale to access the Point of Sale (POS).
Step 2: Select Client
Once you open the Point of Sale, start by selecting a client in the top-right corner of the screen by typing their name into the search bar.

Step 4: Select Service/Product
Next, choose the service, product, or any other item the client wishes to purchase. These options are grouped on the left-hand side of the screen.
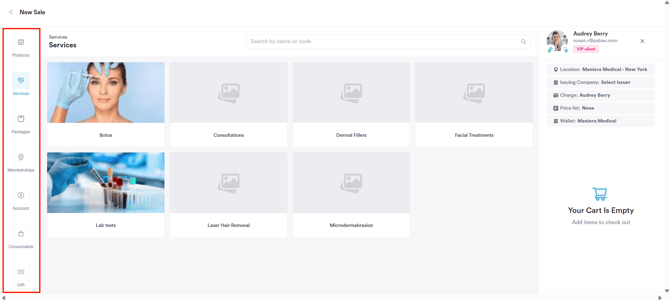
For example, if you're selecting a service, click on Services to view all service categories. Select a category to see all services listed within it. Once you choose a service, it will appear on the right-hand side in the cart.
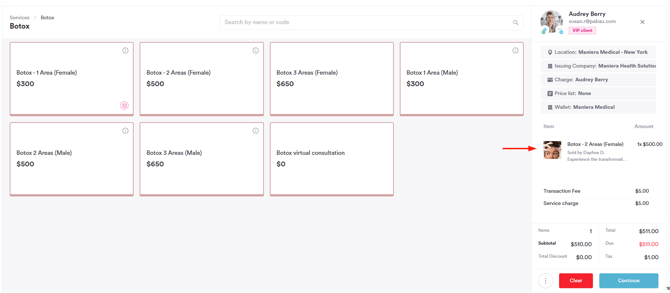
Here, you’ll also see the full breakdown, including the price, any applicable taxes, service fees, and the total amount due.
Step 5: Proceed to Payment
Once you’ve added all the necessary items to the cart, click the Continue button located in the bottom-right corner to proceed to the payment step.

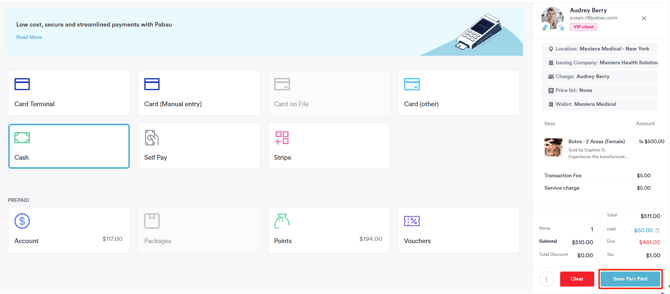
Step 6: Select Payment Method
You’ll now see a list of all available payment methods. Click on the one the client wishes to use to complete the purchase.

Once you select a payment method, a pop-up will appear allowing you to enter the amount the client wishes to pay.
- By default, the full invoice amount will be selected unless you adjust it before clicking Collect.
- You can either choose from the predefined amounts or enter a custom value in the Amount field.

Once you've adjusted the amount, click the Collect button to proceed.
Step 6: Save Part-Paid
After selecting the amount the client will pay, the details on the right-hand side will update automatically, and the button in the bottom-right corner will change to Save as Part-Paid. Click this button to finalize the transaction.
Step 7: Navigate to the Client Card
To view the part-paid invoice, go to the client’s card and switch to the Financials tab. Under the Invoices sub-tab, you’ll see the most recent invoice marked as Awaiting Payment.
For more guides, refer to related articles below, select additional guides, or use the search bar at the top of the page. These guides will help you get the most out of your Pabau account.
Additionally, to help you fully utilize and understand your Pabau account, we recommend exploring additional guides and resources offered at the Pabau Academy. It offers in-depth video tutorials and lessons, offering a holistic learning experience that can equip you with the essential skills for achieving success with Pabau.