Table of Contents:
1. How Room Availability is Checked
2. Configuration Requirements
3. How Room Setups Affect Online Booking Availability
To enhance the reliability of your booking process, Pabau's Online Booking portal checks for room availability in addition to staff availability.
This ensures that when a client books a service that requires a specific room (like a consultation room or a laser room), the system only shows time slots where both the staff member and the necessary room are free. This prevents scheduling conflicts and ensures a smooth client experience from booking to arrival.
How Room Availability is Checked
When a client uses your Online Booking portal, Pabau automatically cross-references three key pieces of information before displaying an available time slot:
1. Staff Availability
Checks the team member's schedule to ensure they are available and have a working shift created for that time. A staff member is only considered available for online bookings if they have a shift covering the requested appointment time.
2. Service-Room Link
This is the crucial connection between a service and the physical room(s) where it must be performed. For the online booking portal to check for room availability, it first needs to know if a service requires a room and, if so, which one.
3. Room Availability & Location:
This final check confirms two things: that the required room is free during the selected time, and that it physically exists at the clinic location the client chose in the online booking portal.
This is a critical step that prevents impossible bookings (e.g., offering a time slot for a service at your "Downtown" clinic when the required room is only available at your "Uptown" clinic).
Configuration Requirements
For the automatic room check to function, you must have the following configured in Pabau:
1. Staff Availability
Create Shift For Staff
To ensure a staff member has a shift created follow the steps below:
Step 1: Navigate to Team
Log in to your Pabau account, and in the left sidebar menu, go to Team, then click on the "Schedule."

Step 2: Select Slot for Shift
Staff members are listed on the left side, and the dates of the week are displayed at the top.
Click on the desired slot to initiate the shift creation.

Create a shift by entering start and end times or choosing from default templates. Alternatively, click the expand button in the top right corner for more options.

In the "Create a Shift" menu, input:
- Start and end of the shift (date prepopulated based on the selected slot - Mandatory field)
- Location (Mandatory field, defaults to your default location)
- Services included in the shift (Optional, defaults to All services)
- Assign a room (Optional)
- Additional notes (Optional)
Click on Create Shift to confirm and schedule the shift.

NOTE: Shifts featuring all services will be highlighted in green, whereas shifts with only select services will be displayed in pink.
2. Service-Room Link
Assign a Room to a Service
This method is best when you are focused on a single service and want to define its requirements.
Step 1: Navigate to Setup
Navigate to the Setup button located at the bottom left corner of the screen to access the "Setup" page. Click on the "Services" tab located under the Catalogue section.

Step 2: Access Services
Click on the "Services" tab located under the Services section. On this page, you'll view a list of all services you've created in the system. Use the search bar to find the service you wish to edit.

Step 3: Select Service
Click on the service name to view the configuration settings.
Step 4: Assign Room
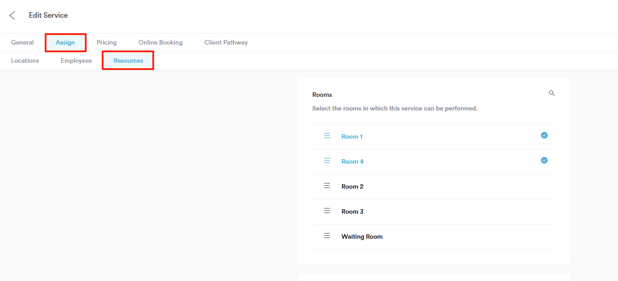
Switch to the "Assign" tab and then select the "Resources" sub-tab where you can directly change the room(s) required for this specific service to be performed.
Tick or untick the rooms to define where this specific service can be performed.
Assign a Service to a Room
This method is useful when you want to see all the services that are linked to a single room.
Step 1: Navigate to Setup
Navigate to the Setup button located at the bottom left corner of the screen to access the "Setup" page.

Step 2: Access Rooms
Click on the "Catalogue" section to reveal the "Rooms" tab to access the rooms you've created in the system.

Step 3: Review Services Assigned to Room
First, select the room you wish to configure. The "Details" tab will open by default.
In this tab, you will find the "All services can be performed in this room" toggle. This switch controls how services are assigned:
- When this toggle is ON: All services in your system can be performed in this room.
- When this toggle is OFF: A new option will appear, allowing you to manually select only the specific services that are performed in this room.

3. Room Availability & Location
Assign a Location to a Room
Step 1: Navigate to Setup
Navigate to the Setup button located at the bottom left corner of the screen to access the "Setup" page.

Step 2: Access Rooms
Click on the "Catalogue" section to reveal the "Rooms" tab to access the rooms you've created in the system.
Step 3: Configure Location
Navigate to the "Locations" tab to see a list of your available clinics. From here, select the location you want to associate with this room.

How Room Setups Affect Online Booking Availability
The system behaves differently based on how you have configured the service. Here are the common scenarios:
1. Service Requires One Specific Room
If a service is linked to a single room at the booking location, Pabau will check for both the staff's availability and that specific room's availability.
- Result: A time slot will only be shown if both the staff member and the room are available for the entire duration of the appointment.
- Example: A client wants to book a 60-minute service at 2:00 PM. The staff member is free from 2:00 PM to 3:00 PM, but the required room is only free from 2:00 PM to 2:45 PM. In this case, the 2:00 PM time slot will not be shown because the room is not available for the full 60 minutes.
2. Service Requires Any One of Multiple Rooms
If a service is linked to multiple rooms (e.g., can be performed in "Consult Room 1" or "Consult Room 2"), Pabau checks if the staff member is free and if at least one of the associated rooms is available.
- Result: A time slot will be shown if the staff member and at least one of the rooms are available. When the client completes the booking, Pabau will randomly assign one of the available rooms to the appointment. If no rooms are free, the time slot will be hidden.
3. Service Requires No Room
If a service has no rooms associated with it for the booking location, the system works as it always has.
- Result: Availability is based only on the staff member's schedule.
NOTE: The system will only consider rooms that are available at the location the client selected in the booking portal. If an appointment is being booked for "Location A," but the service's required room is only assigned to "Location B," the time slot will not be shown.
For more guides, refer to related articles below, select additional guides, or use the search bar at the top of the page. These guides will help you get the most out of your Pabau account.
Additionally, to help you fully utilize and understand your Pabau account, we recommend exploring additional guides and resources offered at the Pabau Academy. It offers in-depth video tutorials and lessons, offering a holistic learning experience that can equip you with the essential skills for achieving success with Pabau.