Step 1: Navigate to Leave Policies
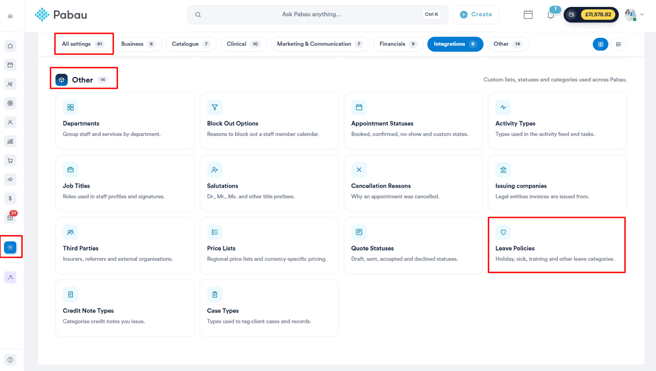
Start by logging into your Pabau account. Once you're in, click on Setup in the left sidebar menu, then click on All Settings. Scroll down to the Other section and select Leave Policies.
Overview of the Leave Policies Page and Available Actions
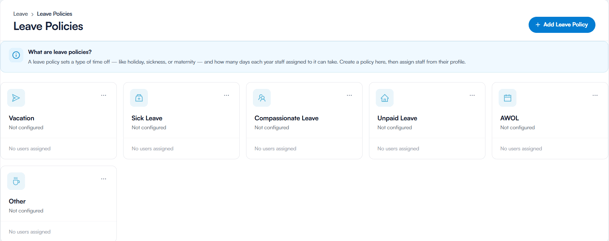
Leave policies define the types of time off available to your staff — such as holiday, sickness, or maternity leave — and how many days each year staff assigned to them can take. This guide walks you through everything you can do in the Leave Policies section.
Leave Policies Overview
Once inside, you'll see all your existing leave policies displayed as cards. Each card shows the policy name, its configuration status, and how many users are assigned to it.
Add a New Leave Policy
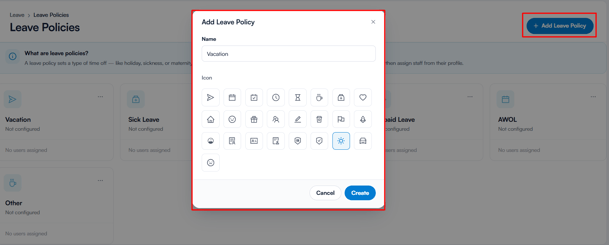
To create a new leave policy, click the + Add Leave Policy button in the top right corner. A pop-up window will appear where you need to fill in two things:
- Name — Enter a name for the policy (e.g. Vacation, Sick Leave, Maternity Leave).
- Icon — Choose an icon that best represents the policy from the selection of available icons, such as a calendar, clock, heart, home, gift, flag, and more.
Once you've entered the name and selected an icon, click ''Create''.
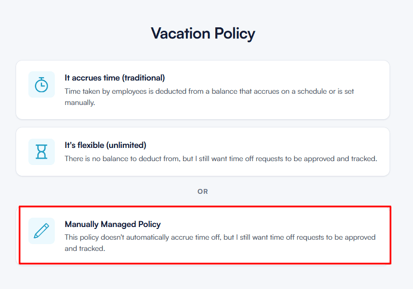
Choose a Policy Type
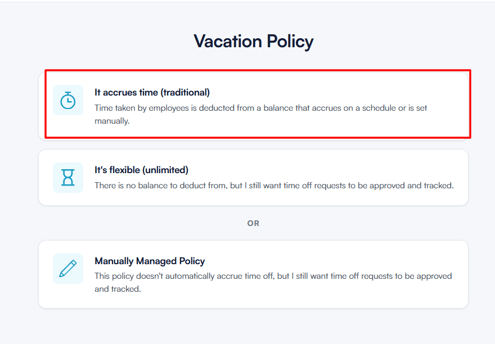
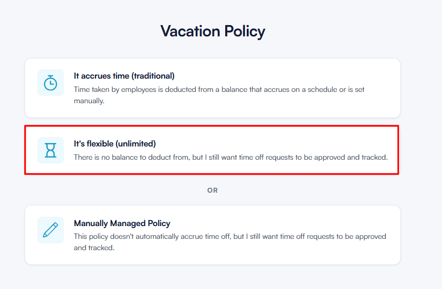
After creating the policy, you'll be redirected to a page where you need to select how this policy works. There are three policy types to choose from:
1. It accrues time (traditional)
This option is best suited for policies where employees build up a leave balance over time, such as holiday or vacation. Time taken is deducted from a balance that either accrues on a set schedule or is configured manually.
Once selected, you'll be guided through a three-step setup:
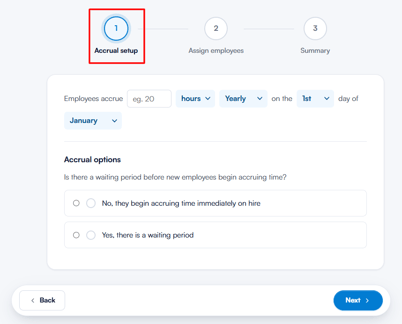
- Accrual Setup - Define how and when employees accrue time, such as the number of hours and the frequency (e.g. 20 hours yearly, reset on the 1st of January). You'll also specify whether new employees begin accruing time immediately upon hire or after a waiting period.
-
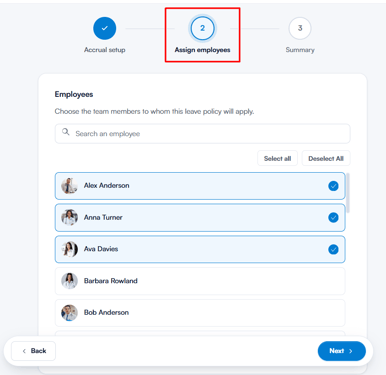
Assign Employees - Select the team members this policy applies to. You can search for employees by name or use the Select All / Deselect All options.
-
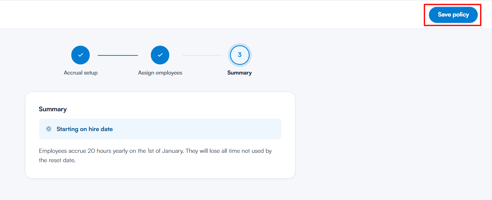
Summary - Review the full policy configuration before saving. Once you're satisfied, click ''Save policy'' in the top right corner to confirm.
2. It's flexible (unlimited)
This option is ideal for policies where no balance needs to be tracked, such as study leave or volunteer days. Employees can take time off without a set limit, but all requests will still require approval and will be tracked.
Once selected, you'll be guided through the following:
- Assign Employees — Select the team members this policy applies to.
- Summary — Review and confirm the policy is set to ''Flexible (unlimited)'', along with the number of assigned employees. Click ''Save policy'' to finish.
3. Manually Managed Policy
This option gives you full control over each employee's leave balance, which you manage directly rather than having it accrue automatically. All time off requests will still be approved and tracked.
Once selected, you'll be guided through the following:
- Assign Employees — Select the team members this policy applies to.
- Summary — Review and confirm the policy is set to ''Manually managed'', along with the number of assigned employees. Click ''Save policy'' to finish.
Edit or Delete a Leave Policy
To edit or delete an existing policy, find its card on the Leave Policies page and click the three-dot menu (...) in the top right corner of the card. You'll see two options:
- Edit — Opens the policy so you can update its name, icon, or configuration.
- Delete — Permanently removes the policy. Use this with caution, as it cannot be undone.
-4.png?width=289&height=207&name=Screenshot%20(1)-4.png)
Alternatively, you can click directly on the policy icon on the card to open it for editing.
By using these tools, you can efficiently manage leave policies and ensure your staff absence records remain clear, accurate, and up to date.
For more guides, refer to related articles below, select additional guides, or use the search bar at the top of the page. These guides will help you get the most out of your Pabau account.
Additionally, to help you fully utilize and understand your Pabau account, we recommend exploring additional guides and resources offered at the Pabau Academy. It offers in-depth video tutorials and lessons, offering a holistic learning experience that can equip you with the essential skills for achieving success with Pabau.