Step 1: Accessing Client Notifications Settings
Begin by logging into your Pabau account. Navigate to the Setup section in the left sidebar menu. Within the Marketing & Communication category, then proceed to choose "Client Notifications."

Step 2: Notification Categories
Client notifications are categorized into tabs such as Appointments, Engagement, Sharing, Classes, and Other, each containing various notification types serving specific purposes. If you intend to customize notifications across all types, replicate the process for each category.
Step 3: Designing Your Template
Select the specific notification you wish to customize. In the Builder section on the left, choose the “Custom” tab, then click on “Edit” to start designing the template.
By default, the builder includes the standard template, allowing you to customize and adjust its components to suit your preferences. Alternatively, you can opt for a complete redesign by following the steps outlined below.
Upon entering the design editing page, you'll find the Content tab on the right, offering a range of elements to incorporate into your template:

-
Columns: The Columns component enables the creation of different content layouts. For example, you can set up a column comprised of four differently-sized boxes. This allows you to drag and drop various elements into each box, such as an image in the first, a button in the second, or text in the third.

The column serves as the foundation for elements like buttons, text, headings, and images. To customize the column's background, click on the gray space adjacent to it. To modify the content within the column, simply click on it to open the editing menu for that specific element on the right.
-
Heading: For headings, you can drag and drop them onto the canvas directly, although they default to a center position. If you want to place them elsewhere, first add a column with multiple boxes, then move the heading accordingly. To edit the heading, click on it, and in the toolbar, you can adjust the text, font style, add links, emoticons, or merge tags.
Additionally, the Smart Headings option uses AI to generate headings in a tone of your preference.

-
Text: The text component enables the addition of text blocks to your template. To edit the text, click on the element and use the toolbar to adjust font styles, add links, emoticons, or merge tags.
Moreover, the Smart Text option utilizes AI to enhance text quality, providing a range of improvement options.

-
Image: The image component allows uploading images into your template. Additionally, you can utilize the Magic Image feature, which employs AI to generate images automatically.
-
Button: The button component enables the addition of buttons to your template, serving as a call to action. Click on the button to input text. Additionally, the Smart Buttons option, located on the right, uses AI to suggest button text. You can also select the desired tone for the button text.

In the Action section, you can specify the action triggered when the client clicks on the button and add the destination link accordingly. Under Special Links, various links generated from within Pabau are available for performing different actions.


-
Divider: Insert dividers to visually separate sections within your template.
-
HTML: The HTML component enables you to seamlessly integrate HTML code from your existing template into the custom email template.
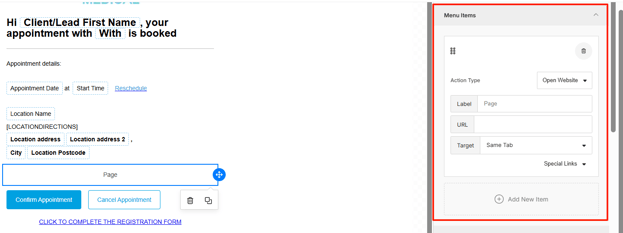
- Menu: With the menu component, you can construct menus to be included in the template. To add an item, simply click on "Add New Item." Then, fill out the text, select the action type, and provide the URL related to the action. You can add additional items by clicking "Add New Item" again.
The Blocks tab functions similarly to Columns, enabling you to incorporate columns into the template.
Within the Body tab, you can customize aspects such as text color, background color, and font family, which will be applied to the entire template. Note that altering these elements within individual components will not affect the general settings.
In the Email Settings section, you can include preheader text, providing a brief summary that follows the subject line when viewing an email in the inbox.
Step 4: Viewing Desktop and Mobile Views
Toggle between Desktop and Mobile views at any point in the design process by selecting the respective tabs on the right-hand side.
Step 5: Reordering Components
Ensure optimal layout by rearranging components as needed. Simply hover over the desired component, click on the arrow icon, and drag it to the preferred position within the template.
Step 6: Saving Your Template
Upon completion of the design phase, click “Save” located in the top right corner. Preview your template using the Client Notifications feature, then click “Save” once again to finalize and activate your custom email client notifications.
For more guides, refer to related articles below, select additional guides, or use the search bar at the top of the page. These guides will help you get the most out of your Pabau account.
Additionally, to help you fully utilize and understand your Pabau account, we recommend exploring additional guides and resources offered at the Pabau Academy. It offers in-depth video tutorials and lessons, offering a holistic learning experience that can equip you with the essential skills for achieving success with Pabau.