How to Create an Email Campaign for Leads
In this article, we'll guide you through the steps on how to create an email campaign for leads.
Step 1: Navigate to Broadcasts
Step 2: Review Existing Campaigns
On the left side, view existing newsletter campaigns categorized by status - Ongoing, Draft, and Completed. In the center, see campaign details such as status, name, subject, sent date, recipients, and performance statistics.

Step 3: Initiate a New Email Campaign
To start a new email campaign, click "Create Campaign" in the top right corner. In the "Select a channel" window, choose "Email".

Step 4: Campaign Creation Sections
The newsletter creation page is divided into four parts: Settings, Design, Audience, and Send or Schedule.
Settings Tab: Provide the campaign title (for internal purposes) and the email subject (visible to leads). Choose the campaign type: Standard (one-time) or Automated.

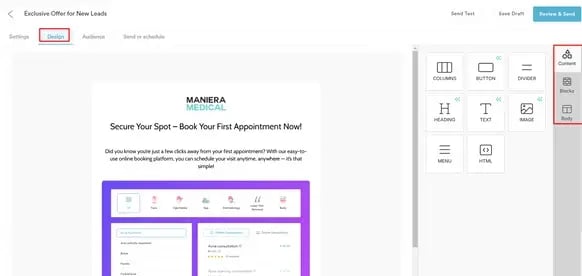
Design Tab: Choose a preexisting template or code your own.
- If using a preexisting template, click on the desired template, then click "Next" in the top right corner.

Add a new component (columns, heading, text, image button, divider, HTML code, or a menu) by closing the editing menu (clicking the X button or outside the template).

Example text for email campaign to leads
Here’s a suggested example for your lead email campaign text.
Subject: Don't Miss Out on Our Exclusive Offer, Client/Lead First Name! 🎉
Email Body:
Hi [Client/Lead First Name],
We hope you're doing well! 🌟
We’re excited to offer you a special promotion on our services at [Company Name]. As a valued lead, we want to make sure you don’t miss out on this opportunity.
🎁 Exclusive Offer Just For You
Enjoy a 30% discount on our top services, including [service name] and [service name 2]. Book your appointment today and save!
📅 Book Your Appointment Now!
Booking is easy with our online platform. Click the link below to secure your spot.
[Insert Booking Link]
This exclusive offer is only available for a limited time, so don't wait! If you have any questions, feel free to reply to this email, and we'll be happy to assist you.
Best regards,
[Your Company Name] Team
Audience Tab: Once you access the Audience tab, a popup will appear asking you to choose the audience: Clients or Leads. After selecting "Leads," you'll be able to decide who will receive your email campaign.

You can choose to send it to all leads, or filter them based on specific criteria, such as lead status or other custom attributes.

If you wish to send it only to a specific group of leads, click on "Lead groups" and select the group you need.

NOTE: To create a new lead group, follow the steps provided in this article.
Send or Schedule Tab: Decide to send the campaign immediately by clicking "Send Campaign Now," or schedule it by expanding the "Schedule campaign" field and selecting the date and time.
Confirm by clicking "Scheduled" or cancel the schedule by clicking "Cancel Schedule."
To send a test email, click "Send Test" in the top right corner.
Step 5: Campaign Completion
The campaign will appear in the Newsletter tab on the Broadcasts page, initially marked as "Processing" until sent, then changing to "Sent" status.
By following these steps, you'll be able to successfully create and launch your lead campaign.
For more guides, refer to related articles below, select additional guides, or use the search bar at the top of the page. These guides will help you get the most out of your Pabau account.
Additionally, to help you fully utilize and understand your Pabau account, we recommend exploring additional guides and resources offered at the Pabau Academy. It offers in-depth video tutorials and lessons, offering a holistic learning experience that can equip you with the essential skills for achieving success with Pabau.