Step 1: Access Automation Section
Log in to your Pabau account, and navigate to the Marketing section in the left sidebar menu. Click on "Automation" to proceed.
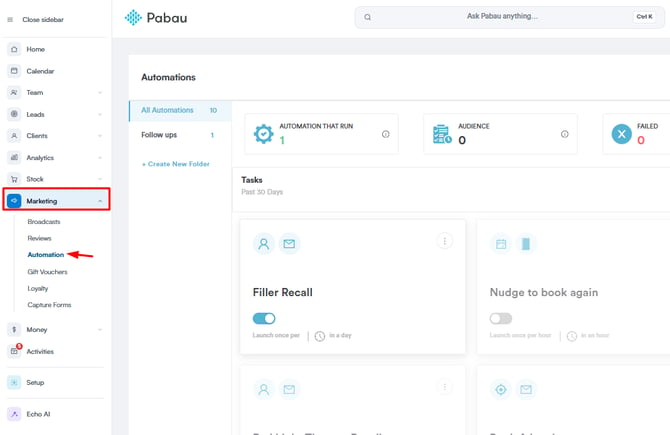
To initiate the creation of a new automation, click the "Create Automation" button located in the top right corner.
Step 2: Choose Automation Template or Start from Scratch
Choose from existing templates, and use the left sidebar's "Filter By Automation Type" section to refine your selection. Alternatively, start from scratch. Whether using templates or starting from scratch, the setup steps remain the same.

Step 3: Choose Automation Filter
When starting from scratch, choose an automation filter based on clients, leads, appointments, invoices, or line items. Each filter serves specific purposes related to the respective Pabau features. For instance:
- Clients: Automation related to fields visible in the client card or patient profile. Use this filter to pull information like the current account balance.
- Leads: Automation associated with fields visible in the lead profile. Utilize this filter to extract information such as the lead stage or lead name.
- Appointments: Automation linked to client appointments. Employ this filter to retrieve details like the appointment status or the service related to the appointment.
- Invoices: Automation connected to invoices issued to clients. Use this filtering to pull information like the invoice total or VAT percentage.
- Line Items: Automation tied to items sold to clients. Utilize this filter to extract details about specific services or packages sold.
NOTE: Conditions can be added to filter the audience based on various components, even if a specific object is selected.
Step 4: Select Automation Type
Next, choose the automation type: Email, SMS, or activity. For this example, we'll focus on email automations.
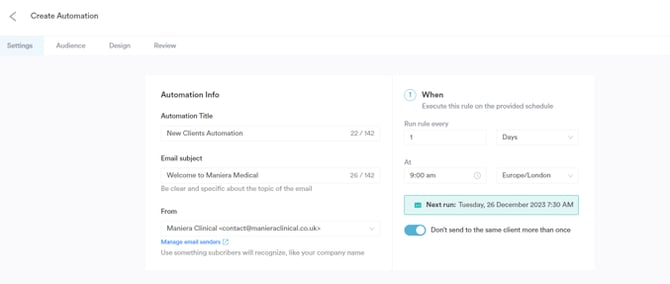
Step 5: Specify General Automation Information
Under "Settings," provide the internal automation title, email subject, sender name, and email address. Schedule the automation's frequency and prevent multiple sends to the same client, especially for special offers or non-repetitive information.
Step 6: Select Audience
In the "Audience" tab, choose an existing audience or create a new one by specifying conditions. We can specify one or more conditions to filter our desired clients or leads to form the list.

Step 7: Design Your Automation
In the "Design" tab, customize your email using templates and the drag-and-drop editor. Modify components such as columns, headings, text, images, buttons, dividers, HTML code, and menu.

NOTE: The templates you've created on your own will be added in the Custom Templates category of the Design tab, right below the Premium templates.
Step 8: Review and Schedule
Review your automation, make necessary changes, and schedule it for sending based on your preferred timing.
By following these steps, you can efficiently create and customize automations in Pabau.
NOTE: You can also learn about this topic by watching a lesson on Pabau Academy.
In addition, we suggest reading our Automations article for a more in-depth exploration of this topic.
For more guides, refer to related articles below, select additional guides, or use the search bar at the top of the page. These guides will help you get the most out of your Pabau account.
Additionally, to help you fully utilize and understand your Pabau account, we recommend exploring additional guides and resources offered at the Pabau Academy. It offers in-depth video tutorials and lessons, offering a holistic learning experience that can equip you with the essential skills for achieving success with Pabau.