Before sharing your form, it’s important to customize its settings to fit your clinic’s needs. From notification preferences to privacy options, these settings help you control how the form behaves and interacts with your system.
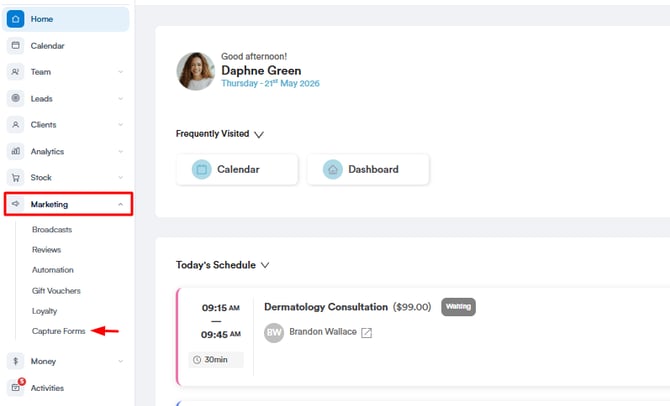
Step 1: Access "Capture Forms"
Start by logging into your Pabau account using your login credentials. Then, navigate to the Marketing section located on the left sidebar menu and click to expand it. The "Capture Forms" tab will be revealed.
Step 2: Navigate to the Forms Tab
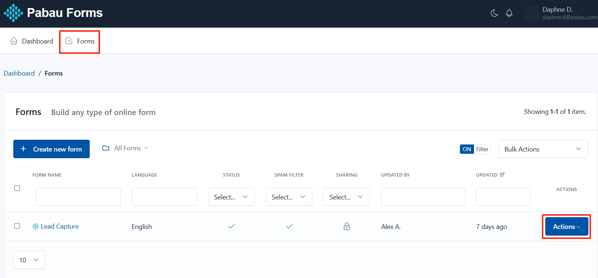
Step 3: Access Form Settings
The actions button will reveal the "Settings" option. Select to proceed with the configuration.

Step 4: Configure Settings
On this stage, you will view 3 tabs at the top of the screen. Let's start configuring the settings on the first tab. You will view the following options:
- Form Name: Displayed on the application administration pages and as the title of the form public page.
- Slug: This option allows you to customize your forms URLs. By default, slugs are created based on the name of the Form, but you can edit it here.
- Status: Indicates if the form is being shown. If set to Off, the form is no longer displayed to the user and instead appears a message indicating that the form is disabled and does not accept more submissions.
- Language: This language will be used to display form messages. For example, validation errors.
- Text Direction: Allows you to set the direction in which the values appear in the form. By default, the text direction is Left to Right (LTR). But, you can change the text direction from Right to Left (RTL) from the dropdown.
- Message: Sets the message to be displayed to the user when the form has been disabled (Off).
- Schedule Form Activity: Set the start an end date in which the Form must be enabled (ON) Before and after it, the form will be automatically disabled.
- Spam filter: Indicates if the form should use the honeypot technique to filter submissions made by real users from the ones made by bots (spam).
- Authorized URLs: To prevent a third party from embedding your Form on their own website, your form can be restricted to a list of URLs that you authorize.
- URLs: The domain names where the form can be embedded.
- Unauthorized Url Message: Enter a custom error message to be displayed when the form widget is embedded in an unauthorized domain.
- No validate: This option allows you to disable the Client-Side validation (by the browser). Take into account that the Server-Side validation won't be disabled. It's recommended to have this option in Off.
- IP Tracking: When this option has been enabled, IP addresses won't be collected by the application. You can enable the Browser Geo-location to collect the Sender information with consent.
- Analytics: Enable/disable monitoring the form by the application. When, IP Tracking has been disabled, Form Stats will be collected with IP anonymization.
- Autocomplete: Enables the browser's autocomplete to forms that have been previously filled. By default, this setting is ON.
- Save & Resume later: When this option has been enabled, the browser automatically will store the information entered by a user on each field to be resumed later, even if the user close the browser.

Step 5: Configure Confirmation Settings
This tab allows you to configure four key aspects of the submission confirmation:
- Inform to the user immediately: Whether using a text message (alone or above the form) or redirect the user to another web page. In the first case, you must type the message to display and in the second, the full URL of the web.
- If you'd like to make the message more personal, you can insert field variables (placeholders) into a confirmation message or confirmation URL, in similar way as a confirmation message by email. Once the form has been submitted, the placeholder will be replaced with the information placed in that field.
- To Redirect the browser to another page, you can set up 3 additional parameters
- Show Message and Redirect After: Here you can enter a number of seconds to start the redirection.
- Append Submission Data to URL: This is useful for small forms when you want to append all the collected data to the URL.
- Replace Field Name with Field Alias when it's available: If this option has been enabled, the collected data will be appended using the Field Alias.
- Conditional Logic With this tool you can customize the way that you handle and process your submissions, giving you more control once a user has submitted your form. A common example of this would be if you wanted to provide your end users the option to download a file. In this scenario you can redirect to the file to start the download process. But, if the user don't want to get the file, we will show the Thank You message.
- Send confirmation email to the user: If you select this option, each time a user submit a form will receive an email that will thank him.
- Double Opt-In You can enable the double opt-in feature to confirm your form submission. Then you can use the placeholder:
to present the link to the Opt-In Confirmation Page. When the end-user clicks this link can be redirected to another web page or see a custom Thank You message.
NOTE: When the end user confirms their Opt-In, the following event will be triggered: Email has been verified by double opt-in. This event can be used in different parts of the system, for instance to send email notifications.

Step 6: Configure Notification Settings
In this tab you can configure how Form Submissions will be sent to your email (All data, only a link to the data or a custom message). Additionally, you can set the email subject, email addresses and more.
- If the form has fields of "Email" type, you can select them as Send To and/or Reply To email address.
- If the form has fields of "File" type, you can attach uploaded files to emails.
- If you choose only Plain Text, a default message with all the submitted data will be sent in plain text.
-
You can choose the event when the email notification will be sent:
- Email is verified by double opt-in
- Form is submitted (New Entry)
- Form is submitted (Edit Entry)
- Submission is created
- Submission is updated

By following these steps, you can successfully configure your form settings.
For more guides, refer to related articles below, select additional guides, or use the search bar at the top of the page. These guides will help you get the most out of your Pabau account.
Additionally, to help you fully utilize and understand your Pabau account, we recommend exploring additional guides and resources offered at the Pabau Academy. It offers in-depth video tutorials and lessons, offering a holistic learning experience that can equip you with the essential skills for achieving success with Pabau.