
Step 1: Navigate to Products
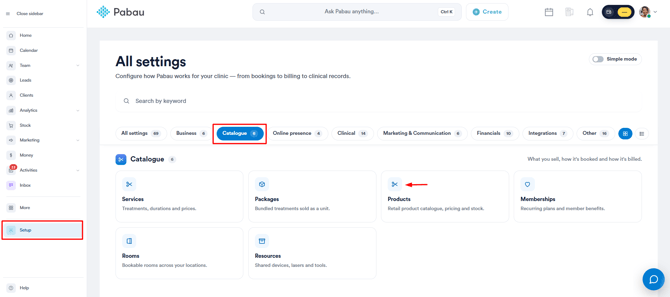
Log in to your Pabau account and in the left sidebar, click Setup. Then, under ''Catalogue'', click Products.
Step 2: Search for the Product
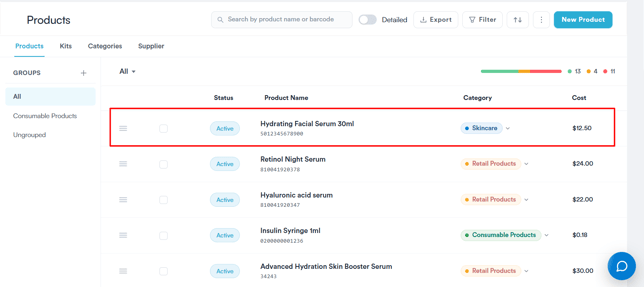
Once on the Products page, locate the product to which you want to apply tax. You can use the search bar to quickly find the product or browse through the category list to select it.
Step 3: Add the Tax
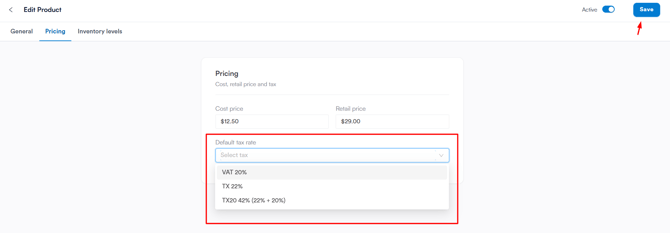
Click on the product to open its details. Navigate to the Pricing tab and scroll down to the default tax rate field. From the dropdown menu, select the tax rate or tax group you wish to apply.
Finally, click on "Save" to ensure the changes are saved. The updated tax will now be reflected the next time the product is sold.
Why isn't the tax added on top of the total at checkout?
Whether tax is added on top of a price, or treated as already included in it, depends on your clinic's tax setting - not on the product. Go to Setup → Business Details and find Tax setting ("How item prices are shown in quotes, invoices and receipts"):
- Item prices include tax - the product's price already contains the tax. The total does not go up; the tax is shown as the part of the price that is tax.
- Item prices exclude tax - the tax is calculated on top of the product's price and added to the total.
IMPORTANT: This setting applies to every item you sell, not just products. Check with your accountant before changing it, and make sure your prices are entered to match.
By following these steps, you can efficiently manage tax settings for your products, ensuring compliance and accurate invoicing.
Was this guide helpful? Let us know by voting below - your feedback helps us write clearer articles.
For more guides, browse the related articles below or use the search bar at the top of the page. You can also watch our video learning series, the Pabau Academy, or visit the Support page for additional help.