How to Approve a Leave Request
In this article, we’ll guide you through the process of approving a leave request in Pabau.
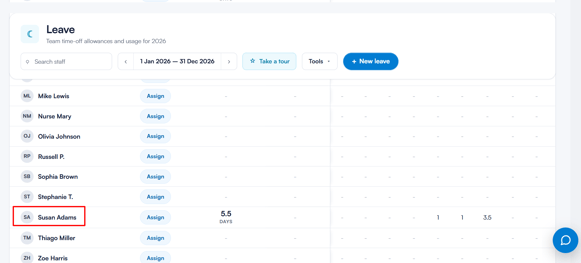
Step 1: Navigate to the Leave Tracker
Log in to your Pabau account, and in the left sidebar menu, go to Team, then click on "Leave Tracker".
Step 2: Open the Pending Requests Section
In Leave Tracker, you’ll see a ''Pending Requests'' section displaying all unapproved leave submissions from staff.
Here, each request shows:
-
The employee’s name
-
Leave type
-
Requested dates
-
Notes (if any)
Use the checkbox beside each request to select the one(s) you'd like to manage and then click on the ''Manage Requests'' button on the top right.
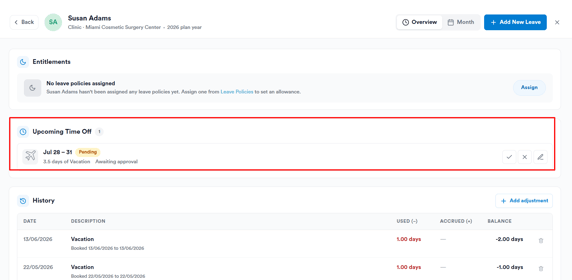
Step 3: Approve the Leave Request
After clicking the ''Manage Requests'' button, a panel will open where you can review the details of the leave request before approving it.
In this panel, you’ll see several key pieces of information to help you make an informed decision:
-
Booked Appointments (Actual and Predicted):
This section shows both the appointments the employee has already booked during the requested leave period (Actual), as well as any appointments that the system predicts may be scheduled based on past patterns (Predicted).
This helps you assess the potential impact of the leave on the clinic’s schedule. -
Utilization:
Utilization indicates how much of the employee’s available working time is accounted for by appointments or other activities. Reviewing this helps you understand how the leave might affect clinic productivity. -
Leave Details:
Here you’ll find the number of days requested, the type of leave (e.g., holiday, sick leave), and any notes the employee has added to their request.
You can also add your own notes or comments if needed.
Once you’ve reviewed all the information and are ready to approve, click the ''Approve'' button located at the bottom right of the panel (highlighted in blue). The request will be marked as approved and removed from the pending list.
Step 4: Review the Updated Leave Status
After approval, the request will disappear from the Pending section. You’ll now see the approved leave reflected in:
-
The employee’s card on the main Leave Tracker view
-
The Leave Status Panel on the right-hand side
-
The Scheduler, where time off is displayed alongside shifts
- A Blockout will also be automatically created in the Scheduler for the employee, preventing any appointments from being booked during the approved leave period.
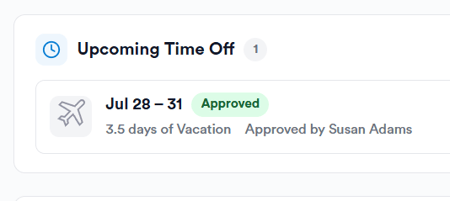
By following these steps, you can easily approve leave requests in Pabau and keep your team’s schedule running smoothly.
For more guides, refer to related articles below, select additional guides, or use the search bar at the top of the page. These guides will help you get the most out of your Pabau account.
Additionally, to help you fully utilize and understand your Pabau account, we recommend exploring additional guides and resources offered at the Pabau Academy. It offers in-depth video tutorials and lessons, offering a holistic learning experience that can equip you with the essential skills for achieving success with Pabau.