What is Conditional Logic?
Conditional logic lets your form respond to the user’s input. For example, you can:
-
Hide or show certain fields only if a user selects a specific option
-
Automatically fill out or copy fields to save your clients time
-
Skip entire pages in multi-step forms based on previous answers
-
Do math calculations right inside the form, like totals or discounts
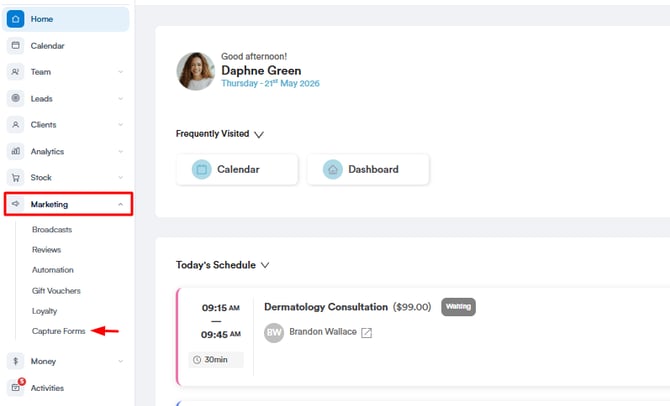
Step 1: Access "Capture Forms"
Start by logging into your Pabau account using your login credentials. Then, navigate to the Marketing section located on the left sidebar menu and click to expand it. The "Capture Forms" tab will be revealed.
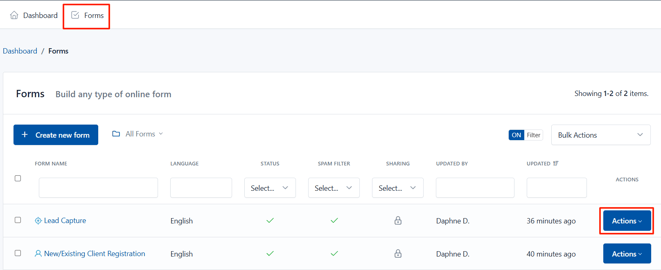
Step 2: Navigate to the Forms Tab
Step 3: Add Conditional Rules
To get started, click the "Conditional Rules" option.

Step 4: Create Rule
When you open the Rule Builder, you’ll see a blank space with an Add Rule button on the top right corner. Click it to create your first conditional rule.

When adding rules, the following components will appear:
-
Name/Description: Give your rule a clear name to help you remember what it does. (Optional)
-
Conditions: The triggers that must be met. You can require all, any, or none of the conditions to be true. Conditions can be grouped and combined in complex ways.
-
Actions: What happens when conditions are fulfilled — showing, hiding, enabling, disabling fields, copying values, performing math, skipping pages, and more.
For example, you can set a rule that hides the Submit button until the Name field is filled in. When you save this rule, the Submit button will only appear once the user enters their name.

Step 5: Add Condition
Adding conditional logic means you can create forms that adapt perfectly to each client’s answers, reduce errors, improve completion rates, and automate tasks. To add a condition, click the "+ Add condition" option.

A field will appear where you can edit the conditions by clicking on the fields and it will reveal a dropdown of options you can select.

Step 6: Add Actions
To add an action, navigate to the green "+Add action" button. A field will appear where you can edit the actions by clicking on the fields and it will reveal a dropdown of options you can select.

Types of actions you can use are:
- Show / Hide: Make fields or buttons appear or disappear.
- Enable / Disable: Let users interact with fields or lock them.
- Copy: Automatically fill one field based on another (perfect for billing/shipping addresses).
- Math: Calculate values using addition, subtraction, multiplication, division, and more — with results shown instantly.
- Evaluate: Use formulas to calculate complex expressions, including date calculations.
- Number Format: Format numbers (like currency) without coding.
- Text Format: Combine fields into formatted text strings (e.g., auto-generate email addresses).
- Skip: Jump between pages in multi-step forms based on answers.
- Form Actions: Submit, reset, or navigate pages programmatically.
Step 7: Add Rule
Once you've added the name, condition and action, you will find additional options on the far right side of the screen.
- Opposite Actions
Most actions automatically support opposite behavior. For example, if a rule says “show field X when condition Y is true,” then field X will hide when condition Y is false. This makes building logical, user-friendly forms quick and easy.
If you don’t tick the opposite actions option, the rule will only perform the specified action when the condition is met, but won’t reverse the action when the condition is not met. For instance, if the rule says to show a field when a condition is true, that field will stay shown even when the condition becomes false. Use this if you want more control and don’t want automatic toggling.
- Enabled
To activate a rule, simply tick this option. You can disable it anytime to pause the rule without deleting it.
To finalize creating the rule, go to the top right corner and click the green checkmark button.

By following these steps, you can successfully add conditional logic to your forms.
For more guides, refer to related articles below, select additional guides, or use the search bar at the top of the page. These guides will help you get the most out of your Pabau account.
Additionally, to help you fully utilize and understand your Pabau account, we recommend exploring additional guides and resources offered at the Pabau Academy. It offers in-depth video tutorials and lessons, offering a holistic learning experience that can equip you with the essential skills for achieving success with Pabau.