![Logo Pabau1-1.png]](https://support.pabau.com/hs-fs/hubfs/Logo%20Pabau1-1.png?height=50&name=Logo%20Pabau1-1.png)
Table of Contents:
1. Overview of Leads
2. How to Create Leads
3. Overview of the Lead Card
4. How to Manage Lead Pipelines
5. How to Create a Lead Pipeline
6. How to Assign a Lead to a Pipeline
Overview of Leads
Pabau's Lead Management feature helps you build strong relationships with potential clients and turn them into loyal customers. Here's how to access and manage your leads in Pabau.
Accessing Leads:
Log into your Pabau account and navigate to Leads in the left sidebar menu. Click on "Leads" to access the lead management feature.

Leads Page Overview:
On the Leads page, you'll find a comprehensive list of all your leads, along with essential details such as name, email, date created, and lead owner, among other information. You can manage the columns displayed by clicking on "Edit columns".
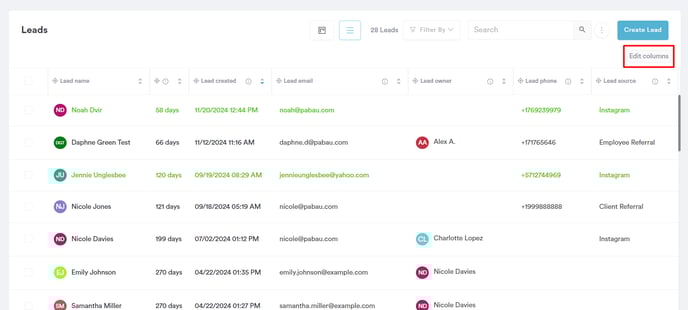
View Options and Details:
At the top of the screen, toggle between List and Kanban View to choose your preferred lead display format. The total number of leads is also visible.

NOTE: Kanban View categorizes leads into different stages of your lead pipelines, providing a visual representation. Refer to this article for more information on lead pipelines.
Additionally, you can filter your leads by lead owner, or you can create views to look at leads fulfilling certain conditions.

Utilize the search bar to quickly locate specific leads.
Create new leads by clicking the "Create Leads" button.
How to Create Leads
In this guide, you'll learn how to create leads and manage potential client information.
Step 1: Access Lead Creation Page
Start by logging into your Pabau account, then click on the Create button at the top of the screen, or use the hotkeys Shift + L to initiate lead creation.

Alternatively, navigate to Leads in the left sidebar menu and click on "Leads." Then, select "Create Lead" in the top right corner.
Step 2: Inputting Relevant Details
Make sure to provide essential details about the lead, including their full name, email, and lead location. The lead location is particularly relevant for multi-location businesses.

Choose the lead pipeline to which the lead will be added and set their current stage within the pipeline.

NOTE: Beyond manual lead creation, consider integrating the Pabau lead form on your website. This allows potential clients interested in your services to conveniently fill out the form, automatically creating their lead profile in Pabau.
To obtain the Pabau lead form, please connect with our dedicated support team for assistance.
Step 3: Assign a Lead Owner
In the top right corner, select the lead's owner from your list of staff members. Designating a lead owner helps in assigning responsibility and streamlining communication.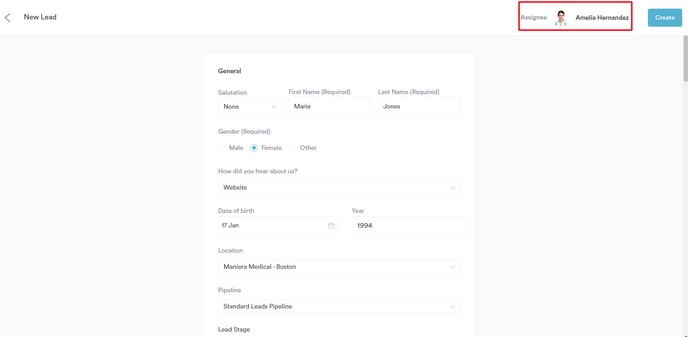
Step 4: Completing the Lead Creation
Once you've entered all the details and selected your options, click "Create" to finish.
Overview of the Lead Card
In this article, we'll show you how to navigate lead cards, update information, track activities, and improve communication.
Step 1: Accessing a Lead Profile
Begin by logging into your Pabau account. Use the search bar at the top of the screen, switch to the Leads tab, and search for leads.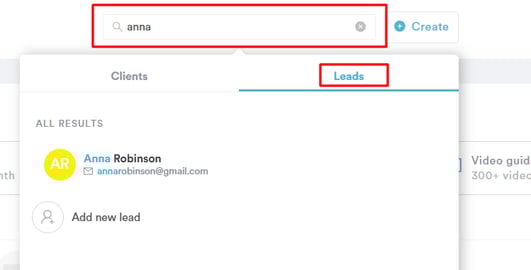
Alternatively, navigate to Leads in the left sidebar menu and click on "Leads". Use the search bar in the top right corner to find specific leads.
Step 2: Opening the Lead Card
Click on the name of the lead whose profile you wish to view. On the left side, you can see the lead's personal details. You can edit these fields by clicking on their respective pen icons.
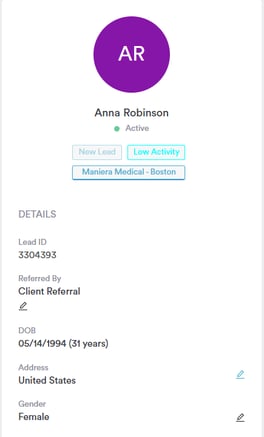
Under the lead's avatar (initials), you will see a location label that indicates which location the lead belongs to. This label appears automatically if a location has been assigned to the lead and follows the same style as existing labels used for leads and clients. If the lead does not have a location assigned, the label will not be shown.

At the top of the lead card, click "Add services to lead" to select the services the lead is interested in. The system will then calculate the total potential value based on the service prices you’ve added.
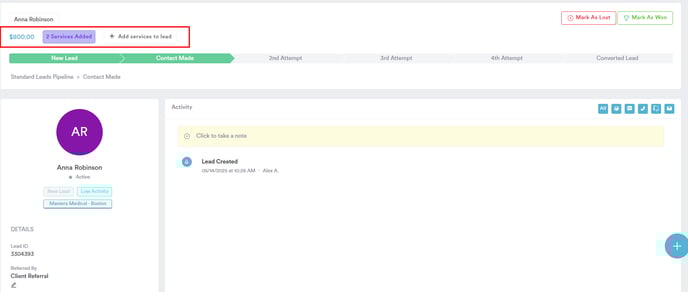
Below the services section, you can view and update the lead's pipeline, and change the pipeline stage by clicking on the green funnel.
In the top right corner, you can change the lead owner and mark the lead as won or lost.
In the center of the screen, you can see the activities related to this lead, and leave notes.
Step 3: Create Activities
Click the blue plus sign in the bottom right corner to create activities for this lead, send emails or SMS, and upload photos or documents.

By following these steps, you'll be able to manage lead cards, helping you build stronger relationships with your leads.
How to Manage Lead Pipelines
In this guide, we’ll walk you through the functionalities of the Lead Pipelines feature.
What are lead pipelines?
Lead pipelines are organized workflows that help you track and manage potential customers as they move through different stages of your sales process. Each pipeline represents the journey a lead takes from initial contact to becoming a paying customer. By using lead pipelines, you can prioritize efforts, forecast sales, and make sure your leads are nurtured effectively at every stage.
Why you should have service-specific pipelines
It’s a great idea to create service-specific lead pipelines because it tailors your sales process to meet the unique needs of each offering. For example, if you run a skincare clinic, you might have one pipeline for consultation bookings and another for product sales.
By setting up pipelines that are specific to your services, you can better track relevant information and apply targeted strategies for each service. This can improve conversion rates and make your customers feel more catered to.
Other ways to make your pipelines more specific
-
Location-based pipelines: If your business operates in different regions or cities, creating pipelines based on geographic location helps you customize your approach to each market. This ensures that your marketing efforts and communication align with the preferences and needs of customers in each area.
-
Lead source pipelines: Organizing your leads by their source (e.g., referral, website inquiry, social media) can give you valuable insights into which channels are most effective. This way, you can focus your efforts on high-performing sources.
-
Customer type pipelines: If you serve different customer segments, tailoring pipelines for each segment allows you to address their specific needs and preferences throughout the sales process.
You can access the lead pipeline page by navigating to Leads in the left sidebar menu, and then selecting Pipeline.
Alternatively, you can access the lead pipelines by switching to Kanban view on the Leads listing page.

The lead pipeline page is your go-to place for tracking and managing leads effectively. Here's what you can see and do on this page:
Switch Between Pipelines
You can easily switch between different pipelines you've created. Simply click on the currently selected pipeline at the top of the page, then choose another one from the dropdown menu.

View Potential Sales Value
For each pipeline, you'll see the potential sales value of all leads displayed in the top left corner. This amount is the sum of the sales value for each lead, as defined in their individual lead cards.

Sort and Filter Leads
- Sorting: Arrange leads in ascending or descending order based on their creation date.
- Filtering: Filter leads by their order or focus specifically on unassigned leads.

Options Dropdown
The "Options" dropdown lets you take several actions:
- Delete the currently selected pipeline.
- Create a new pipeline.
- Edit the existing pipeline.
- Reorder your pipelines.
- Filter leads by their Won or Lost status.
If no filter is selected, the default view will show you all open leads.

Create New Leads
The "Create Lead" button at the top opens the lead creation modal, where you can quickly create new leads.

Lead Tiles
Each lead tile provides key details, including:
- The avatar of the lead's owner.
- The potential sales value of the lead.
- Any scheduled activities.

Manage Activities
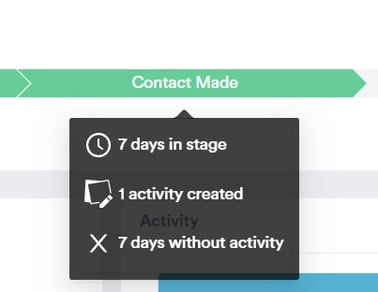
- To create a new activity, click the exclamation point (!) on a lead tile.
- If activities are already scheduled, clicking the exclamation point will show more details, such as the assignee and due date.
Drag and Drop Leads
Reorganizing your pipeline is simple. You can:
- Move leads from one stage to another by dragging and dropping them.
- Move leads directly to Won or Lost stages when their status changes.
By following this guide, you’ll be able to navigate and manage your lead pipelines more effectively.
How to Create a Lead Pipeline
Lead pipelines play a crucial role in managing leads effectively, allowing you to track their progress through various stages. This guide will walk you through the process of creating a lead pipeline in Pabau.
Step 1: Access Pipelines
Log in to your Pabau account and navigate to Leads in the left sidebar menu, then click on "Pipeline".
Alternatively, you can access the lead pipelines by switching to Kanban view on the Leads listing page.

Step 3: Create a New Pipeline
On the Pipeline page, click on "Options" in the top right corner, then select "Create a new pipeline".

Step 4: Configure Pipeline Details
First, add a name for the pipeline, then configure the stages included in the pipeline.
- To rename the stage, click on the three dots next to the stage, then click on "Edit" and add the new name.
- To add a new stage, click on the plus sign that appears when you hover over between two stages or when you hover over your last existing stage.
- You can reorder stages by dragging and dropping them.
- To delete a stage, click on the "Delete Stage" button that appears when you hover over a stage.
- Choose whether this will be your default pipeline in the top right corner.
Step 5: Finalize and Create
Click on "Create" in the top right corner to complete the pipeline creation process.
Now, with the new pipeline in place, you can easily switch between different pipelines by clicking on the button next to "Options" on the Pipeline page.

NOTE: It is advisable to have a minimum of one standard lead pipeline, but ideally, consider having multiple pipelines tailored to specific treatments.
By following these steps, you can create lead pipelines in your Pabau account.
How to Assign a Lead to a Pipeline
In this guide, you'll learn how to assign leads to the right pipeline for better management of their treatment needs.
Step 1: Locate the Lead
Log in to your Pabau account and search for the lead you want to assign to a pipeline. Use the search bar at the top of the screen or navigate to Leads in the left sidebar menu and click on "Leads" again.
Step 2: Assign to a Different Pipeline (if applicable)
If you have multiple pipelines, you can assign existing leads to a different pipeline by accessing their lead profile.
Open the lead card and in the top right corner, click on the name of the lead's current pipeline.
A dropdown menu will appear, showing all available pipelines.
Select the desired pipeline from the menu and click on "Save" to confirm the pipeline assignment.
By following these steps, you can efficiently categorize leads into treatment-specific pipelines, ensuring a more specialized and effective approach to lead nurturing within Pabau.
For more guides, refer to related articles below, select additional guides, or use the search bar at the top of the page. These guides will help you get the most out of your Pabau account.
Additionally, to help you fully utilize and understand your Pabau account, we recommend exploring additional guides and resources offered at the Pabau Academy. It offers in-depth video tutorials and lessons, offering a holistic learning experience that can equip you with the essential skills for achieving success with Pabau.