Table of Contents:
1. Staff Optimization
2. Calendar & Scheduling
3. Business Details Setup
4. Location Details
5. Sender Address Optimized
6. Services Setup
5. Medical Forms
5. Client Communication
Staff Optimization
The first thing you need to check when optimizing your Pabau account is how your staff is set up. A well-organized staff section ensures that the right people have the right access and responsibilities, keeping your clinic efficient and secure.
Step 1: Access Team
Start by logging into your Pabau account using your login credentials. To access staff settings click the Team tab on the left sidebar menu to expand it. Then, select the "Team" sub-tab — this is where you can manage your staff.
Step 2: Select Team Member
Once you select a team member, all their available configuration settings will appear in the left menu.

Step 3: Key Areas to Optimize
Here’s what you need to review and optimize for your staff members:
Staff Permissions
Control what each team member can see and do in Pabau. Setting the right permissions helps protect sensitive data and keeps operations running smoothly. To adjust permissions, click the arrow in the far right corner of the feature name to expand the options, then toggle access on or off as needed.

Staff Services
Assign the correct services to each staff member. This ensures that only qualified professionals can be booked for specific treatments.
If a staff member doesn’t take bookings or online bookings, you can disable those options in the first section by toggling access. In the next section, simply tick the services they’re allowed to perform.

Staff Locations
If your clinic has multiple locations, ensure each staff member is assigned correctly to prevent scheduling mishaps and enhance the client experience. Set their primary location, and if they work at additional locations, simply tick the ones where they can be booked.

Staff Photo & Bio
Adding professional photos and bios makes online bookings more personal and builds client trust. Clients feel more confident when they can see who will be treating them. They can be set up on the Personal Details section.

Prescriber Info
If a staff member is a prescriber, make sure their details are set up correctly to avoid any issues when issuing prescriptions. You'll find the Prescription info field under Personal Details. 
If you don’t see the field, click "Customize Fields" in the top right corner and add 'Prescriber Info' to their details.

Here's where you can rearrange, remove or add more fields in their personal details. The "Add fields" button is located on the bottom of the list. Ensure to click the "Save Button" after adjusting the fields.

Staff PIN Codes
Enhance security by requiring staff to enter a PIN when accessing the Pabau GO iOS App and the Calendar. This helps with compliance and accountability.
To add a PIN code, staff need to navigate to the top right corner of the screen and click their avatar to reveal the available options. Then select "Account Settings."

In the account settings page, switch to the "Security" tab. There you can find the Passcode field where you can enter a 4 digit code. Ensure to click the "Save Changes" button on the bottom right corner to save your settings.

By optimizing these settings, you’ll create a well-structured and secure system that keeps your clinic running smoothly!
Calendar & Scheduling
Your calendar is the backbone of your clinic’s schedule, so it’s important to set it up correctly. This ensures appointments are booked accurately, staff availability is clear, and scheduling conflicts are avoided.
Step 1: Access Scheduler
Navigate to the "Team" tab located on the left sidebar menu and click to expand it. This will reveal the "Schedule" sub-tab.
Step 2: Key Areas to Optimize in the Scheduler
Here’s what you need to check in the Scheduler to make sure everything is set up correctly and fully optimized:
Shifts & Availability
Ensure all staff have the correct working hours assigned. To set up working hours, select the day you want to create a shift under the specific employee section. The shift template modal will appear, allowing you to choose from pre-defined working hours.

To reveal more options when creating a shift, click the arrows in the top right corner of the modal. A pop-up window will appear with additional settings, including the option to add the working hours.

Repeat Shifts
If staff work the same hours regularly, set up repeat shifts to save time and avoid manual adjustments. Just click the "Repeat" button and the following repeat options will appear on the right side of the modal:
- Repeats every -- Choose how often the shift repeats (e.g., every 1 week, every 2 months).
- Repeats on -- Select the specific days of the week for the shift to repeat. The selected days will turn blue.
- Repeats until -- Set an end date for the repetition. You can extend it up to a year by using the arrows in the top right corner of the calendar modal—one arrow jumps a week ahead, and two arrows fast-forward a year.

Location Assignments
If your clinic has multiple locations, confirm that staff shifts are linked to the correct location to prevent scheduling conflicts.

Assigned Services
Check that each shift includes the correct services the staff member can perform. This prevents booking errors. By default, all services are selected. To edit, click the "All Services" button, and a list of services will appear. Simply untick the ones that won’t be performed during this shift.
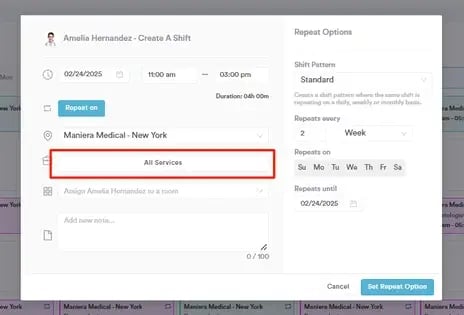
NOTE: In the scheduler, a shift that includes all services will be displayed in green, while a shift with specific services will appear in pink.
Step 3: Navigate to Calendar
To access your calendar, navigate to the "Calendar" tab located on the left sidebar menu.
Step 4: Key Areas to Optimize in the Calendar
To ensure your calendar is fully optimized, check these key settings:
Calendar Settings
Configure default views, time slots, and other preferences to match your clinic’s workflow.
Here’s what you need to check:
- Configuration – Set your calendar’s start and end time, adjust appointment time slots, define the starting date, and configure auto-lock settings for better control.
- Appointment Settings – Choose whether to allow overlapping appointments and pre-select notifications that should be sent when booking an appointment.
- Appearance – Customize how your calendar looks by deciding if staff names should be displayed with initials only, whether to hide client surnames, adjust font sizes, and modify the layout of tooltips and the appointment modal.

Blockouts
Set up blocked times for staff meetings, breaks, or unavailable hours to prevent accidental bookings. Simply select the time slot, and when the "Book Appointment" modal appears, switch to the "Lunch" or "OFF" tab at the top. Set the duration by selecting a specific time or toggle the "All day" option if you or your staff member won’t be available for the entire day.

If the blockout occurs on multiple days at the same time, such as lunch hours, you can set it to repeat by clicking the "Repeat Blockout" option. Once selected, the repeat settings will pop-up.

Filters
Use calendar filters to quickly view appointments by staff, location, room, status, or service, making scheduling easier. To adjust filters, click the filter icon in the top left corner of the screen. The filter options will then appear on the right-hand side.

By following these steps you can make sure that appointment types, breaks, and availability are properly configured.
Business Details Setup
Ensure your Business Details are accurately set up to keep everything clear and organized for both your team and clients. Here's what to check:
Step 1: Access Business Details
Navigate to Setup at the bottom of the left sidebar menu. Under the Business section, click on the "Business Details" tab.
Step 2: Key Areas to Optimize
Make sure your business details are fully set up to keep everything running smoothly. Here's what to check:
Details
Ensure all essential details are added, including your business phone number, company email, website, country, currency, and time zone. Also, upload your logo to represent your brand—it will appear on invoices, notifications, and other client communications.

Social
Add all relevant social media links, as these will automatically populate in your client communications, making it easy for clients to connect with your business online.

Features
Enable features like Quotes, Letters, Labs, and Insurance Billing if they align with your practice needs. Activating the right features ensures you have the tools necessary for efficient operations.

Once you've optimized your business details, ensure to click the "Save Changes" button on the top right corner of the screen to update the changes.
Location Details
Setting up your locations correctly helps prevent scheduling errors, ensures clients book at the right place, and keeps staff availability organized.
Step 1: Navigate to Locations
To access location settings in Pabau, go to Setup at the bottom of the left sidebar menu. Under the Business section, click on the "Locations" tab.
Step 2: Select Location
Review if all locations have been added to your Pabau account. To view location details, hover over the location and the edit button will appear on the far right side. Click to edit.

Step 3: Key Areas to Optimize
Whether you have one clinic or multiple branches, the information you set here will directly impact your calendar, online bookings, invoices, and client communications. Here’s what to check to ensure accuracy and efficiency:
General
Verify that the location name, email, and phone number are correct. Additionally, check if online booking is enabled and adjust any booking settings by toggling the available options.

Location
Make sure the address, zip code, and other details are accurate, as these will reflect in client communications, invoices, and online bookings.

Employees
Assign the correct staff members to each location. This affects availability in the calendar and online booking system.

Opening Hours
Set the correct opening hours for each location to ensure accurate scheduling in the calendar and online bookings.

By setting up your locations correctly, you ensure accurate scheduling, proper staff assignments, and a smooth booking experience for clients. This also ensures that invoices, client communications, and online bookings display the right details for each location.
Sender Address Optimized
Your sender address plays a key role in ensuring emails reach your clients without landing in spam. A properly configured sender address enhances deliverability and maintains a professional image.
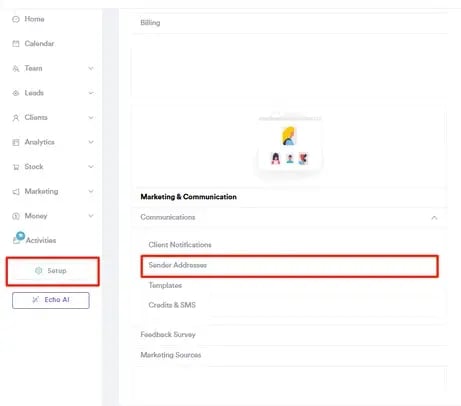
Step 1: Navigate to Sender Address
Access the Setup page by clicking the "Setup" button in the bottom corner of the left sidebar menu. Under Marketing & Communication, locate the Communications tab and click to expand it. This will reveal the "Sender Address" sub-tab.

Step 2: Key Areas to Optimize
Setting up your Sender Address correctly ensures that emails and SMS messages sent from Pabau appear professional and reach your clients without issues.
Here’s what to check and optimize:
Sender Name
Set the name that clients will see when they receive SMS messages from your clinic, ensuring they recognize who the message is from. To update or add a sender, click on the existing sender. If no sender has been created yet, click the "Create a Sender" button in the top right corner of the screen.
To set this address as the default, simply enable the "Default Sender" toggle.

Sender Email
NOTE: This address will only be displayed if the enterprise email feature is enabled, which is part of our Marketing Plus add-on, and if your email address is verified by our email delivery provider, SendGrid. Without this feature, emails will be sent from noreply@pabau.com.

This ensures all messages are sent from the same recognizable sender, maintaining consistency in client communication.
Services Setup
Setting up your services correctly ensures clients can easily book the right treatments, staff can manage their schedules efficiently, and all service-related details are accurately reflected in invoices and client communications.
Step 1: Navigate to Services
Navigate to "Setup" located at the bottom of the left sidebar menu. Under the "Services" section you'll find the "Services" tab. Tap to access details.
Step 2: Key Areas to Optimize
Once you're on the Services page, check that the following details have been added:
Service Groups
Services are organized into broad groups to keep everything structured and easy to manage. For example, you can create Service Groups like Aesthetics, Medical Treatments, or Wellness & Therapy. Within each group, you can add Service Categories.
Groups are listed on the left-hand side of the Services page. To add a new group, click the "Groups" button in the top right corner.

Service Categories
Within each group, you can set up Service Categories—for instance, under Aesthetics, you might have Facial Treatments and Skin Rejuvenation, while under Medical Treatments, you could include GP Consultations and Health Screenings.

To create Categories, you switch to the "Categories" tab at the top of the page and click the "New Category" button on the top right corner. This action will open a pop-up window where you can add any category, update the service category color, and link it with services.

Services
You can assign a specific category to each service for better organization. For example, Hydrafacial or Chemical Peel can be placed under Facial Treatments, while New Patient Consultation or Follow-up Appointment can be categorized under GP Consultations. To check or update a service’s category, select the service, go to the General tab, and choose the appropriate category from the Category field.

Service Descriptions
Ensure each service has a clear and informative description, especially for online bookings. To add or update a description, select the service, then switch to the Online Booking tab. Here, you can either write one manually or use AI to generate a description.

Assigned Locations
Check that each service is linked to the correct locations. To do this, select the service, go to the Assign tab, and open the Locations sub-tab. Here, you can select or deselect the locations where the service is available.

Assigned Employees
Verify that the correct staff members are assigned to each service. To do this, select the service, go to the Assign tab, and navigate to the Employees sub-tab. Here you can select which employees can perform this service.

Assigned Resources
Ensure that the correct rooms and equipment are assigned to each service to prevent scheduling conflicts. To do this, select the service, go to the Assign tab, and navigate to the Resources sub-tab. Here, you can select the necessary rooms and equipment by ticking or unticking them, you can also drag and drop to rearrange their order.

By setting up your services correctly, you ensure a smooth booking experience for clients and an organized workflow for your team.
Medical Forms
Medical forms help you collect essential patient information before appointments, ensuring a smooth and efficient consultation process. In Pabau, you can create, customize, and assign medical forms to specific services, streamlining data collection and enhancing patient care.
Step 1: Navigate to Forms
Navigate to the Setup page in the bottom corner of the left sidebar menu. Then, go to the Forms tab under the Clinical section.

Step 2: Key Areas to Optimize
Here, you can view all the medical forms created in your Pabau account, including consent forms, medical history forms, treatment notes, and more.
Here’s what to check to ensure your medical forms are optimized:
Form Components
Ensure your forms include essential components, such as a header with your business details, by using merge tags. This automatically populates key information like your clinic’s name, phone number, email, and address, ensuring consistency across all client communications and documents.

To include merge tags in your forms, click the edit button on the top right corner of the component. This will open the edit options on the right side. From there, navigate to the listed icons and select the tag icon.

This action will open a pop-up window displaying all available merge tags, including client details, appointment information, company information, and more. Clicking on any of these will insert the merge tag, ensuring the correct information is automatically pulled into the form.

Code Lookup Component
Check if the Code Lookup component is included in your forms. When clients fill out this field, the information automatically populates in the Client Card Summary, ensuring key details are easily accessible.
This component is particularly useful for documenting important medical history, such as:
-
Family History – Select predefined codes for genetic conditions or hereditary health risks.
Example: ICD-10 codes for a family history of cancer or cardiovascular diseases. -
Allergies – Record known allergies, including medications, foods, and environmental factors.
Example: ICD codes for drug allergies, food allergies, or allergic rhinitis. -
Diagnosis – Look up and assign diagnostic codes to describe the client’s condition.
Example: ICD-10 codes for asthma, pneumonia, or diabetes. -
Social History – Document lifestyle factors that may impact health, such as smoking, alcohol use, or occupation.
Example: SNOMED or ICD codes for smoking status, alcohol use disorder, or occupational health risks.
By ensuring the Code Lookup component is included in your forms, you can streamline data entry and maintain accurate, structured records for every client.
Linked Services
Check the "Which service should this form be used for?" field under the General tab in the top left corner of the screen. Here, you can type the name of a service, and it will appear in the search results for you to select. You can link multiple services to a form, ensuring it is automatically sent when any of the selected services are booked.

By following these steps, you ensure that your forms are fully optimized with accurate information, relevant linked services, and essential components.
Client Communication
Setting up client notifications is essential for keeping clients informed and engaged throughout their journey with your clinic. Timely reminders and updates not only reduce no-shows but also create a sense of trust and reliability.
Step 1: Navigate to Communications
Navigate to Setup, then expand the Marketing and Communications section. Click on the Communications tab to reveal additional options, where you'll find the Client Communications tab.
Step 2: Key Areas to Optimize
Here’s what you need to check to ensure your client notifications are fully optimized:
Enable Confirmations & Reminders
Turn on appointment confirmations and reminders to ensure clients never miss an appointment. To enable confirmations, select the "New Appointment is Booked" notification template. Then, navigate to the top right corner and hover over the "Enable Confirmations" button. Two options will appear—Enable Confirmation Emails and Enable Confirmation via SMS. Tick the boxes to activate them.

Turn on appointment reminders to help reduce no-shows and keep clients informed. To do this, select the "Upcoming Appointment Reminder" notification template. Then, navigate to the top right corner and hover over the "Enable Reminders" button. Two options will appear—Enable Reminder Emails and Enable Reminder via SMS. Tick the boxes to activate them.

Configure Notification Settings
Start by configuring your appointment confirmation settings to ensure clients receive all the necessary details. You can customize what information is included, such as including a "Cancel Appointment" or "Reschedule" button, practitioner name, and more. Additionally, you can add a personalized message — for example, displaying your cancellation policy or important instructions in the Medical History Message box.

To configure reminders you can choose to include important details like a "Cancel Appointment" or "Reschedule" button, and add a "Complete Forms" button if you want clients to fill out any necessary forms before their visit. Additionally, you can customize the Medical History Message box to display any policies or information you’d like to share.
Lastly, choose when the reminder should be sent (1 day, 3 days, or 8 days before) and set the exact time for the notification to be delivered.

Customize Branding
Match your notification colors to your brand for a professional look. You can customize the background color, text color, and button color of your notifications by adding the hex codes that match your brand. This ensures that your notifications maintain a consistent look and feel with your clinic's branding.

Add Social Media Links
Include your social media icons to keep clients engaged by selecting which icons should appear on your notifications. The links for your social media accounts are automatically pulled from your business details.

SMS Messages
Double-check the SMS content to ensure it’s clear, concise, and includes key details like appointment time and location. To access the SMS template, click the "SMS Text" tab in the preview. The builder on the left will update to show the message that will be sent, allowing you to edit the text and insert merge tags.

By optimizing your client communications, you’ll reduce no-shows, keep your calendar full, and improve client satisfaction. With automated confirmations and reminders, you ensure that your clients are always informed and prepared, making appointments run smoothly and efficiently.
For more guides, refer to related articles below, select additional guides, or use the search bar at the top of the page. These guides will help you get the most out of your Pabau account.
Additionally, to help you fully utilize and understand your Pabau account, we recommend exploring additional guides and resources offered at the Pabau Academy. It offers in-depth video tutorials and lessons, offering a holistic learning experience that can equip you with the essential skills for achieving success with Pabau.