![Logo Pabau1-1.png]](https://support.pabau.com/hs-fs/hubfs/Logo%20Pabau1-1.png?height=50&name=Logo%20Pabau1-1.png)
Table of Contents:
1. How to Enable Client Notifications
2. How to Edit Email Notifications
3. How to Edit SMS Notifications
Related content: Communication Templates
How to Enable Client Notifications
Automate your client communication by enabling or disabling notifications in Pabau. This guide walks you through the steps to manage both email and SMS notifications efficiently.
Step 1: Navigate to Client Notifications
Log in to your Pabau account and go to Setup, then navigate to Marketing & Communication, Communications, and Client Notifications.
Step 2: Choose Notification Type
On the left, you'll find several tabs that categorize client notifications based on their purpose or relevance. Choose the specific tab related to the notification you want to adjust.
For each client notification template, you'll find details about its purpose, and on the far right, there are icon indicators. The first icon shows if the notification is enabled for SMS, and the second indicates email notification status. 
Choose the relevant tab for the specific client notification you want to customize.
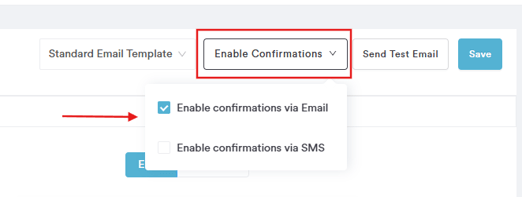
Step 3: Enable Confirmation
To enable or disable the selected notification, click the "Enable confirmations" button in the upper right corner.Check or uncheck the boxes for SMS and email settings based on your preferences.
Step 5: Save Changes
Click on "Save" in the upper right corner to apply the adjustments.Step 6: Repeat the Process
Repeat the process for other notifications as needed.For further customization of communication templates, refer to our guide on editing client notifications.
NOTE: You can also learn about this topic by watching a lesson on Pabau Academy.
How to Edit Email Notifications
This guide walks you through the process of customizing automated email notification templates in Pabau. Tailor these templates to your liking, providing a personalized and branded experience for your clients.
Step 1: Navigate to Client Notifications
Log in to your Pabau account and go to Setup, then navigate to Marketing & Communication, Communications, and Client Notifications.
Step 2: Choose the Template to Edit
In the left sidebar, select the tab that corresponds to the type of notification template you want to edit. Choose the specific notification you wish to customize.

Step 3: Preview and Select Notification Type
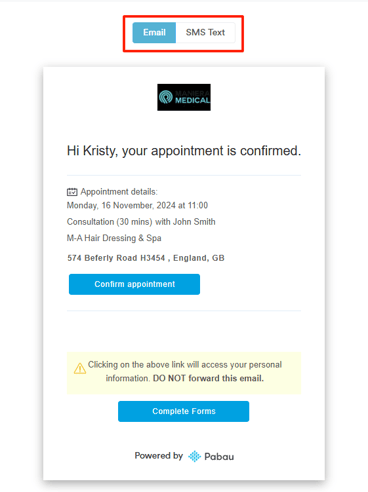
In the center of the screen, preview the current state of the template and any changes you make.Right above the template, switch between email and SMS by selecting the appropriate option. The default is set to email.
Step 4: Adjust Functionality
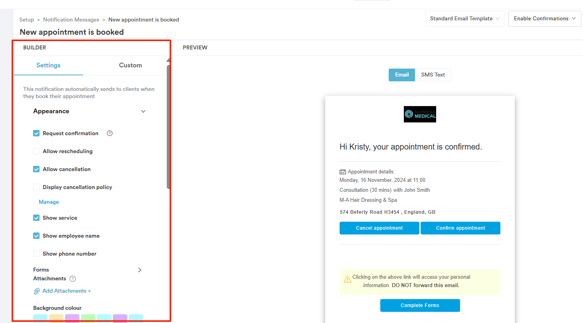
Step 5: Visual Customization
Step 6: Add Attachments
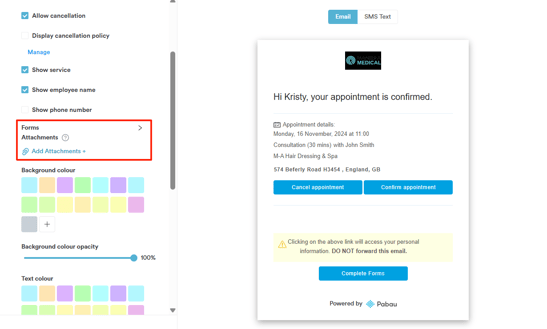
Once uploaded, you will see the attached file displayed in the email preview.

Step 7: Social Media Integration
Towards the bottom of the builder, you can integrate social media icons into your notifications.

Step 8: Save Changes
After making the necessary edits, click on the "Save" button located in the upper right corner of the screen to confirm your changes.
How to Edit SMS Notifications
This guide provides detailed steps for customizing automated SMS notification templates in Pabau.
Step 1: Navigate to Client Notifications
Log in to your Pabau account and go to Setup, then navigate to Marketing & Communication, Communications, and Client Notifications.
Step 2: Choose the Template to Edit
In the left sidebar, select the tab that corresponds to the type of SMS notification template you want to edit.Choose the specific notification you wish to customize.
Step 3: Preview and Select Notification Type
In the center of the screen, preview the current state of the template and any changes you make.
Right above the template, switch between email and SMS by selecting the appropriate option. For SMS customization, switch the preview toggle to SMS text.

Step 4: Customize SMS Notification
In the builder on the left, customize the SMS notification.
The SMS character limit is displayed above the message box.
At the bottom of the message box, find the "Add Merge Tag" button. Click on it to insert personalization fields into your templates for a personalized touch.
Step 5: Save Changes
After editing the SMS template, click on the Save button located in the upper right corner of the screen to confirm your changes.For more guides, refer to related articles below, select additional guides, or use the search bar at the top of the page. These guides will help you get the most out of your Pabau account.
Additionally, to help you fully utilize and understand your Pabau account, we recommend exploring additional guides and resources offered at the Pabau Academy. It offers in-depth video tutorials and lessons, offering a holistic learning experience that can equip you with the essential skills for achieving success with Pabau.