Table of Contents:
1. How to Create a Class
2. How to Book a Class in the Calendar
3. How to Add More Participants to a Class
4. How to Set Up Client Notifications for Classes
5. How to Process a Class Payment from the Calendar
6. How to Update Appointment Statuses for Class Participants
7. How to Remove Participants From a Class
8. How to Cancel a Class Booking from the Client Card
In Pabau, a Class is a type of service that allows more than one client to attend at the same time. Whether you're running group fitness sessions, training programs, or workshops, you can easily set up and manage these group-based appointments through the Classes feature.
How to Create a Class
In Pabau, you can create classes the same way you create services, with just a few extra settings to manage group appointments. Whether you're offering training, workshops, or group treatments, the class feature helps you manage multiple participants in one booking.
Step 1: Navigate to Setup
Start by logging into your Pabau account using your login credentials. Then, navigate to Setup, located on the bottom left corner of the left sidebar menu, to access the Setup page.

Step 2: Access Services
Under the Services section, click the Services tab.

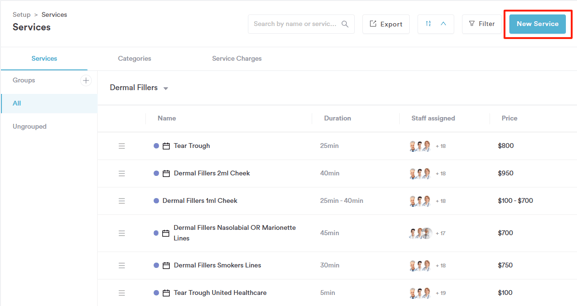
Step 3: Navigate to the "New Services" Button
Now, navigate to the "New Services" button on the top right corner of the page to start the process.
Step 4: Create Class
You'll now notice a new “Class” option just below the Virtual option. Click "Class" to indicate that the service you're creating is a group session.

At this stage, you can start adding the class information. On the "General" tab, you’ll be able to fill in the following details:
-
Class name:
The name of the class (e.g. Yoga Flow, Laser Training, etc.) -
Number of participants:
Set the maximum number of people that can attend the class. To qualify as a class, the Number of Participants must be greater than 1. -
Service Code:
An internal code to help you identify or categorize the class quickly (optional). -
Category:
Assign the class to a specific category (e.g. Fitness, Training, Wellness) for easier filtering and organization. Follow the steps from this guide to create a category. -
Appointment Color:
Choose a color to represent the class in your calendar, helpful for quick visual identification. -
Image:
Upload an image that represents the class (this can be shown in online booking, if enabled).

Step 5: Switch to the Pricing Tab
On this tab, you can set the price of the class, define your deposit amount, and configure your online payment policy, ensuring clients know what to pay and when.

Step 6: Configure Online Booking Settings
If you'd like the class to appear under a different name in online bookings, you can enter a Friendly Name. You can also provide a description to give clients more context.

Step 7: Set Communications
You can also set up communication to be sent before and after the class appointment on the "Client Pathway" tab.

Messages can be sent immediately upon enrolment or scheduled as part of an automation (requires Marketing Plus to be active).

Once you’ve finished configuring the class settings, go to the top-right corner of the screen, toggle Active on, and click Create.
 By following these steps, you can successfully create a class in Pabau.
How to Book a Class in the Calendar
Step 1: Navigate to the Calendar
Start by logging into your Pabau account using your login credentials, then navigate to the Calendar located on the left sidebar menu.
Step 2: Book a Class
On the calendar, select an available slot where you want to book the class, and the book an appointment modal will open. At the top of the modal, you can switch to the "Class" tab to get started with booking a class.

From here, you can book classes directly via the calendar by selecting the desired class and enrolling participants.
The booking flow is similar to the Appointments tab, you can select one or more staff members, choose the location, room, and equipment, with a few key differences:
-
The "Book from Package" option will not appear, as individual clients are not pre-selected.
-
You can only choose from services that are set as type: Class.
-
You can add multiple participants to a class. In the right section of the pop-up window, you can manually add clients to the class. However, adding participants is not required to book the class; you can book it with zero participants and add them later.
When booking a class in the calendar, you’ll have several fields and options available to tailor the session:
- Start Time & Duration
Choose when the class starts and how long it will last. -
Room Selection
Select a room for the class. Room availability functions the same as for regular appointments; only available rooms will be shown. -
Class Notes
Add internal notes related to the class. These are not visible to clients. -
Repeat Class
Use this option if you'd like to set up a recurring class schedule. - Search Bar to Add Participants
Use the search bar to look up and add clients to the class. You can book a class with one, multiple, or even zero participants and add them later.

Step 3: Configure Notifications
Navigate to the Participants section and click the bell icon next to a participant’s name. This will open the notification settings, where you can tick or untick the notifications you’d like to send.

Once you're done adding the information, click the "Book Class" button at the bottom of the modal.
This button stays greyed out until all mandatory fields are completed:
- Class service
- Staff member
- Location
By following these steps, you can successfully book a class in the Calendar.
How to Add More Participants to a Class
Step 1: Click on the Class
Locate the Class on your Calendar and click to reveal the available actions.

Step 2: View Class
Proceed to click the "View Class" option to add more participants.

Step 3: Add Participants
A window will open on the right-hand side where you can view all participants. To add more participants, proceed to click the "Add Participant +" button in the top right corner.

Upon clicking, a search bar will appear where you can search to add an existing client. If you want to add a new client, you have the option to +Add new client.
You can also add any notes in the "Add notes" field.

To finalize, click the "Add Participant" button in the bottom right corner of the screen.

You will be notified that the participants have been added, and the capacity will be updated automatically.

By following these steps, you can successfully add more participants to an already booked class.
How to Set Up Client Notifications for Classes
Step 1: Navigate to Setup
Start by logging into your Pabau account using your login credentials. Then, navigate to the Setup page, located at the bottom left corner of the left sidebar menu. Next, expand the "Communications" tab under the Marketing & Communication section. This will reveal the "Client notifications" sub-tab.
Step 2: Switch to the Classes Tab
In the Client Notifications section, click on the "Classes" tab from the left-hand menu to view all available notification types related to classes.

Step 3: Select Notification Type
Choose the notification type you'd like to configure (e.g. confirmation, reminder, cancellation) to view its available settings and actions.
Step 4: Configure Notifications
You’ll see a preview of the standard message that will be sent to clients.
-
On the left-hand side, you can tick or untick specific details to include or exclude from the message.
-
To create a custom message, click on the "Custom" tab and edit the text as needed.
- To view the standard SMS notification, click the SMS option above the notification preview.
To enable or disable the notification, hover over the "Enable Confirmation" button at the top right. This will reveal options to enable or disable email and/or SMS notifications. You can select either, both, or none depending on your preferences.

Step 5: Save Changes
Once you're happy with your configuration, click "Save Changes" in the top right corner to apply your settings.

By following these steps, you can tailor how clients are notified about their class bookings.
How to Process a Class Payment from the Calendar
Step 1: Navigate to Calendar
Start by logging into your Pabau account using your login credentials, then navigate to the Calendar located on the left sidebar menu.
Step 2: Click on the Class
Locate the Class on your Calendar and click to reveal the available actions.

Step 3: View Class
Proceed to click the "View Class" option to view more options.

Step 4: Pay for Class
A window will open on the right-hand side, displaying all participants. To process a payment, click the "$" icon next to the participant's name — this will redirect you to the point of sale screen.

On the Point of Sale (POS) screen, the client and item fields will be pre-filled automatically. Proceed to select the payment method from the available options.

Once you're done, click the "Confirm Payment" button in the bottom right corner to finalize.

Step 5: Checkout Completed
Once the payment is successfully processed, you’ll see the Checkout Completed screen. To return to the calendar, simply click the back arrow in the top-left corner.

The icon next to the participant's name will turn green once their payment has been completed.

By following these steps, you can successfully process a payment for a class from the Calendar.
How to Update Appointment Statuses for Class Participants
Step 1: Navigate to the Calendar
Start by logging into your Pabau account using your login credentials, then navigate to the Calendar located on the left sidebar menu.
Step 2: Click on the Class
Locate the Class on your Calendar and click to reveal the available actions.

Step 3: View Class
Proceed to click the "View Class" option to view more details.

Step 4: Update Status
A window will open on the right-hand side, showing all participants. To update a participant’s appointment status, click the clock icon located at the far right of their name.

This will display all available appointment statuses. When you hover over a status icon, the status name (such as Waiting, Arrived, No Show, or Completed) will appear.

Click the icon to update the participant’s status accordingly.

By following these steps, you can successfully update appointment statuses for class participants.
How to Remove Participants From a Class
Step 1: Click on the Class
Locate the Class on your Calendar and click to reveal the available actions.
Step 2: View Class
Proceed to click the "View Class" option to view more details.
Step 3: Remove Participant
A window will open on the right-hand side, displaying all participants. To remove someone from the class, simply click the trash icon next to their name.

A pop-up will appear asking you to confirm the removal. To proceed, click "Remove" to finalize the action.

The participant will be removed from the class, and the capacity will be automatically updated.

The class will be cancelled for the client, and it will be reflected in their client card.

By following these steps, you can successfully remove a participant from a class in Pabau.
How to Cancel a Class Booking from the Client Card
Step 1: Access the Client Card
Start by logging into your Pabau account using your login credentials. Then, navigate to the search bar to search for the client who wants to cancel their class participation.

Alternatively, you can access the participant's client card by opening the class from the calendar. Simply click on the participant's name to be redirected to their client card.

Step 2: Switch to the Appointments Tab
On the client card, navigate to the Appointments tab to view a list of all the client’s booked appointments.

Step 3: Navigate to the Three Dots
Locate the class the client booked and hover over the appointment. This will display a three-dot menu on the far right side.

Click the three dots to view the available actions. This will reveal the option to cancel the participation in the class.

Step 4: Select Cancellation Reason
You’ll be prompted to select a cancellation reason first. Once a reason is selected, the Cancel Appointment button will become active. Click it to finalize the cancellation.

The class participation has been cancelled, and the "Cancelled" banner will appear when viewing the appointment in the client card.

By following these steps, you can successfully cancel a client’s class participation directly from their client card.
For more guides, refer to related articles below, select additional guides, or use the search bar at the top of the page. These guides will help you get the most out of your Pabau account.
Additionally, to help you fully utilize and understand your Pabau account, we recommend exploring additional guides and resources offered at the Pabau Academy. It offers in-depth video tutorials and lessons, offering a holistic learning experience that can equip you with the essential skills for achieving success with Pabau.