
Table of Contents:
1. How to Integrate Pharmacies
1.1. How to Integrate with Pharmacierge
1.2. How to Integrate with CloudRx
1.3. How to Integrate with Signature RX
2. How to Prescribe to a Client
3. Managing Centralized Prescriptions
Manage all prescriptions across your business in one centralized location, ensure accuracy with intelligent error-checking, and send prescriptions using the method that works best for you —whether via integrated pharmacy APIs or directly by email.
How to Integrate Pharmacies
Step 1: Navigate to Labs & Pharmacies
Start by logging into your Pabau account using your login credentials. Then navigate to the Setup page located on the bottom right corner of the screen. Then, click on the "ePrescriptions" tab located under the "Clinical" section.

The Pharmacies tab will open by default and you can select which pharmacy you want to integrate by clicking the "Connect" button.
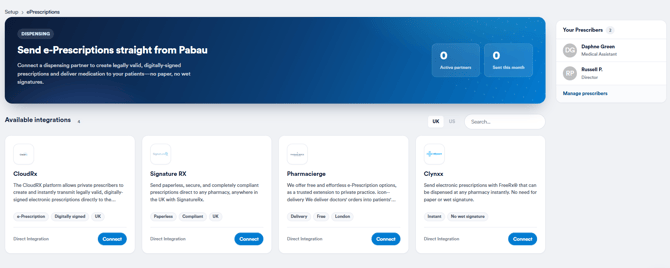
How to Integrate with Pharmacierge
NOTE: Pharmacierge integration is available exclusively for clinics located in the United Kingdom.
Pharmacierge is a premium, concierge-style prescription delivery service that brings medication straight to your patient’s doorstep — quickly, securely, and hassle-free.
Click on the "ePrescriptions" tab located under the "Clinical" section to get started.

On the ePrescriptions page, click the “Connect now” button next to the Pharmacierge option to get started.

A pop-up window will appear, showing all your prescriber employees as tabs across the top for easy selection.
Simply click on the tab for the specific employee you want to configure.

Then, enter the email address linked to their Pharmacierge account in the field provided.
This ensures that prescriptions sent by that employee are correctly associated with their Pharmacierge profile.
After entering the email address, select the "Save" button right below the field.
 You will get notified that you have successfully connected with Pharmacierge.

By following these steps, you’ll successfully integrate your Pabau account with Pharmacierge. Once connected, you’ll be able to send prescriptions directly from Pabau to Pharmacierge with just a few clicks.
How to Integrate with CloudRx
CloudRx is an online pharmacy with which Pabau has a direct integration. By enabling the integration, you can send the prescriptions directly to CloudRx, simplifying the process for both yourself and your clients.
NOTE: CloudRx integration is available exclusively for clinics located in the United Kingdom.
In the ePrescriptions section, you will find the option to set up CloudRx. To continue the process, click the blue "Connect" button on the CloudRx tab.

You will be prompted to enter the Account ID provided by CloudRx. Additionally, you have the option to add a markup fee for prescriptions, allowing you to set a percentage you'd like to charge.
Clicking the Save button will finalize the integration.
NOTE: You will need to have prescriptions enabled in your account and add the prescription info and registration number under your user profile to use CloudRx.
Following these steps will successfully integrate CloudRx into your Pabau account.
How to Integrate with Signature RX
NOTE: SignatureRx integration is available exclusively for clinics located in the United Kingdom.
SignatureRx is a secure, UK-based digital prescription platform that allows clinicians to send prescriptions electronically to pharmacies — no printing, scanning, or posting required.
n the ePrescriptions section, you will find the option to set up Signature RX. To continue the process, click the blue "Connect" button on the Signature RX tab. To connect SignatureRx, simply click the “Connect now” button next to the SignatureRx option to get started.

A pop-up window will appear where you’ll be prompted to enter the source code provided by your SignatureRx representative. You’ll also see a slider to set a markup fee, giving you the option to add a percentage-based charge to prescriptions if you choose to.

To finalize, click the "Save" button in the bottom right corner of the pop-up. By following these steps, you will successfully integrate SignatureRx to your Pabau account.
How to Prescribe to a Client
Step 1: Navigate to Setup
Start by logging into your Pabau account using your login credentials. To create prescriptions, you will need to first ensure that the prescription form is created in your account. Navigate to the Setup page and access your forms under the Clinical section.

Step 2: Insert Prescription Info for Prescribers
Prescription information should be added to the profiles of staff members who will be creating prescriptions.

This information includes credentials that enable your staff members to create prescriptions, such as GMC numbers, DEA numbers, or NPI numbers.
To add prescription info to the relevant staff members, follow the steps provided in this article.
Step 3: Navigate to the Client Card
Navigate to the search bar at the top of the page and proceed to type at least three letters of the client's name for whom you wish to create a prescription.

Step 4: Create a Prescription
Once you are viewing the client's profile, click on the Create button represented as a blue plus sign at the bottom right corner of the page to reveal the option to create a prescription.
.webp?width=557&height=318&name=Screenshot%20(18).webp)
Step 5: Select a Template
Select the form you want to use from your existing templates. If you haven't created a prescription form template yet, read our article on how to create a prescription form.

Step 6: Complete the Prescription form
After selecting the template, you will be prompted to complete the fields in the form.
Initially, select the appointment related to the prescription and choose the prescriber.

Proceed to select the drug that you need to prescribe by searching from the drugs that you have created previously.

After selecting the drug, you will need to add the dosage. There are two ways to go about this.
The first option is to click on the cogwheel icon to configure the instructions.
This action will open a pop-up window where you can manually build the instructions.

Alternatively, clicking anywhere in the field will reveal recommended instructions on the right side, which you can click to insert.

After selecting a drug, you can preview information from BNF and medicines.org.uk about the drug on the right side of the menu.

Enter the Prescriber Signature after completing all other fields.
Step 7: Save Form
Make sure to select "Save Form" so the Prescription can be saved in the client card.

After clicking "Save Form," you will see a prompt. Select if you'd like to print the prescription. It will be opened in another tab in PDF format—proceed as you normally would. Otherwise, close it.

You will be able to locate the created prescription by navigating to Chart/EMR and then clicking on the Prescriptions tab in the specific client card where you can review the details of the prescription, make any necessary edits, or print it for your records.

By following these steps, you will be able to create prescriptions in Pabau efficiently, ensuring accurate records and effective patient care management.
Managing Centralized Prescriptions
The Prescription Page in Pabau helps you keep track of every individual medication prescribed, across all prescriptions in your clinic. This is especially useful for auditing, reviewing medication history, and ensuring every detail is accurate before sending prescriptions to pharmacies.
NOTE: For detailed information on the Prescription Report, refer to this article.
Step 1: Navigate to the Prescription Page
Start by logging into your Pabau account using your login credentials. Then, navigate to your avatar located at the top right corner of the screen and click to open the available options.
The Prescription tab will be displayed.

Step 2: Manage Prescriptions
On the 'Prescription' page, you can find and manage every prescription you have created. Each entry in the list provides key information about the prescriptions you have written.
NOTE: This report is drug-based, not prescription-based. That means each row represents a single medication, even if multiple drugs were prescribed under the same prescription.
You can identify each prescription by its unique Prescription number, which serves as a reference for tracking. The Date column shows when each prescription was originally created.
A key feature of this page is the Status icon. This icon provides an "at-a-glance" validity check, telling you whether a prescription is complete and ready to be sent to a pharmacy.

- The icon will appear green if all necessary checks are passed. This includes ensuring that the patient's details are complete, the dosage and quantity are set, all required prescription fields are filled out, and the prescriber is authorized.
- If any of this information is missing or incomplete, the icon will appear grey or red, signaling that the prescription needs your attention before it can be finalized and sent. If you hover over the icon, it will show what is missing.
For each entry, the Client column displays the name of the patient who received the prescription.
The specific details about the medication itself are also clearly laid out. You'll see the Medication Name, the prescribed Dosage, and the Quantity of units included in the prescription. Additionally, the Description column contains any important notes or specific instructions that were included for the for pharmacy.
Step 3: Send Prescription to Pharmacy
Before a prescription can be sent to a pharmacy, it must pass a validity check. To initiate this check, first click the 'Approve' button. If the prescription is valid, the 'Send' button will become active, allowing you to click it.

After clicking the 'Send' button, a window will appear where you can finalize the prescription details. Before sending, you will need to:
- Select the Pharmacy: Choose the destination pharmacy from your list of integrated options.
- Select the Drugs: If the prescription includes more than one medication, you can select which specific drugs you want to send at this time.
- Add Notes (Optional): You can also add any additional instructions or notes for the pharmacy in the provided field.
Once you have configured these options, click the 'Save' button in the top right corner to finalize and transmit the prescription to the selected pharmacy.

By following these steps, you can confidently prepare, approve, and send prescriptions directly to pharmacies through the Centralized Prescriptions feature in Pabau.
For more guides, refer to related articles below, select additional guides, or use the search bar at the top of the page. These guides will help you get the most out of your Pabau account.
Additionally, to help you fully utilize and understand your Pabau account, we recommend exploring additional guides and resources offered at the Pabau Academy. It offers in-depth video tutorials and lessons, offering a holistic learning experience that can equip you with the essential skills for achieving success with Pabau.