
Table of Contents:
1. Overview of Automations2. How to Create a New Automation
3. How to Create Recall Automations
4. How to Set Up a Birthday Automation
5. How to Create New SMS Automations
6. How to Set Up a Debt Collection Automation
7. How to Clone an Automation
Overview of Automations
Automations are a powerful tool in Pabau, revolutionizing patient engagement by facilitating various processes including marketing, recall management, sales, and invoicing. With these automations, you can efficiently attract and retain patients while managing your practice with ease, all requiring minimal monitoring on your part.
Configure Automation Permissions
Go to the Team feature and select the staff member for whom you wish to grant access to the Automations feature.
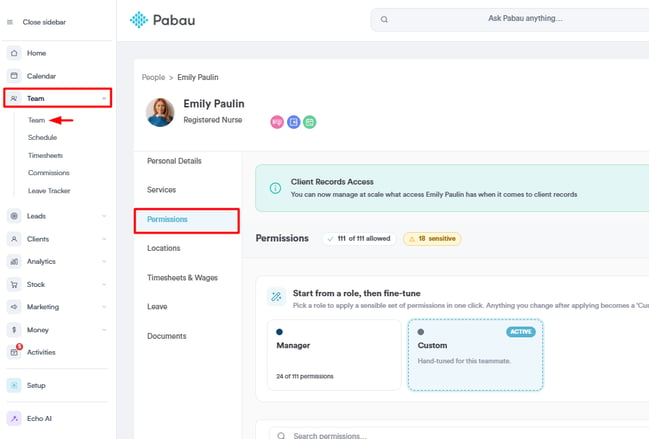
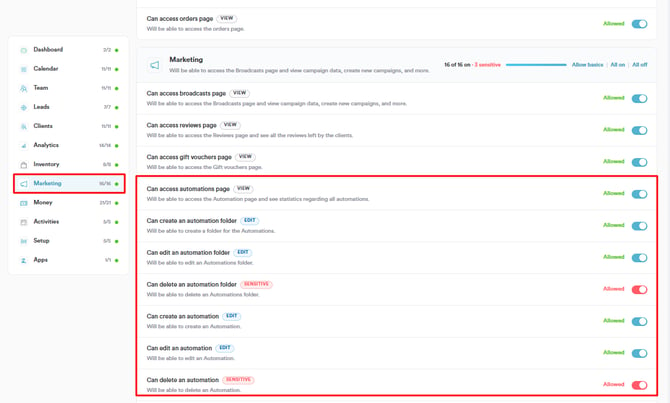
Within their user profile's Permissions tab, navigate to Marketing permissions, and activate the Automations permission setting.
Automations Dashboard
Access the Automations feature by clicking on "Automation" in the Marketing feature in the left sidebar menu.
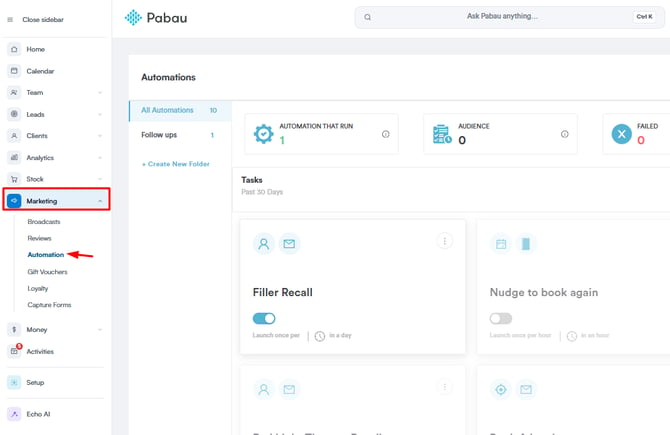
Upon accessing Automations, you'll encounter a dashboard presenting statistics on "Automations That Run," "Audience," "Failed," and "Filtered". This information helps gauge the effectiveness of your automated campaigns.
Individual Automations
Get an overview of each automation, including its name, the clients it applies to, its status, launch time, and frequency. Recommended automations, such as Recalls, Precare Templates, and Reminders, are highlighted for optimal setup.

Managing Automations
Effortlessly customize automation settings by accessing options like "View Details," "Edit," "Move to Folder," and "Delete" through the three dots associated with each automation.

Organizing with Folders
Organize and manage your automations effectively by utilizing folders. You can create, edit, or delete folders on the left side of the dashboard, enhancing overall automation management.

NOTE: You can also learn about this topic by watching a lesson on Pabau Academy.
How to Create a New Automation
In this guide, we'll walk you through the process of creating a new automation in Pabau, allowing you to manage communication tasks. Follow the steps below to set up your automation:
Step 1: Access Automation Section
Log in to your Pabau account, and navigate to the Marketing section in the left sidebar menu. Click on "Automation" to proceed.
To initiate the creation of a new automation, click the "Create Automation" button located in the top right corner.
Step 2: Choose Automation Template or Start from Scratch
Choose from existing templates, and use the left sidebar's "Filter By Automation Type" section to refine your selection. Alternatively, start from scratch. Whether using templates or starting from scratch, the setup steps remain the same.

Step 3: Choose Automation Filter
When starting from scratch, choose an automation filter based on clients, leads, appointments, invoices, or line items. Each filter serves specific purposes related to the respective Pabau features. For instance:
- Clients: Automation related to fields visible in the client card or patient profile. Use this filter to pull information like the current account balance.
- Leads: Automation associated with fields visible in the lead profile. Utilize this filter to extract information such as the lead stage or lead name.
- Appointments: Automation linked to client appointments. Employ this filter to retrieve details like the appointment status or the service related to the appointment.
- Invoices: Automation connected to invoices issued to clients. Use this filtering to pull information like the invoice total or VAT percentage.
- Line Items: Automation tied to items sold to clients. Utilize this filter to extract details about specific services or packages sold.
NOTE: Conditions can be added to filter the audience based on various components, even if a specific object is selected.
Step 4: Select Automation Type
Next, choose the automation type: Email, SMS, or activity. For this example, we'll focus on email automations.
Step 5: Specify General Automation Information
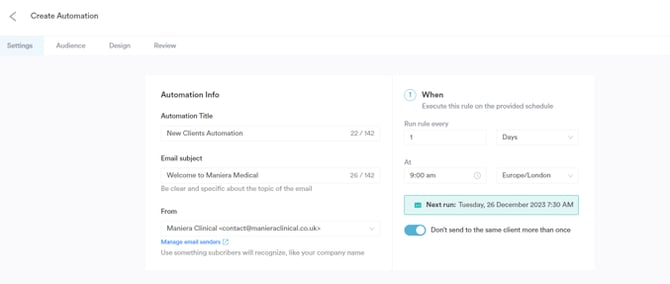
Under "Settings," provide the internal automation title, email subject, sender name, email address and automation description. Schedule the automation's frequency and prevent multiple sends to the same client, especially for special offers or non-repetitive information.
Step 6: Select Audience
In the "Audience" tab, choose an existing audience or create a new one by specifying conditions. We can specify one or more conditions to filter our desired clients or leads to form the list.

Step 7: Design Your Automation
In the "Design" tab, customize your email using templates and the drag-and-drop editor. Modify components such as columns, headings, text, images, buttons, dividers, HTML code, and menu.

Step 8: Review and Schedule
Review your automation, make necessary changes, and schedule it for sending based on your preferred timing.
By following these steps, you can efficiently create and customize automations in Pabau.
How to Create Recall Automations
Creating recall automations in Pabau is a strategic way to remind clients of upcoming appointments, ensuring they stay engaged with your services. Follow these steps to set up a recall automation:
Step 1: Enable Automations
If you haven't already enabled automations in your Pabau account, do so by logging into your Pabau account, navigating to Setup in the left sidebar menu, then clicking on "Business Details" in the Business section. In the "Features" tab, enable the Automations feature.
NOTE: You can also learn about this topic by watching a lesson on Pabau Academy.
Step 2: Navigate to Automations
Navigate to the Marketing feature in the left sidebar menu, then click on "Automation".
Step 3: Creating a New Automation
Click the "Create Automation" button in the top right corner of the Automations page and click on "Start from scratch".
Step 4: Choosing Automation Filter
In the filtering prompt, designate "Appointment" as the primary object since we are constructing a recall automation, focusing on appointment dates.

Step 5: Selecting Automation Type
In the next step, choose the automation type "Email," as recalls are most commonly sent via email.
Step 6: Specifying General Automation Information
- Type the name of the recall, e.g., "Botox Recall - 3 months."
- Set the email subject to "It's time for your next appointment."
- Schedule the recall to run "Every 1 Day."
- You can add 'Automation Description' if needed.

Step 7: Selecting Audience
Create an audience with the following criteria:
- The appointment date was 120 days ago.
- Appointment status is Complete.
- Appointment service is any of Botox 1, 2, 3.
- Contact where the future appointment service is not Botox 1, 2, 3.

Save the audience for future use.
Step 8: Designing Your Automation
In the "Design" tab, build an email template that will include reasons why the client should book another appointment.

Customize your email using templates and the drag-and-drop editor. Modify components such as columns, headings, text, images, buttons, dividers, HTML code, and menu.
You can also add a button linking to your online bookings portal.
Step 9: Review and Schedule
Review your recall automation, make necessary changes, and schedule it based on your preferred timing.
How to Set Up a Birthday Automation
Step 1: Access Automations
Log into your Pabau account and navigate to the Marketing section in the left sidebar menu. From there, select "Automation."
Step 2: Create a New Automation
Click on "Create Automation" located in the top right corner of the screen. Choose "Start from scratch" to begin building the birthday automation from the ground up.

Step 3: Define Filtering Criteria
Next, you need to specify the criteria for filtering clients. Choose "Clients" as the data object for this automation. Depending on your preference, opt for either an email or SMS automation. You'll follow similar steps regardless of whether you choose email or SMS. For the sake of this guide, we'll proceed with creating an email automation.
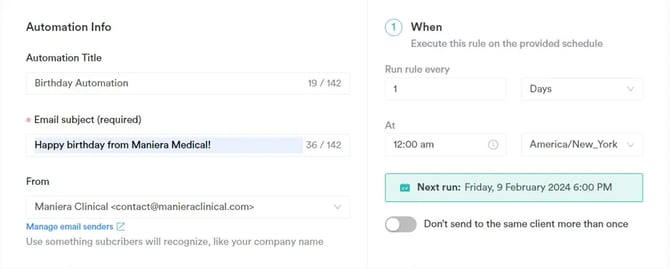
Step 4: Title and Subject
Assign a title to the automation (e.g., "Birthday Automation") for internal reference and add a subject line for the email that clients will receive. Additionally, select the sender address from which the email will be dispatched.
Step 5: Set Execution Rules
Determine when the automation will run. Since it's a birthday automation, you can set it to run once per day at noon. This ensures that the system checks for clients whose birthdays match the current date and sends them the designated email.
For this particular automation, refrain from toggling the "Don’t send to the same client more than once" option. Enabling this setting would result in clients receiving the email only once, thus they won't receive it next year on their birthday.
Step 6: Audience Definition
Under the Audience tab, create an audience filter. For a basic version, include conditions such as "Client is active" and "Client Date of Birth is Today." This ensures that the automation runs daily and sends birthday emails to clients with birthdays on that day.

Step 7: Design the Email
Move to the Design tab and craft the email's design. You can choose from existing templates and customize them to suit your preferences, or code your own template using HTML.
Consider adding a special discount code as a birthday gift for clients to redeem during their next appointment.

Step 8: Review and Activation
Finally, review all settings in the Review tab to ensure everything is configured correctly. If everything looks good, click on "Turn on" to activate the birthday automation.
To review the automation's performance, simply click on the three dots positioned in the top right corner of the automation interface and select "View details."

Congratulations! Your birthday automation is now set up and ready to delight your clients on their special day. Keep track of its performance and make adjustments as needed to optimize client engagement and satisfaction.
How to Create New SMS Automations
Step 1: Navigate to Automations
Log in to your Pabau account, and navigate to the Marketing section in the left sidebar menu. Click on "Automation" to proceed.
Step 2: Create New SMS Automation
When creating a new automation from scratch, after you choose which object to filter, you will be prompted to select if you want to set up an email or SMS automation. Select the "Send an SMS" option to get started.

Step 3: Complete the Required Information
After selecting the type of automation you'd like to create, you can fill out the information that each tab requires. The tabs are listed at the top left corner of the page.
- Settings: In this tab, you should provide the internal automation title and sender name. You can also schedule the automation's frequency and prevent multiple sends to the same client, especially for special offers or non-repetitive information.
- Audience: In the "Audience" tab, choose an existing audience or create a new one by specifying conditions. We can specify one or more conditions to filter our desired clients or leads to form the list.

- Design: In the design tab, you can edit the message that you'd like to be sent, and you also have the option to include links such as the Online Bookings link, the Client Portal link, or any custom link.

- Review: On the Review tab, you can review your automation setup. Check to ensure all required fields are filled out for activation. Once everything is in order, simply click the "Turn On" button to activate it.

The SMS automation you created will appear on the Automations page. If it's active it will have the toggle enabled. If not, the toggle will be greyed out.

By following these steps, you can schedule SMS automations.
NOTE: Without Marketing Plus, you're limited to sending just two automations. To explore the enhanced capabilities of Marketing Plus, refer to this article for more information.
How to Set Up a Debt Collection Automation
Step 1: Navigate to Automations
Log in to your Pabau account and navigate to the Marketing section in the left sidebar menu. Click on "Automation" to proceed.
Step 2: Create a New Automation
To initiate the creation of a new automation, click the "Create Automation" button in the top right corner.

Proceed to start an automation from scratch. In the next stage, where you can choose the object you wish to perform an automation against, select "Line Items" to filter out the unpaid invoices.

On the next page, you'll be prompted to select if you wish to create an SMS Automation (will add the article once it's published) or email automation.
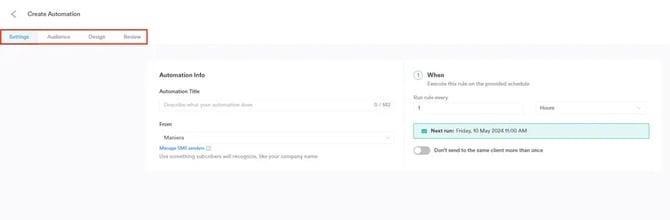
Step 3: Specify General Automation Information
In this tab, if you are creating an email automation, you should provide the internal automation title and the email subject that will be visible to clients. This field is required to be filled out. If you are creating an SMS automation, you should provide the internal automation title and sender name. You can also schedule the automation's frequency and prevent multiple sends to the same client.
.webp?width=670&height=236&name=image-png-May-13-2024-09-04-16-2485-AM%20(1).webp)
When choosing the days to schedule the reminder, Saturdays and Sundays are initially excluded from the automation. To include or exclude specific days, click on each day. Selected days are highlighted in light blue.

Step 4: Select the Audience
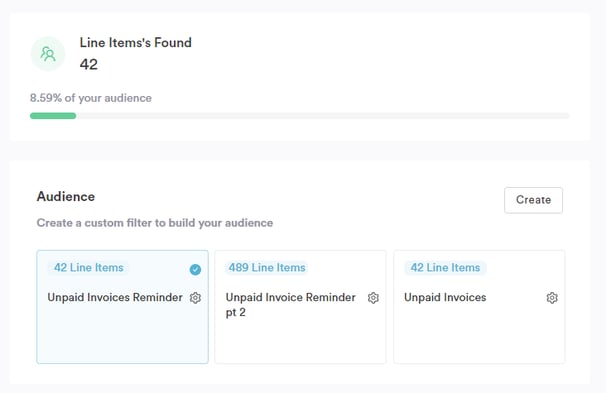
This step is crucial in setting up your automation. You should first filter your audience to send notifications to clients with unpaid or partially paid invoices. To do this, navigate to the 'Audience' tab and click the 'Create' button to add filters.

- The first filter, "Show clients that match ALL of these conditions," filters clients that match all the conditions you add; if one condition does not match, it won't show the client. In this case, we recommend adding the condition "Client Active is Active" in this filter to show only active clients.
- The second filter, "And match ANY of these conditions," filters any conditions you add. In this case, we recommend adding the condition "Invoice Payment Status is Unpaid" and "Invoice Payment Status is Part-Paid."

Ensure to enter a filter name; you won't be able to save the changes without one. After adding the name, the blue 'Save' button will appear at the bottom right of the screen.

When you apply filters, the line items that match those conditions will be displayed in the audience tab. This includes the number of line items that meet the filter criteria. This gives you a clear overview of how your filter settings affect audience selection.
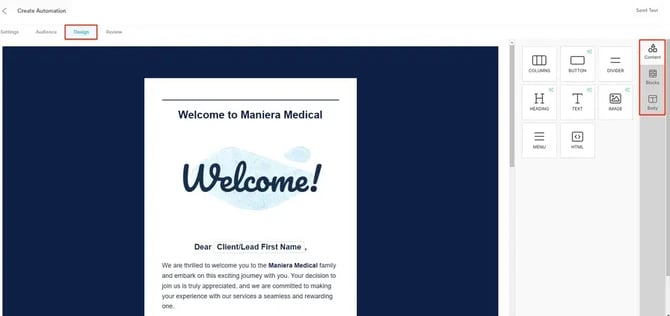
Step 5: Design Your Automation
You can choose from various templates provided by Pabau, or you can create your own by coding it. You'll find the option to code your template by scrolling down the Design tab.
If you prefer to use a template from Pabau, you can manually enter all its components by dragging and dropping them onto the page.
Alternatively, if you've created a template elsewhere, you can directly enter its HTML code. Additionally, you can manually enter components in the 'Code Your Own' template.
If you are creating SMS automations, in the design tab, you can edit the message that you'd like to be sent, and you also have the option to include links such as the Online Bookings link, the Client Portal link, or any custom link.
.webp?width=540&height=475&name=image-png-May-10-2024-03-30-49-4099-PM%20(1).webp)
Step 6: Review the Automation
Switch to the Review tab to confirm if you have completed your automation setup. Check to ensure all required fields are filled out for activation. Once everything is in order, click the "Turn On" button to activate it. Clicking the "Save" button will save your automation without activating it. This means it will be stored in your list of automations but will not run until you manually trigger it to do so.

The automation you created will appear on the Automations page. If it's active, the toggle will be enabled. If not, the toggle will be greyed out.

By following these steps, you can create a reminder automation for clients to pay their unpaid invoices.
How to Clone an Automation
Step 1: Navigate to Automations
Start by logging into your Pabau account using your login details. Then, expand the Marketing tab on the left sidebar menu to reveal the Automations tab.
Step 2: Locate the Desired Automation
On the Automations page, use the search bar to find the automation you'd like to clone.
Step 3: Clone the Automation
After locating it, hover over the three dots at the top right corner of the automation to reveal the 'Clone' action.
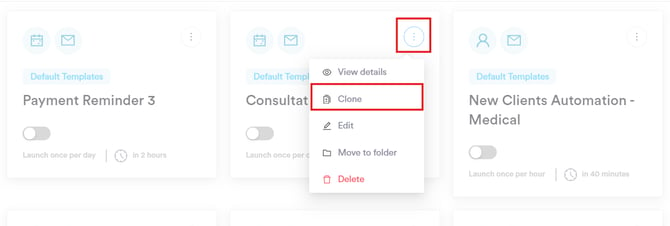
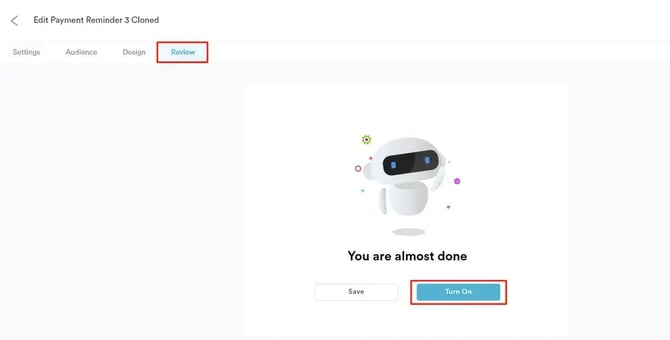
Once you click 'Clone,' the duplicated automation will open, giving you the option to edit any details. To turn on the automation, head to the 'Review' tab and select 'Turn On.'
The cloned version will now be listed along with all others in the system in the Automations page.

By following these steps, you can clone an automation in Pabau.
For more guides, refer to related articles below, select additional guides, or use the search bar at the top of the page. These guides will help you get the most out of your Pabau account.
Additionally, to help you fully utilize and understand your Pabau account, we recommend exploring additional guides and resources offered at the Pabau Academy. It offers in-depth video tutorials and lessons, offering a holistic learning experience that can equip you with the essential skills for achieving success with Pabau.