
NOTE: This feature is part of the new client card version and is currently available to select users only, starting August 2026. A wider rollout to all accounts is coming soon.
Step 1: Navigate to the Appointments Tab
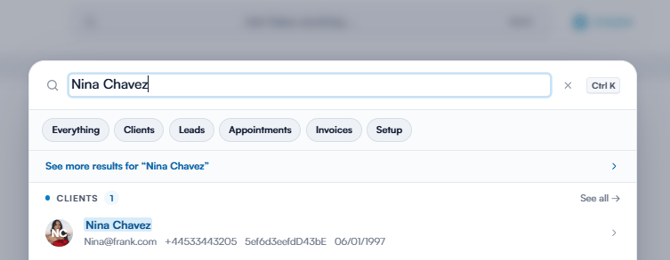
Log in to your Pabau account and open the client card of the client whose appointments you want to review.
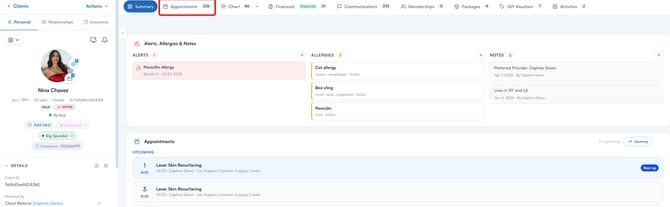
At the top of the client card, click on the "Appointments" tab. The number next to the tab shows the total number of appointments recorded for that client.
Step 2: Understanding the Appointments Overview
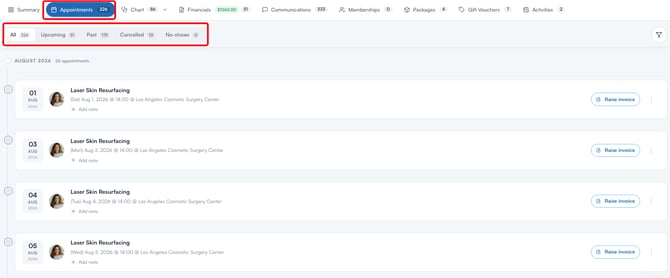
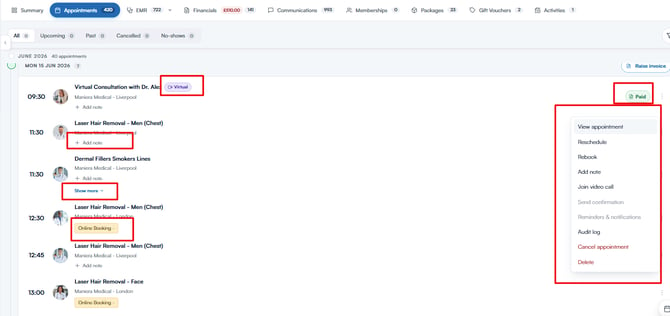
The Appointments tab displays all of the client’s appointments against a left-hand timeline, grouped by month. On the "All" tab, a "Today" marker separates upcoming appointments from past ones, and appointments that fall on the same day are grouped under a single date header. Here’s a breakdown of the key elements on the page:
Appointment Filters
Use the tabs at the top of the page to filter the appointments displayed. Each tab shows the number of appointments in that category:
- All - Displays every appointment, regardless of status.
- Upcoming - Displays only appointments scheduled for a future date.
- Past - Displays only appointments that have already taken place.
- Cancelled - Displays only cancelled appointments.
- No-shows - Displays only appointments the client did not attend.
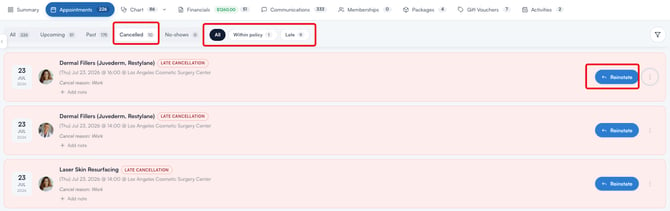
When you open the "Cancelled" tab, an additional filter appears, allowing you to view "All" cancellations, only cancellations made "Within policy", or only "Late" cancellations. Each cancelled appointment is labelled accordingly and shows the cancellation reason. From here, you can also click on the "Reinstate" button to restore a cancelled appointment.
In addition to the tabs, click on the filter icon in the top right corner of the page to apply advanced filters by status, team member, service, and date range.
Appointment Details
Each row in the timeline represents an individual appointment and includes:
- Service - The name of the booked service.
- Date and time - When the appointment is scheduled to take place.
- Team member - The team member the appointment is booked with, shown as their avatar. Hover over the avatar to see their name; any additional team members appear as stacked avatars.
- Location - The clinic location of the appointment.
- "Virtual" marker - Indicates that the appointment is a video appointment.
- "Dx" chip - Indicates that a diagnosis is linked to the appointment. Click it to view or edit the diagnosis.
- Status - A colour-coded badge next to the service name showing the appointment’s current status (for example, Scheduled or Complete), matching the statuses used on the calendar.
- Payment - A pill for each invoice linked to the appointment, showing its status (Paid, Due, Deposit, or Credit) along with any outstanding amount. Click a pill to preview that invoice.
- Booking source - An icon indicates when the appointment was booked online by the client.
You can also click on "Add note" below an appointment to attach a note to it, and click on "Show more" to reveal any custom booking fields captured for the appointment. Multi-day bookings are grouped into a single series, with each row labelled "Day 1 of 3", "Day 2 of 3", and so on.
Managing Individual Appointments
Click on the three-dot menu on the right side of an appointment to manage it. Depending on the appointment’s status, the available actions include:
- View appointment - Open the appointment on the calendar.
- Reschedule - Move the appointment to a different date or time.
- Rebook - Book the same service again for the client.
- Add note - Attach a note to the appointment (shown as "Edit note" once a note exists).
- Join video call - Join the video call for virtual appointments.
- Send confirmation - Resend the appointment confirmation to the client (upcoming appointments only).
- Reminders & notifications - Adjust the appointment reminder and feedback request for the appointment (upcoming appointments only).
- Audit log - View a log of all changes made to the appointment.
- Cancel appointment - Cancel the appointment. You will be asked to select a cancellation reason and can choose whether to notify the client by email or SMS.
- Delete - Permanently remove the appointment. You will be asked to confirm, as this cannot be undone.
For cancelled appointments, you can also edit the cancellation reason or reinstate the appointment.
NOTE: Rescheduling and cancelling require the matching user permissions - without them, the option appears greyed out.
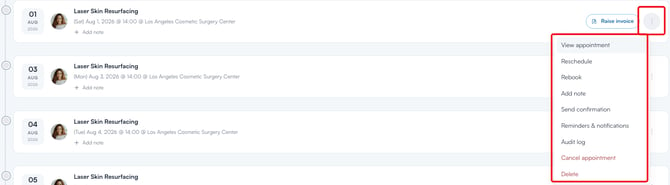
Additionally, use the "Raise invoice" button on the right side of an appointment or day to create an invoice for the services provided. For appointments that have already been invoiced, click the invoice pill to view the invoice instead.
Tips for Getting the Most Out of the Appointments Tab
- Check the "Cancelled" tab before enforcing fees - The "Within policy" and "Late" filters show you at a glance whether a cancellation fee applies.
- Use "Rebook" for returning clients - Rebook a past appointment in a few clicks instead of creating a new booking from scratch.
- Review the "No-shows" tab before confirming new bookings - A pattern of no-shows may warrant a deposit or prepayment for future appointments.
- Use the audit log to trace changes - If an appointment was moved or cancelled unexpectedly, the audit log shows who made the change and when.
- Add notes to keep context in one place - Attach notes about special requests or follow-ups directly to the relevant appointment.
By using these filters and actions, you can review a client’s full appointment history and manage every booking without leaving the client card.
Was this guide helpful? Let us know by voting below - your feedback helps us write clearer articles.
For more guides, browse the related articles below or use the search bar at the top of the page. You can also watch our video learning series, the Pabau Academy, or visit the Support page for additional help.