
Table of Contents:
- Promotions Explained: Deal Types and When to Use Each
- Understanding Your Promotions Dashboard
- How to Create a Promotion (Code-Based)
- How to Create a Flash Sale
- How to Choose What's Discounted: Services, Products, Gift Cards, Packages, and Locations
- How to Set Client Eligibility
- How to Set Usage Limits and Stacking
- How to Edit, Duplicate, Pause, Archive, or Delete a Promotion
- How to Apply Promotions at Point of Sale
- How to Use Promo Codes in Online Booking
Promotions explained: Deal Types and When to Use Each
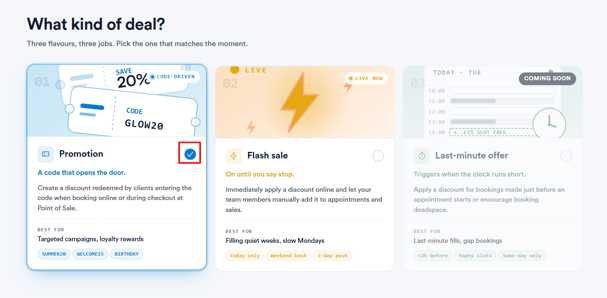
There are two deal types available, each designed for a different purpose and used in slightly different ways.
Promotion
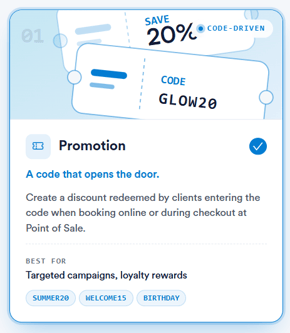
A Promotion is a code-based discount. Clients redeem it themselves by entering a unique code, either at the payment step of an online booking or at checkout at Point of Sale, where a team member enters it manually on the client's behalf. Because it requires a code, a Promotion gives you the most control over exactly who receives the discount and when - nothing is applied unless the code is entered.
When to use it:
- Targeted campaigns - sharing a code with a specific group, for example through an email newsletter or social media post.
- Loyalty rewards - giving returning or VIP clients a code as a thank-you.
- Seasonal offers - running a limited-time discount such as SUMMER20 around a particular event or time of year.
- Referral or welcome offers - codes like WELCOME15 for new clients booking for the first time.
A Promotion can be enabled for Online bookings, Point of Sale, or both, depending on where you want clients to be able to redeem it.
Flash sale
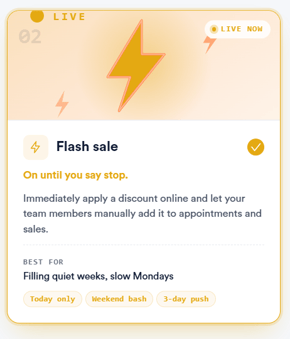
A Flash sale applies a discount automatically, with no code required. As long as an item meets the criteria you've configured such as the day, time, or location - the discount is applied instantly, both at Point of Sale and in Online bookings, without the client or team member needing to do anything extra.
When to use it:
- Filling quiet periods - for example, discounting appointments on a slow Monday or a historically quiet afternoon.
- Short, high-urgency windows - running a sale for a few hours or a single day to create a sense of urgency.
- Encouraging bookings in specific time slots - using time-of-day rules to only apply the discount during the hours you're trying to fill.
Because the discount shows automatically wherever it's active, Flash sales tend to work best for broad, visible promotions rather than discounts meant for a specific, limited audience.
With a clear understanding of each deal type, you can choose the one that best fits your clinic's goals.
Here's how the dashboard is organized, and how to use each part of it:
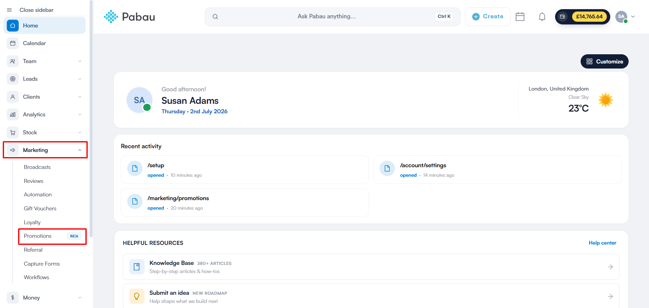
Locating Promotions
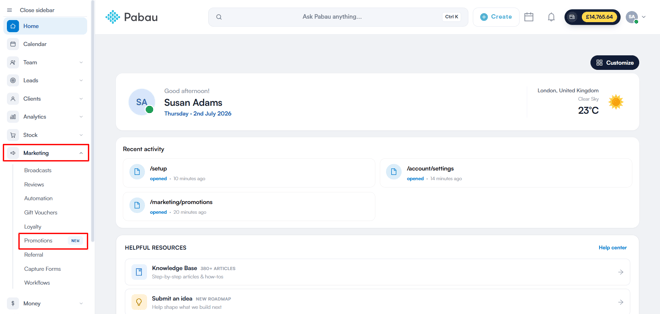
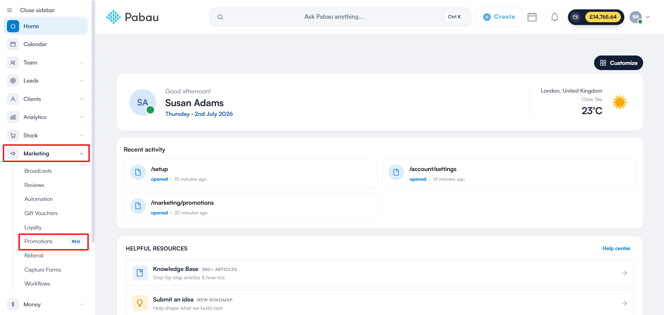
Once you're logged in to Pabau, navigate to the left-hand sidebar and select ''Marketing'', then click ''Promotions'' from the dropdown menu.
Performance stats
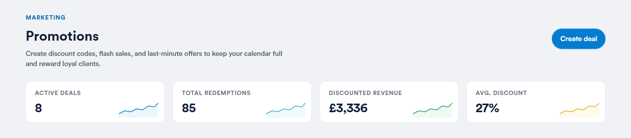
At the top of the page, four summary cards give you a quick snapshot of how your promotions are performing overall:
- Active deals - the number of promotions that are currently live and available for use.
- Total redemptions - the cumulative number of times any promotion has been redeemed.
- Discounted revenue - the total value of revenue that has been discounted through promotions.
- Avg. discount - the average discount percentage or value applied across all redemptions.
Search and filters
Below the stats, promotions are filtered by status using a set of tabs:
- All - shows every promotion, regardless of status.
- Active - promotions that are currently live.
- Scheduled - promotions set up with a future start date that haven't yet begun.
- Paused - promotions temporarily suspended; they won't be applied at checkout while paused.
- Ended - promotions whose end date has passed and are no longer active.
- Archived - promotions that have been manually archived and removed from the active view.

Each tab displays a count of promotions in that state. A search bar lets you look up a specific deal by name or discount code, and the Sort button reorders the list by oldest or latest.
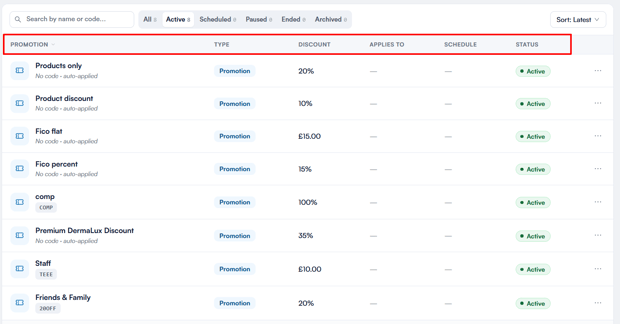
The deals list
Each deal in the list displays:
- Promotion - the name of the deal, along with either its unique discount code (e.g. SUMMER20) or No code · auto-applied if the discount is applied automatically without a code.
- Type - Promotion, Flash sale, or Last-minute offer.
- Discount - the discount value, shown as either a percentage (e.g. 20%) or a flat rate amount (e.g. £15.00).
- Applies to - the services, products, or employees the promotion is restricted to. Blank if it applies to everything.
- Schedule - the active date range for the promotion, if one has been set.
- Status - the current status of the promotion, e.g. Active or Paused.
Managing a deal
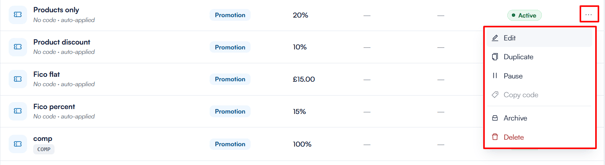
Click the three-dot menu next to any deal to:
- Edit - opens the promotion so you can make changes.
- Duplicate - creates an exact copy of the promotion, with "Copy" added as a prefix to the name.
- Pause - temporarily suspends the promotion; it won't be applied at checkout while paused. For paused promotions, this option becomes Resume.
- Copy code - copies the promotion's discount code to the clipboard. This only appears for promotions with a code, not for auto-applied deals.
- Archive - removes the promotion from the active list without deleting it.
- Delete - permanently deletes the promotion. This is a soft deletion and any invoices where the discount was applied will still reference it.
With a clear view of the dashboard, you're ready to start creating your first promotion.
Step 1: Access Promotions
Once logged in to Pabau, go to the left-hand sidebar and select ''Marketing'', then ''Promotions''.
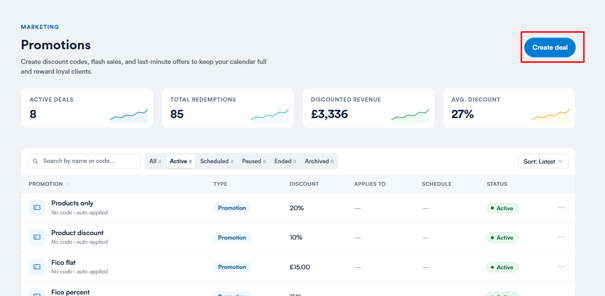
Step 2: Start a New Deal
From the Promotions dashboard, click Create deal in the top right corner.
Step 3: Select the Deal Type
On the first step, select Promotion, then click Continue in the top right corner.
Step 4: Enter the Promotion Details
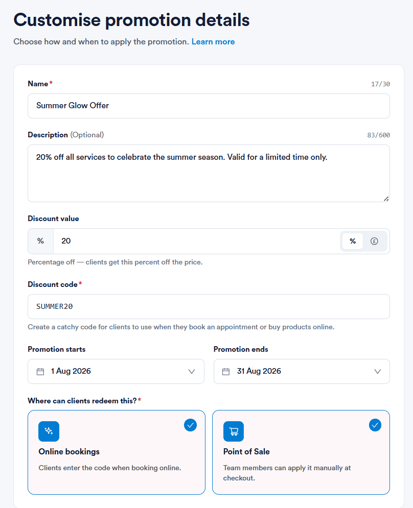
- Name - the name of the promotion as it will appear in the system.
- Description (optional) - additional context about the promotion, up to 600 characters.
- Discount value - enter the value and select the unit: % or £.
- Discount code - a unique code clients use to redeem the deal, e.g. SALE10. This can be entered by the client at checkout during online booking, or applied manually by a team member at Point of Sale.
- Promotion starts - the date the promotion becomes active. If left blank, it goes live immediately on publishing.
- Promotion ends - the date the promotion expires. Defaults to Never if left blank, meaning it runs indefinitely.
- Where can clients redeem this? - select Online bookings, Point of Sale, or both.
Please note: A promotion with a flat rate discount greater than the basket total will reduce the total to £0 - it will never produce a negative balance.
Step 5: Choose What's Discounted
Select which catalogue items the promotion applies to - Services, Products, Gift cards, or Packages or tick Include all to apply it across the whole catalogue.
%204.png?width=485&height=280&name=how%20to%20create%20a%20promotion%20(code-based)%204.png)
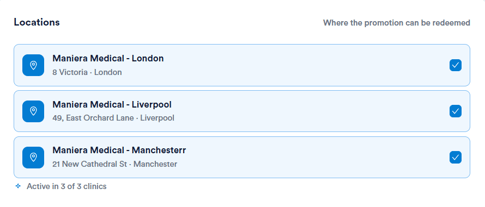
You'll also choose which clinic locations the promotion can be redeemed at.
Step 6: Set Client Eligibility and Usage Limits
Choose who's eligible to use the promotion - All clients, New clients only, Returning clients only, or a Specific client segment.
%206.png?width=485&height=306&name=how%20to%20create%20a%20promotion%20(code-based)%206.png)
You can also set optional usage limits, such as a total redemption cap or a limit per client, and decide whether the promotion can be combined with other active discounts.
%207.png?width=485&height=146&name=how%20to%20create%20a%20promotion%20(code-based)%207.png)
Step 7: Review and Publish
Review the summary of your promotion and use the Live preview panel to see how it will appear to clients at checkout or during online booking.
%208.png?width=642&height=303&name=how%20to%20create%20a%20promotion%20(code-based)%208.png)
Once everything looks correct, click ''Publish promotion'' to make the deal live.
By following the steps above, you can create and publish a Promotion to fit your clinic's needs.
Once logged in to Pabau, go to the left-hand sidebar and select ''Marketing'', then ''Promotions''.
Step 2: Start a New Deal
From the Promotions dashboard, click Create deal in the top right corner.
%202.png?width=622&height=264&name=how%20to%20create%20a%20promotion%20(code-based)%202.png)
Step 3: Select the Deal Type
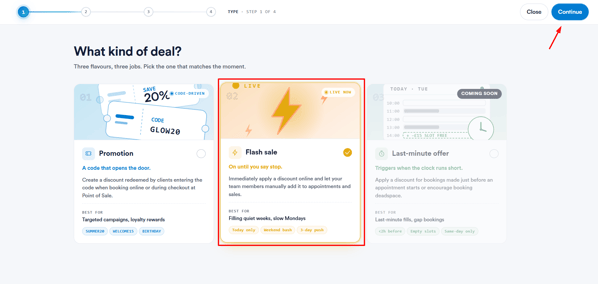
On the first step, select Flash sale as the deal type, then click Continue in the top right corner.
Step 4: Enter the Flash Sale Details
- Name - the name of the flash sale as it will appear in the system.
- Description (optional) - additional context about the flash sale, up to 600 characters.
- Discount value - enter the value and select the unit: % or £.
- Promotion starts / ends - the date range the flash sale runs for. Leave the end date blank to run indefinitely.
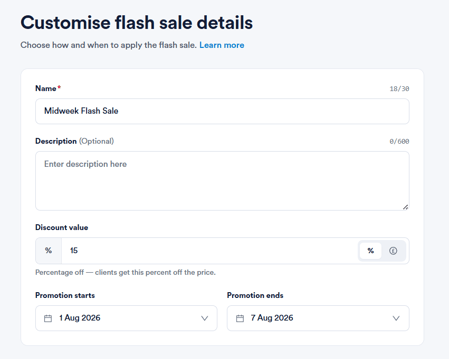
Unlike a Promotion, a Flash sale doesn't use a discount code - the discount is applied automatically to eligible items.
Please note: A flash sale with a flat rate discount greater than the basket total will reduce the total to £0 - it will never produce a negative balance.
Step 5: Choose What's Discounted
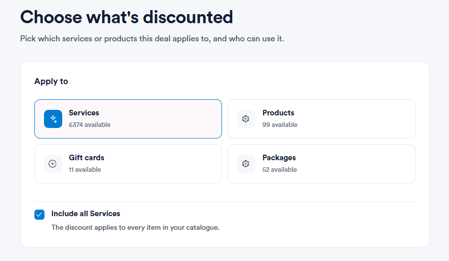
Select which catalogue items the flash sale applies to - Services, Products, Gift cards, or Packages or tick Include all to apply it across the whole catalogue.
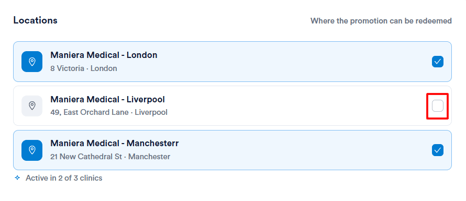
You'll also choose which clinic locations the flash sale can be redeemed at, and set client eligibility if needed.
Step 6: Set Time-of-Day Rules
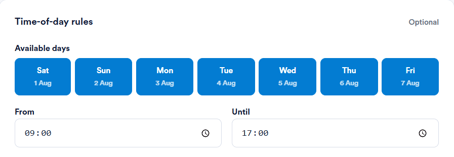
Flash sales can be restricted to specific days and times, so the discount is only visible and applicable within that window:
- Available days - select which days of the week the sale is active, Monday through Sunday.
- From / Until - set the time window the discount applies during, e.g. 09:00–17:00.
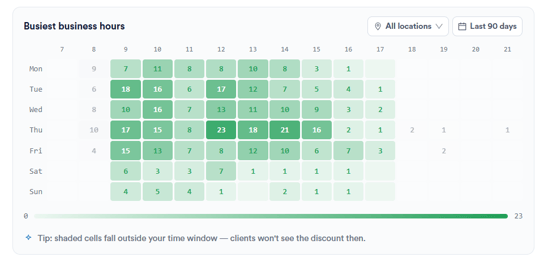
Using the busiest business hours heatmap
Below the time-of-day settings, a heatmap displays appointment density by day and hour across the last 90 days, filterable by location. Darker cells indicate busier periods, while lighter cells highlight quieter times - helping you identify the best windows to target with a flash sale. Shaded cells outside your selected time window show where clients won't see the discount.
NOTE: Usage limits are not available for Flash sales, since the discount is applied automatically rather than redeemed individually by clients.
Step 7: Review and Publish
Review the summary of your flash sale and use the Live preview panel to see how it will appear to clients at checkout or during online booking.
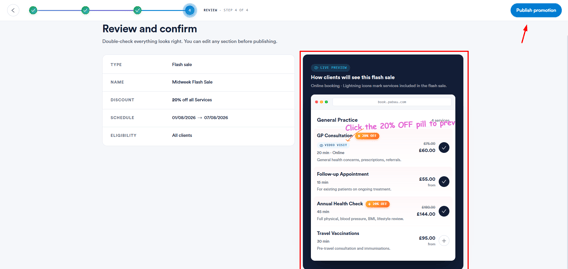
Once everything looks correct, click Publish promotion to make the deal live.
By following the steps above, you can create and publish a Flash sale to help fill quieter periods in your calendar.
What to Apply the Discount To
Under Apply to, select which catalogue items the discount applies to. Items can be selected individually, or included all at once:
- Services - choose from all active services in the catalogue.
- Products - choose from all active products.
- Gift cards - apply the discount to gift card purchases.
- Packages - apply the discount to packages.
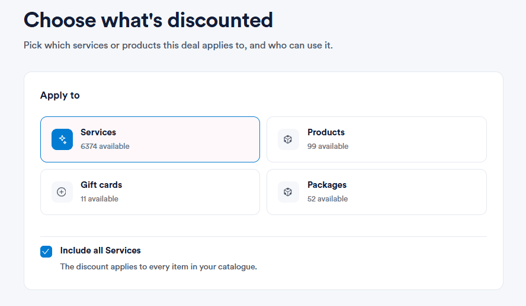
To apply the discount across an entire category without selecting items one by one, tick Include all Services, Include all Products, Include all Gift cards, or Include all Packages, depending on which category you're working with.
Eligible Locations
Under Locations, select which clinic locations the deal can be redeemed at. All active locations are listed and can be toggled on or off individually, allowing you to run a deal at one clinic, a selection of clinics, or across your entire business.
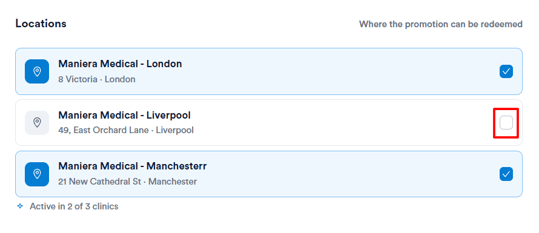
Upon completing this step, review your selections before publishing the deal.
Please note: If a deal is scoped to specific services, products, or locations, it will only apply to items in the basket that match those rules. Any items that don't match will be charged at their standard price.
By choosing what's discounted and where it applies, you can make sure each deal reaches the right services, products, and locations.
As part of the Scope & Rules step, Client eligibility lets you decide who is able to use a deal. This applies to both Promotions and Flash sales.
By default, a deal is open to every client, but you can restrict it further - for example, to reward loyal clients, encourage new clients to book their first appointment, or run a targeted offer for a specific group, such as VIP clients.
Setting client eligibility
Under Client eligibility, choose one of the following options:
- All clients - anyone with the code, or a qualifying booking, can use the deal.
- New clients only - restricted to first-time clients without a previous appointment.
- Returning clients only - restricted to clients with at least one past appointment.
- Specific client segment - restricted to clients with a particular label, e.g. VIP, Lapsed, or Birthday this month.
Good to know:
A deal is made up of several conditions - who it applies to (Client eligibility), what it applies to (Apply to), and where it can be redeemed (Locations). All conditions must be met for the discount to apply.
For example, if a deal is restricted to returning clients and to facial treatments only, a new client would not qualify, nor would a returning client booking a different service - only a returning client booking a facial treatment would receive the discount.
Upon completing this step, review your selections before publishing the deal.
By following the steps above, you can control exactly which clients are eligible to redeem a Promotion or Flash sale.
NOTE: Usage limits are available for Promotions only. This section does not apply to Flash sales, since Flash sale discounts are applied automatically rather than redeemed individually by clients.
As part of the Scope & Rules step, Usage limits let you control how many times a Promotion can be redeemed. Let's see how to set these limits and control whether a deal can be combined with other active discounts.
Setting usage limits
Under Usage limits, you can set the following, both of which are optional:
- Total redemptions - cap the total number of times the promotion can be used across all clients, for example the first 500 clients to redeem it. Leave blank for unlimited use.
- Per client - cap how many times a single client can use the promotion. Leave blank for no limit.
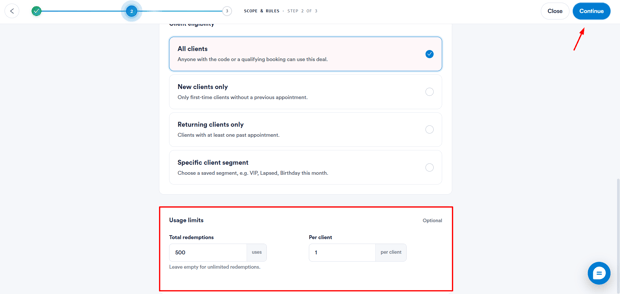
Once you're done, you can continue setting up the rest of the promotion.
By following the steps above, you can control how often a Promotion can be used and whether it can be combined with other discounts.
Once a deal has been created, you can manage it at any time from the Promotions dashboard. Each promotion has a More actions menu, giving you quick access to the most common management options.
Access the More actions menu
From the Promotions dashboard, click the three-dot menu on the right-hand side of any deal's row.
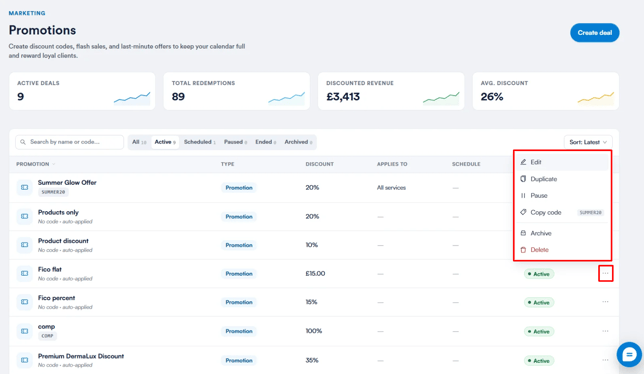
Edit a promotion
Select Edit to open the promotion and make changes. The edit form follows the same structure as the Create deal flow, with all existing settings pre-populated, so you can update any field without starting from scratch.
Duplicate a promotion
Select Duplicate to create an exact copy of the promotion. The copy is added to your list with "Copy" as a prefix to the name, making it a useful starting point when setting up a similar deal.
Pause a promotion
Select Pause to temporarily suspend the promotion. While paused, the discount will not be applied at checkout, even if a client already has the code. For a paused promotion, this option becomes Resume, allowing you to reactivate it at any time.
Please note: Pausing a promotion takes effect immediately. It will not apply to any new checkouts from that point on, even if the client already has the code.
Copy a discount code
Select Copy code to copy the promotion's discount code to your clipboard, ready to share with clients or your team. This option only appears for promotions that use a code — it isn't available for auto-applied deals such as Flash sales.
Archive a promotion
Select Archive to remove the promotion from the active list without deleting it. Archived promotions can still be found under the Archived tab on the dashboard.
Delete a promotion
Select Delete to permanently remove the promotion. This is a soft deletion - any invoices where the discount was applied will still reference it, even after the promotion itself has been deleted.
By following the steps above, you can keep your promotions organized and up to date as your clinic's needs change.
When a promotion is enabled for Point of Sale, your team can apply it directly at checkout, with no code entry required. Let's see how this works.
Step 1: Accessing the Point of Sale
To begin, log into your Pabau account and navigate to the Point of Sale. You can access the Point of Sale using one of the following methods:
- Use the Create button at the top of the screen and select Sale.
- Navigate to Calendar in the left sidebar menu and click on the appointment you wish to check out, then select Checkout.
- Open the client card of a client, then click on the blue plus icon in the bottom right corner of the screen and select Sale.
Step 2: Processing the Transaction
Within the Point of Sale interface, proceed with the transaction as usual.
If you used the Create button to access the Point of Sale, first add a client in the top right corner. Then, add the products and services that should be included in the invoice.
If you are raising the invoice from within the calendar, the client and service will be pre-selected. If necessary, you can add additional products and services.
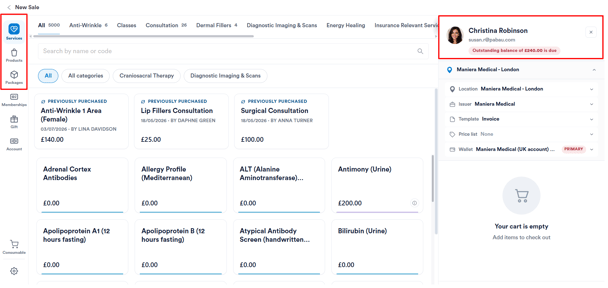
Step 3: Applying the Deal
Applying a discount to a single item
To apply a discount to a single service or product, select the item in the invoice.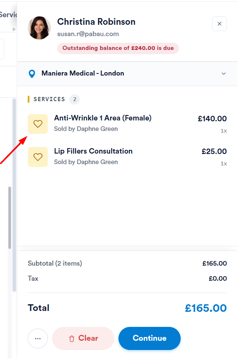
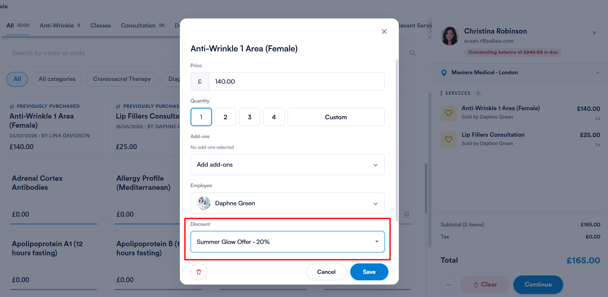
This will open the item's details, where you'll find a Discount dropdown. Select the promotion you'd like to apply - in this example, Summer Glow Offer · 20% and then click Save. The discount will be reflected against that item only.
Applying a discount to the entire invoice
To apply a discount across the whole invoice rather than a single item, click the three-dot menu at the bottom of the invoice, then select Add discount. 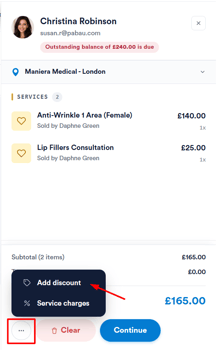
A list of available discounts will appear - choose the promotion you'd like to apply, in this example Summer Glow Offer · 20% off. The discount will be spread proportionally across all items on the invoice.
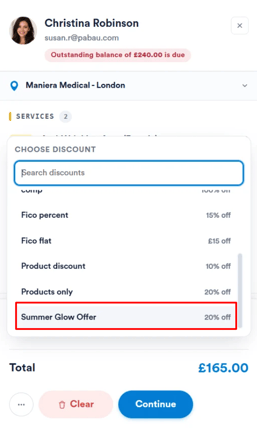
Once applied, review the updated total, then click Continue in the bottom right corner to complete the sale.
Please note:
When a flat rate discount is applied to the entire invoice, the amount is divided among the items proportionally, based on each item's share of the invoice total. For example, a £90 flat rate discount applied to an invoice containing three items would be split as follows:
| Item | Share of invoice | Discount applied |
|---|---|---|
| Botox | 33.3% | £30 |
| Facial | 16.7% | £15 |
| Dermal filler | 50% | £45 |
Good to know:
If a promotion is scoped to specific services, products, or employees, it will only apply to items in the basket that match those rules. Any items that don't match will be charged at their standard price.
Before clients can use a promo code during online booking, the promo code field must be enabled in your booking settings. Let's see how to set this up.
Step 1: Navigate to Online Booking Settings
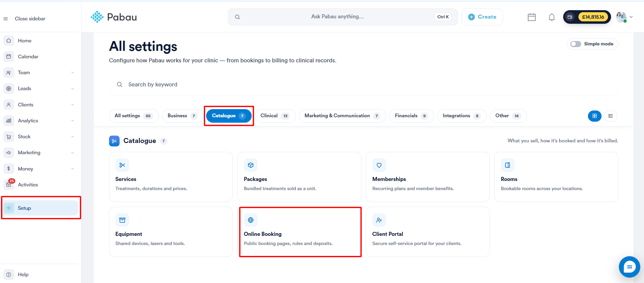
To begin, log in to your Pabau account, then navigate to Setup in the left sidebar menu and select Online Booking under Catalogue.
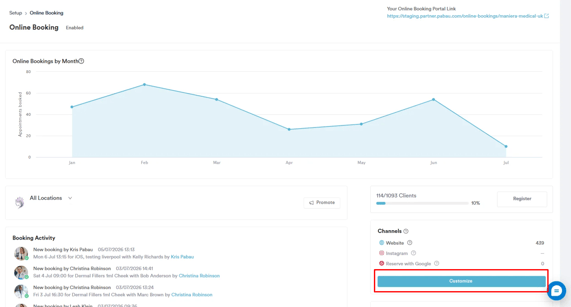
Once there, click Customize on the right side of the screen.
Step 2: Enable Promo Codes
In the Online Bookings customization section, go to the Your booking details tab and scroll down slightly to find the Allow promo codes option.
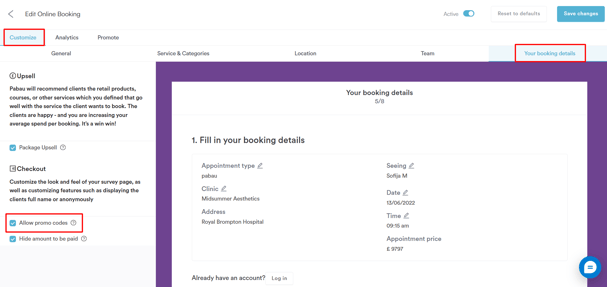
Check the box to activate the promo code field for clients, then save your changes.
Step 3: Client Applies the Code
Once this setting is enabled, clients will see a promo code field appear at the final stage of the online booking process, once they have selected their service, chosen an appointment time, and reached the payment step.
[Screenshot to be added]
Here, they can enter a valid promo code before completing their payment. If the code is valid and applicable to their booking, the discount is applied automatically, and the updated total is reflected before the client confirms and pays.
Good to know:
- If a flat rate discount is greater than the basket total, the total will be reduced to £0 - it will never produce a negative balance.
- Pausing a promotion takes effect immediately. It will not apply to any new checkouts from that point on, even if the client already has the code.
With this set up, clients can now apply promo codes directly during online booking.
Was this guide helpful? Let us know by voting below - your feedback helps us write clearer articles.
For more guides, browse the related articles below or use the search bar at the top of the page. You can also watch our video learning series, the Pabau Academy, or visit the Support page for additional help.