
Table of Contents
Overview
A product kit bundles multiple products together for easy selling at a fixed price. You can use kits to package treatment add-ons, offer a discount on multi-buys, or build curated retail sets, all sold as a single item at checkout.
When to use product kits
Product kits work well in a number of scenarios:
-
Treatment add-ons: Bundle complementary products together to enhance a treatment, for example a skincare kit to accompany a facial or a post-treatment recovery set.
-
Multi-buy offers: Group multiple units of the same or similar products at a discounted combined price to encourage higher-value purchases.
-
Curated retail sets: Put together a selection of products as a ready-made retail offering, such as a gift set or a seasonal bundle.
TIP: Product Kits vs. Individual Products
A product is a single item sold on its own - for example, a moisturizer, a serum, or a pack of needles. A product kit groups multiple products together and sells them as one item at a set price, often at a discount compared to buying each product separately.
Here are some examples of when you'd use a kit rather than a single product:
- 💡 Summer Glow Kit - Bundle a SPF moisturizer, a vitamin C serum, and a brightening toner into one kit for clients looking for a seasonal skincare boost. Sell it at a fixed price that's lower than buying all three separately.
- 💡 Facial Aftercare Kit - Group a gentle cleanser, a hydrating mask, and a recovery serum into one kit to offer clients everything they need to care for their skin after a facial treatment.
- 💡 Botox Aftercare Kit - Bundle the botulinum toxin with an arnica gel (to help with any bruising), a gentle SPF moisturizer, and a cold compress. Ideal to sell or include at the end of a Botox appointment to support recovery and protect the skin.
- 💡 Multi-Buy Offer - Bundle three units of the same product together at a discounted price to encourage higher-value purchases, for example three sessions of a booster treatment.
How kits are priced
There are two ways to price a kit. You can set a fixed price manually, which is what the client will always pay at checkout regardless of the individual product prices. Alternatively, you can leave the price field blank and let the system calculate the kit price automatically based on the per-item discounts you apply to each product in the kit.
When the kit price is lower than the combined retail value of its products, the saving is highlighted in green on the kit card, giving clients a clear view of the value they're getting.
Where to find product kits
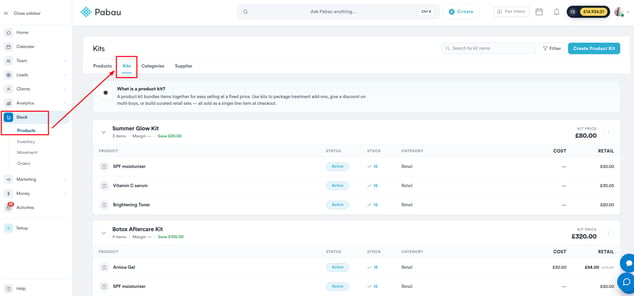
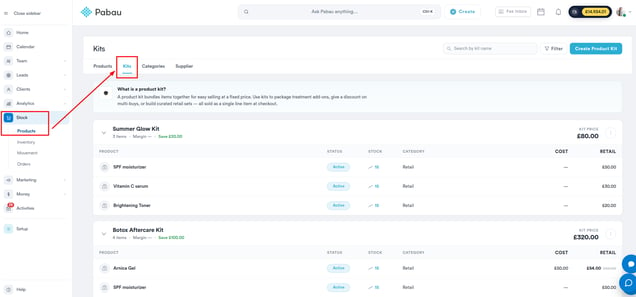
Product kits are managed under Stock > Products > Kits in the left sidebar menu. Once a kit is created and set to active, it is immediately available to sell through the Point of Sale.
How to Create a Product Kit
Step 1: Navigate to Product Kits
Log in to your Pabau account and in the left sidebar menu, navigate to Stock, then Products. From there, select the "Kits" tab at the top of the page.
Step 2: Open the Kit Creation Form
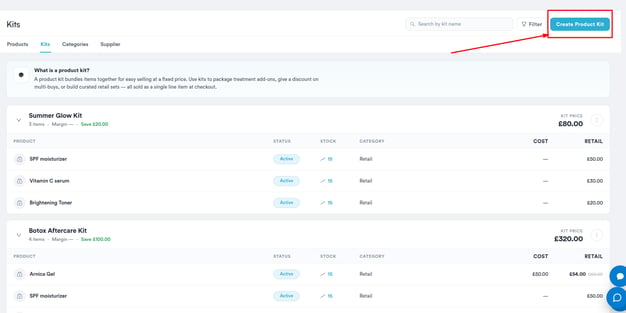
Click the "Create Product Kit" button. This opens the kit creation form, which is made up of a main configuration area on the left and a live Kit Summary panel on the right that updates in real time as you build your kit.
Step 3: Fill In the General Details
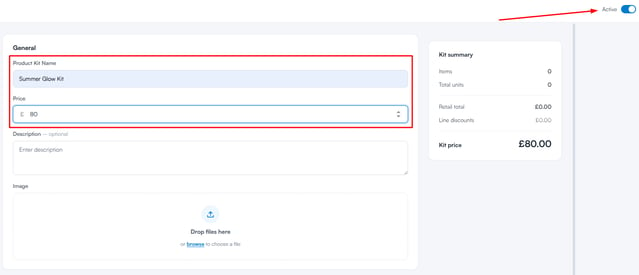
In the General section, fill in the following:
-
Product Kit Name: Enter the name of the kit as it will appear in the system and at checkout.
-
Price: Enter the fixed price the kit will be sold for. If you'd prefer the price to be calculated automatically based on the individual product discounts you set, leave this field blank. A hint below the field will show you what the auto-calculated total would be.
-
Description (optional): Add a brief description of the kit.
-
Image (optional): Upload an image for the kit by dropping a file or browsing your device. The image can be removed after upload.
-
Active toggle: Located in the top right corner of the form, this determines whether the kit is live and available for sale once saved.
Step 4: Add Products to the Kit
In the Add Product section, configure the contents of your kit. Each row represents one product, with the following fields:
-
Product: Search and select a product from your catalogue.
-
Retail: The product's standard retail price, auto-filled and read-only.
-
Discount: An optional per-item discount for this product within the kit. Toggle between % (percentage off) and $ (flat amount off) using the button next to the field.
-
QTY: The quantity of this product included in the kit.
-
Subtotal: The calculated line total after any discount is applied. If a discount is set, the original price will appear struck through next to the discounted subtotal.
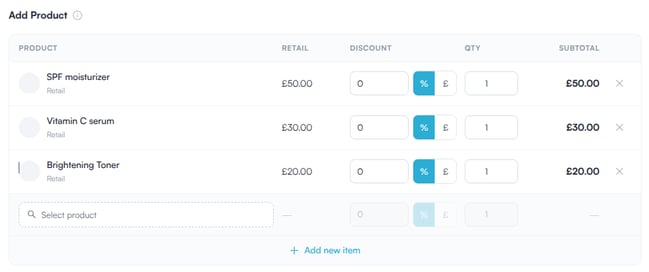
Click "+ Add new item" to add more products to the kit. To remove a product, click the × button on its row.
Step 5: Review the Kit Summary
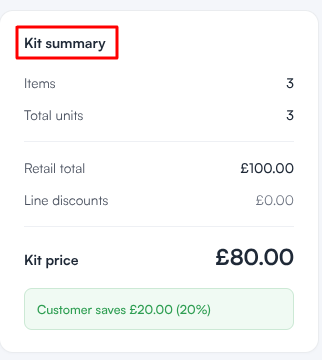
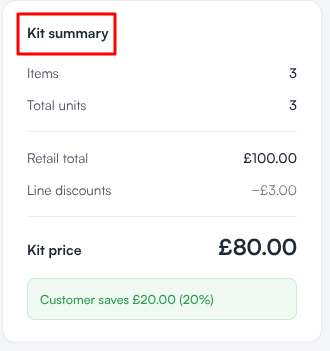
As you build your kit, the Kit Summary panel on the right updates in real time, showing:
-
Items: The number of distinct products added.
-
Total units: The combined quantity across all product lines.
-
Retail total: The sum of all products at their standard retail prices.
-
Line discounts: The total discount value applied across all product lines.
-
Kit price: The final price the kit will be sold for.
-
Customer saves: Shown in green when the kit price is below the retail total, displaying the saving in both amount and percentage.
Use this panel to check that your pricing and discounts are set up correctly before saving.
Step 6: Save the Kit
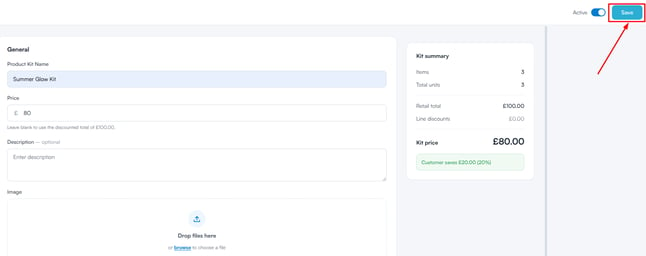
Once you're happy with the kit configuration, click "Save" to create the kit. If the Active toggle is on, the kit will be immediately available for sale at checkout.
How to Sell a Product Kit at Checkout
Once a product kit has been created and set to active, it's immediately available to sell at checkout.
Step 1: Open the Point of Sale
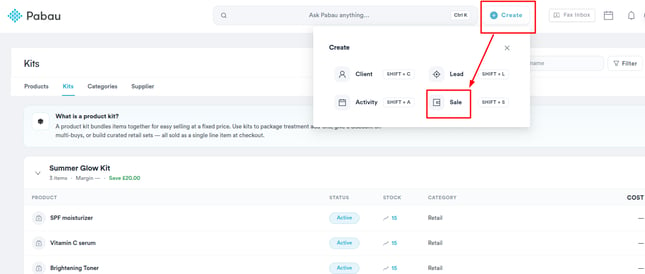
Log in to your Pabau account and click the "Create" button at the top center of the screen, next to the search bar. From the dropdown, select "Sale" to open the Point of Sale.
Step 2: Find the Kit
In the Point of Sale, go to the Products section on the left side of the screen and select the "Kits" tab to filter the product list and display only kits. Each kit is shown as a card with the kit name, the number of products it contains, and the kit price.
To see exactly what a kit includes, hover over the info icon on the kit card. A tooltip will appear listing the products and quantities included in that kit.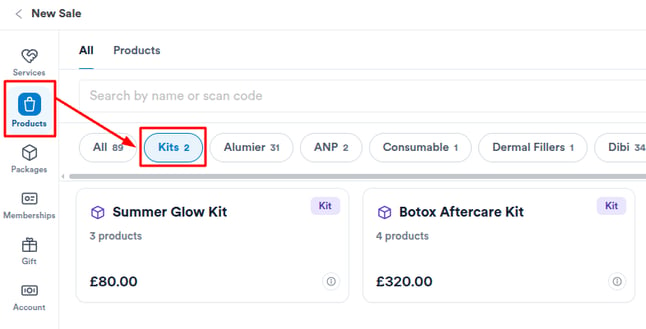
Step 3: Add the Kit to the Sale
Click on the kit card to add it to the sale. The kit's individual products will be added to the basket as separate line items, each showing the product name, the staff member selling it, and its quantity.
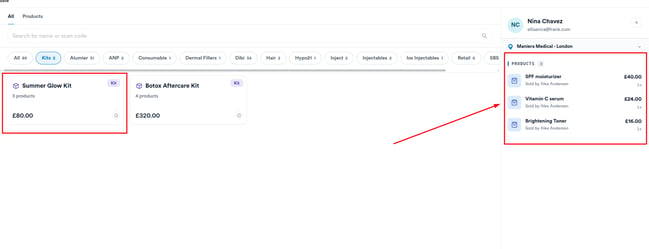
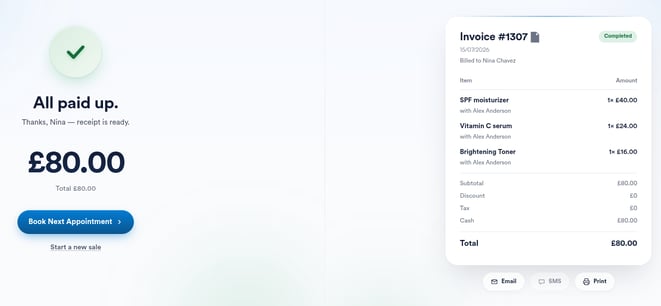
NOTE: The checkout reflects the kit price as the total, not the combined retail value of the individual products. The price of each item is proportionally adjusted to fit the kit price, so the client always pays the fixed kit price at checkout.
Step 4: Complete the Checkout
Once the kit has been added to the basket, proceed through the checkout as normal to complete the sale.
How to Edit or Update a Product Kit
Once a product kit has been created, you can edit, duplicate, or delete it at any time from the Kits tab.
Step 1: Navigate to Product Kits
Log in to your Pabau account and in the left sidebar menu, navigate to Stock, then Products. From there, select the "Kits" tab at the top of the page to view all existing product kits.
Step 2: Open the Kit Menu
Locate the kit you want to manage and click the three-dot menu on the kit card. This reveals the following options:
- Edit: Opens the kit to make changes.
- Duplicate: Creates an exact copy of the kit.
- Delete: Permanently deletes the kit.

Step 3: Edit the Kit
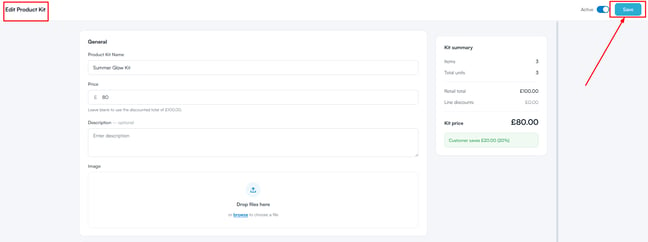
If you wish to edit an existing kit, select "Edit" from the three-dot menu. The kit will open in the same form as the creation form, with all existing settings pre-populated, including the kit name, price, description, image, and all product lines with their quantities and discounts.
Make any changes you need and click "Save" to apply them. Changes take effect immediately once saved.
Step 4: Duplicate a Kit
If you'd like to create a variation of an existing kit without rebuilding it from scratch, select "Duplicate" from the three-dot menu. This creates an exact copy of the kit, including the kit name, price, description, image, and all product lines with their quantities and discounts. The duplicate is saved as a separate kit and can be edited independently.
Step 5: Delete a Kit
To permanently remove a kit, select "Delete" from the three-dot menu.
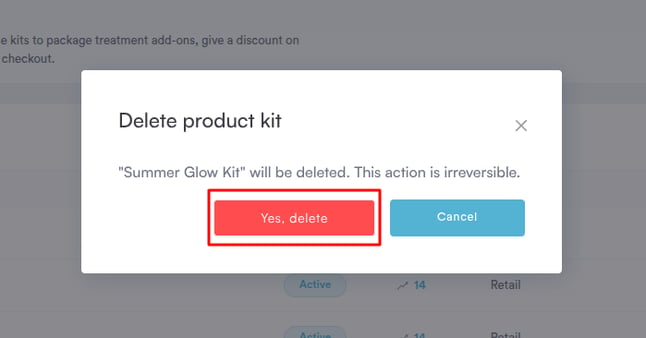
NOTE: Deleting a kit is permanent and cannot be undone. The products that were part of the kit are not affected - only the kit itself is removed. Any previously sold kits will still appear in invoice logs and client cards.
How to Set Pricing and Discounts for a Product Kit
Pabau gives you two ways to price a product kit: setting a fixed price manually, or letting the system calculate the price automatically based on the per-item discounts you apply.
Step 1: Navigate to Product Kits
Log in to your Pabau account and in the left sidebar menu, navigate to Stock, then Products. From there, select the "Kits" tab at the top of the page. Open an existing kit via the three-dot menu and select "Edit," or click "Create Product Kit" to set pricing on a new kit.
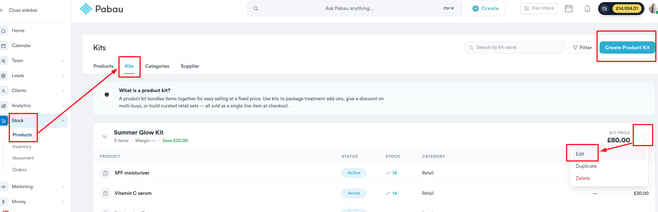
Step 2: Set the Kit Price
In the General section of the kit form, locate the Price field. You have two options:
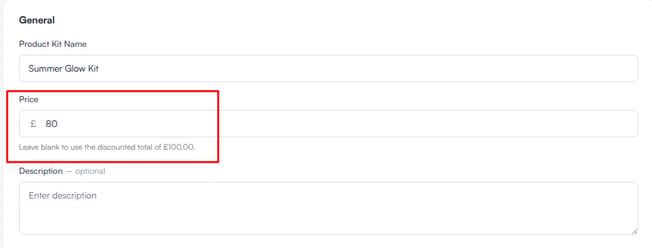
- Manual price: Enter a specific price in the field. This sets a fixed amount that the client will pay at checkout, regardless of the individual retail prices or discounts applied to the products inside the kit.
- Auto-calculated price: Leave the price field blank. The system will automatically calculate the kit price by adding up the discounted subtotals of all product lines. A hint below the field will show you what the auto-calculated total would be, for example "Leave blank to use the discounted total of $35.00."
Step 3: Apply Per-Item Discounts
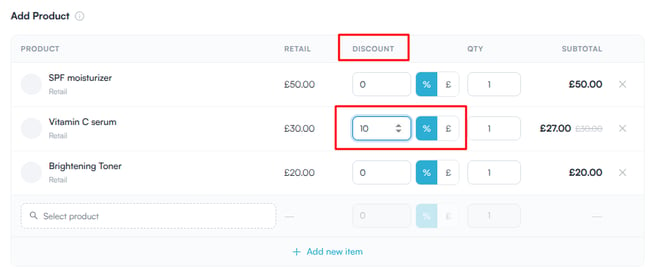
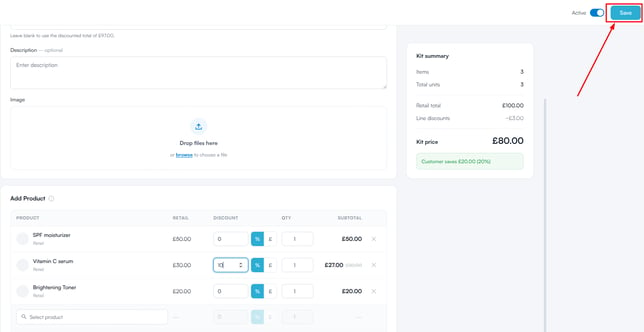
In the Add Product section, you can apply an optional discount to each individual product within the kit. For each product row, locate the Discount field and enter the discount amount. Use the toggle button next to the field to switch between:
- % — a percentage off the product's retail price.
- $ — a flat amount off the product's retail price.
Once a discount is applied, the Subtotal column will update to show the discounted line total, with the original retail price shown struck through next to it.
NOTE: Per-item discounts affect the auto-calculated kit price when the Price field is left blank. If you've entered a manual kit price, the client will always pay that fixed amount at checkout, regardless of the per-item discounts set.
Step 4: Review the Kit Summary
As you configure pricing and discounts, the Kit Summary panel on the right side of the screen updates in real time. Use this to verify your pricing before saving:
- Retail total: The sum of all products at their standard retail prices.
- Line discounts: The total discount value applied across all product lines.
- Kit price: The final price the client will pay, either the manual price or the auto-calculated discounted total.
- Customer saves: Shown in green when the kit price is below the retail total, displaying the saving in both amount and percentage.
Step 5: Save the Kit
Once you're happy with the pricing and discounts, click "Save" to apply the changes. The updated kit price will be reflected immediately at the Point of Sale.
How to View Product Kit Margins
Step 1: Navigate to Product Kits
Log in to your Pabau account and in the left sidebar menu, navigate to Stock, then Products. From there, select the "Kits" tab at the top of the page.
Step 2: View Kit Margin at a Glance
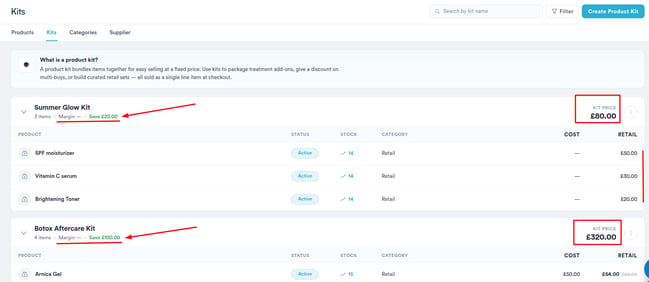
Each kit is displayed as a card on the Kits page. Without opening a kit, you can see the following financial information directly on the card:
-
Margin: The difference between the kit price and the combined cost price of all products included in the kit, at their configured quantities.
-
Save $: Displayed in green when the kit price is lower than the combined retail value of its products. This indicates the saving the client receives by purchasing the kit rather than the individual products separately.
-
Kit price: The fixed price the kit is sold for at checkout.
Step 3: View Detailed Margin in the Kit Summary
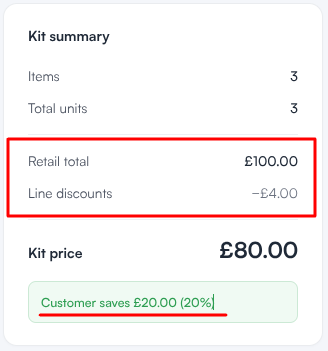
For a more detailed breakdown, open a kit by navigating to its three-dot menu and selecting "Edit." The Kit Summary panel on the right side of the form provides a live breakdown of the kit's financials:
- Retail total: The sum of all products at their standard retail prices and quantities.
- Line discounts: The total discount value applied across all product lines.
- Kit price: The final price the kit will be sold for, either the manually set price or the auto-calculated discounted total.
- Customer saves: Shown in green when the kit price is below the retail total, displaying the saving in both amount and percentage.
With your product kits set up, priced, and ready to sell, you have everything in place to offer bundled products at checkout, track your margins, and keep your kit catalogue up to date as your offering evolves.
Was this guide helpful? Let us know by voting below - your feedback helps us write clearer articles.
For more guides, browse the related articles below or use the search bar at the top of the page. You can also watch our video learning series, the Pabau Academy, or visit the Support page for additional help.