
Table of Contents:
1.How to Manage Leave Policies
2.How to Create a Leave Policy
3.How to Edit a Leave Policy
4.How to Delete a Leave Policy
5.How to Manage the Leave Tracker
6.How to Request Time Off
7.How to Request Time Off on Behalf of a Team Member
8.How to Edit a Leave Request
9.How to Approve a Leave Request
10.How to Decline a Leave Request
Step 1: Navigate to Leave Policies
Start by logging into your Pabau account. Once you're in, click on Setup in the left sidebar menu, then click on All Settings. Scroll down to the Other section and select Leave Policies.
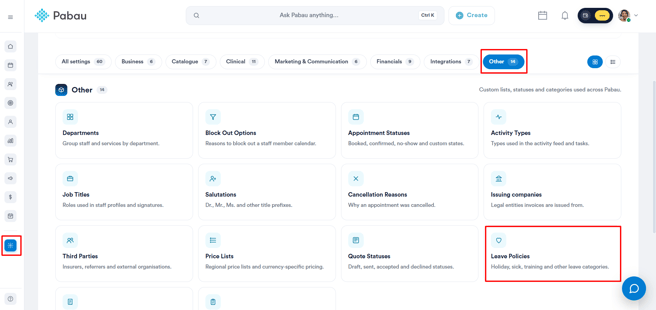
Overview of the Leave Policies Page and Available Actions
Leave policies define the types of time off available to your staff — such as holiday, sickness, or maternity leave — and how many days each year staff assigned to them can take. This guide walks you through everything you can do in the Leave Policies section.
Leave Policies Overview
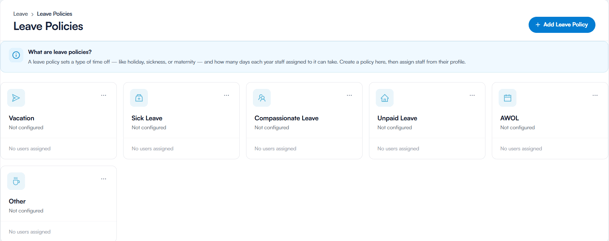
Once inside, you'll see all your existing leave policies displayed as cards. Each card shows the policy name, its configuration status, and how many users are assigned to it.
Add a New Leave Policy
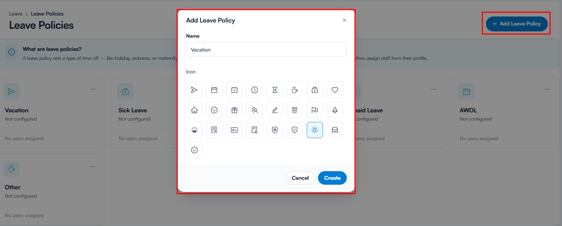
To create a new leave policy, click the + Add Leave Policy button in the top right corner. A pop-up window will appear where you need to fill in two things:
- Name — Enter a name for the policy (e.g. Vacation, Sick Leave, Maternity Leave).
- Icon — Choose an icon that best represents the policy from the selection of available icons, such as a calendar, clock, heart, home, gift, flag, and more.
Once you've entered the name and selected an icon, click ''Create''.
Choose a Policy Type
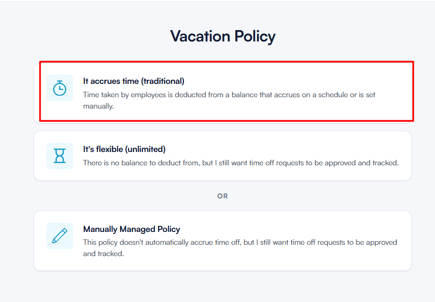
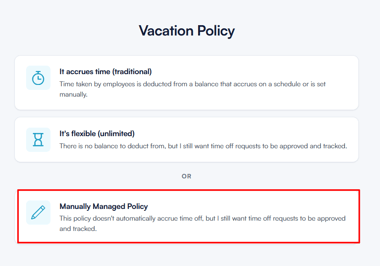
After creating the policy, you'll be redirected to a page where you need to select how this policy works. There are three policy types to choose from:
1. It accrues time (traditional)
This option is best suited for policies where employees build up a leave balance over time, such as holiday or vacation. Time taken is deducted from a balance that either accrues on a set schedule or is configured manually.
Once selected, you'll be guided through a three-step setup:
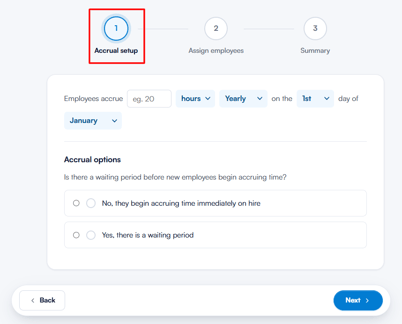
- Accrual Setup - Define how and when employees accrue time, such as the number of hours and the frequency (e.g. 20 hours yearly, reset on the 1st of January). You'll also specify whether new employees begin accruing time immediately upon hire or after a waiting period.
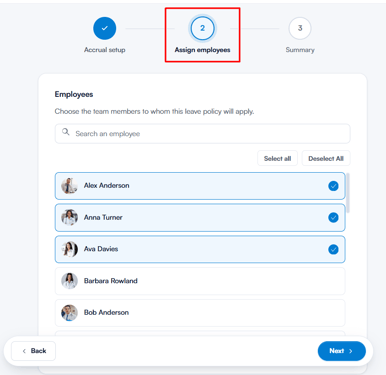
- Assign Employees - Select the team members this policy applies to. You can search for employees by name or use the Select All / Deselect All options.
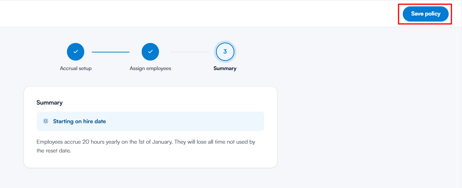
- Summary - Review the full policy configuration before saving. Once you're satisfied, click ''Save policy'' in the top right corner to confirm.
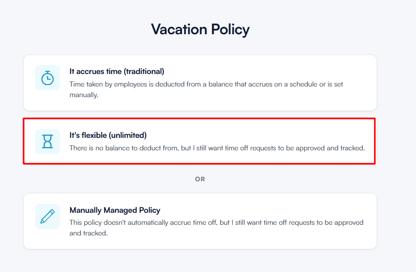
2. It's flexible (unlimited)
This option is ideal for policies where no balance needs to be tracked, such as study leave or volunteer days. Employees can take time off without a set limit, but all requests will still require approval and will be tracked.
Once selected, you'll be guided through the following:
- Assign Employees — Select the team members this policy applies to.
- Summary — Review and confirm the policy is set to ''Flexible (unlimited)'', along with the number of assigned employees. Click ''Save policy'' to finish.
3. Manually Managed Policy
This option gives you full control over each employee's leave balance, which you manage directly rather than having it accrue automatically. All time off requests will still be approved and tracked.
Once selected, you'll be guided through the following:
- Assign Employees — Select the team members this policy applies to.
- Summary — Review and confirm the policy is set to ''Manually managed'', along with the number of assigned employees. Click ''Save policy'' to finish.
Edit or Delete a Leave Policy
To edit or delete an existing policy, find its card on the Leave Policies page and click the three-dot menu (...) in the top right corner of the card. You'll see two options:
- Edit — Opens the policy so you can update its name, icon, or configuration.
- Delete — Permanently removes the policy. Use this with caution, as it cannot be undone.
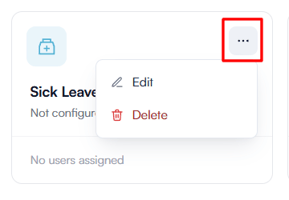
Alternatively, you can click directly on the policy icon on the card to open it for editing.
By using these tools, you can efficiently manage leave policies and ensure your staff absence records remain clear, accurate, and up to date.
Step 1: Navigate to Leave Policies
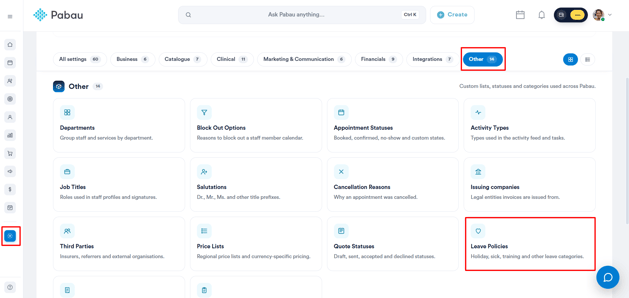
Start by logging into your Pabau account. Once you're in, click on Setup in the left sidebar menu, then click on All Settings. Scroll down to the Other section and select Leave Policies.
Step 2: Create a Leave Policy
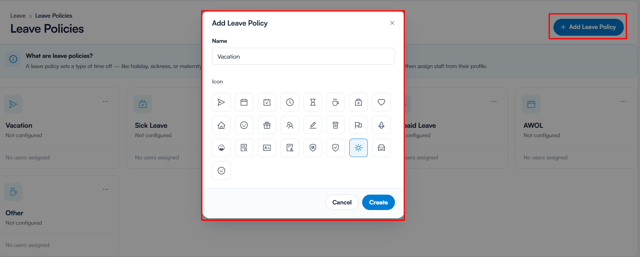
Once there, click the + Add Leave Policy button in the top right corner. A pop-up window will appear where you need to fill in the following:
- Name - Enter a name for the policy (e.g. Holiday, Sick Leave, Training).
- Icon - Choose an icon that best represents the policy from the available selection.
Once you've filled in the details, click Create.
Step 4: Choose a Policy Type
After creating the policy, you'll be redirected to a page where you need to select how this policy works. There are three policy types to choose from:
It accrues time (traditional)
This option is best suited for policies where employees build up a leave balance over time, such as holiday or vacation. Time taken is deducted from a balance that either accrues on a set schedule or is configured manually.
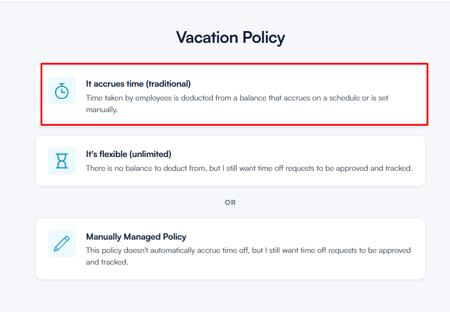
Once selected, you'll be guided through a three-step setup:
- Accrual Setup - Define how and when employees accrue time, such as the number of hours and the frequency (e.g. 20 hours yearly, reset on the 1st of January). You'll also specify whether new employees begin accruing time immediately upon hire or after a waiting period.
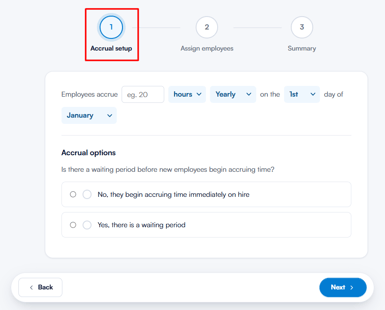
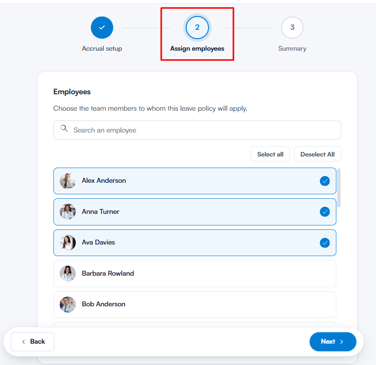
- Assign Employees - Select the team members this policy applies to. You can search for employees by name or use the Select All / Deselect All options.
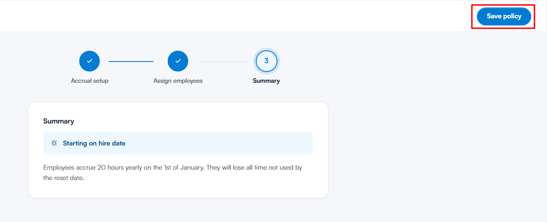
- Summary - Review the full policy configuration before saving. Once you're satisfied, click ''Save policy'' in the top right corner to confirm.
It's flexible (unlimited)
This option is ideal for policies where no balance needs to be tracked, such as study leave or volunteer days. Employees can take time off without a set limit, but all requests will still require approval and will be tracked.
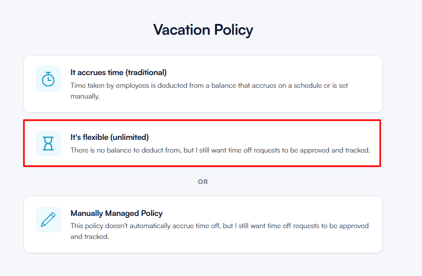
Once selected, you'll be guided through the following:
- Assign Employees - Select the team members this policy applies to.
- Summary - Review and confirm the policy is set to Flexible (unlimited), along with the number of assigned employees. ClickSave policy to finish.
Manually Managed Policy
This option gives you full control over each employee's leave balance, which you manage directly rather than having it accrue automatically. All time off requests will still be approved and tracked.
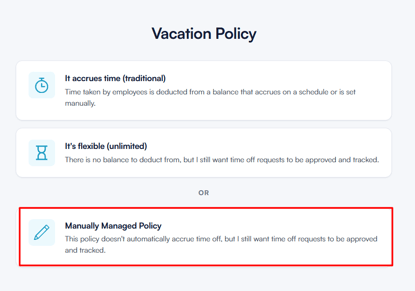
Once selected, you'll be guided through the following:
- Assign Employees - Select the team members this policy applies to.
- Summary - Review and confirm the policy is set to ''Manually managed'', along with the number of assigned employees. Click ''Save policy'' to finish.
NOTE: Leave policies created here will be available when assigning time off to staff members. Make sure the name and icon clearly represent the purpose, as this will help when viewing the calendar and reports.
By following these steps, you’ll be able to create leave policies in Pabau, helping you clearly categorise staff absences and keep your schedule organised.
Step 1: Navigate to Leave Policies
Start by logging into your Pabau account. Once you're in, click on Setup in the left sidebar menu, then click on All Settings. Scroll down to the Other section and select Leave Policies.
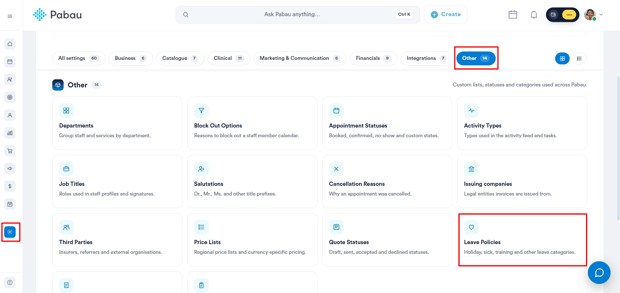
Step 2: Locate the Leave Policy You Want to Edit
Once you're in the Leave Policies section, find the policy card you wish to edit.
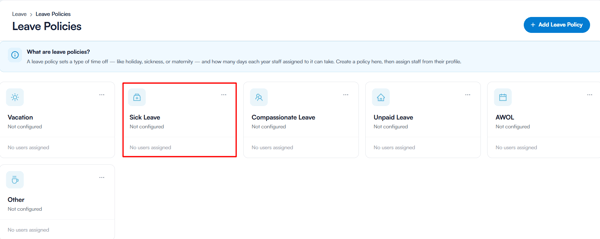
NOTE: Editing a leave policy will update all future records associated with that policy. However, past leave records may not automatically reflect these changes, so it’s a good idea to review existing entries if needed.
Step 3: Edit the Leave Policy
There are two ways to open a leave policy for editing:
- Click the three-dot menu (...) in the top right corner of the policy card and select Edit.
- Alternatively, click directly on the policy icon on the card to open it.
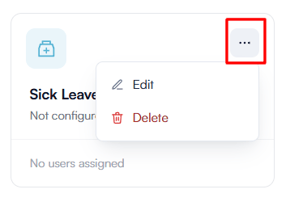
Either option will redirect you to the policy type selection screen, where you can update how the policy works. Once you've made your changes, click Save policy to apply them.
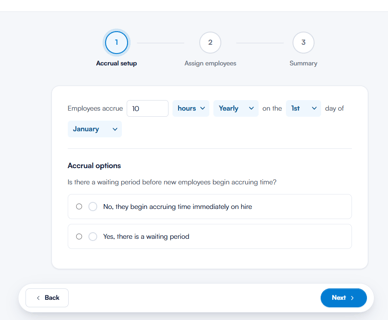
By following these steps, you can easily update existing leave policies in Pabau to keep your staff absence categories accurate and up to date.
How to Delete a Leave Policy
Step 1: Navigate to Leave Policies
Start by logging into your Pabau account. Once you're in, click on Setup in the left sidebar menu, then click on All Settings. Scroll down to the Other section and select Leave Policies.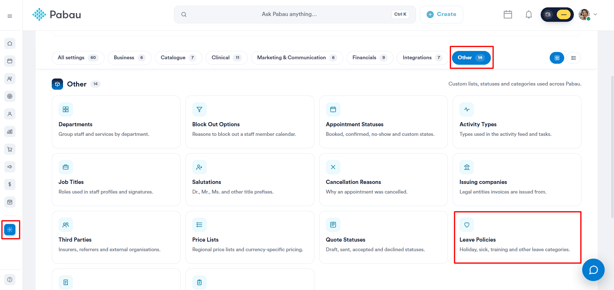
Step 2: Locate the Leave Policy You Want to Delete
Once you're in the ''Leave Policies'' section, find the policy card you wish to delete.
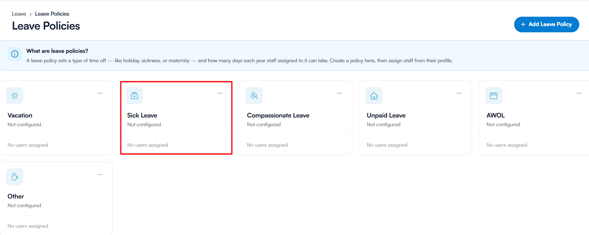
NOTE: Deleting a leave policy will remove it from the system and may affect existing records associated with it. Be sure to review any linked time off or reports before deleting.
Step 3: Delete the Leave Policy
Click the three-dot menu (...) in the top right corner of the policy card and select Delete.
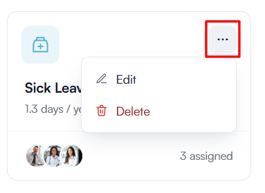
Confirm the deletion when prompted to permanently remove the leave policy.
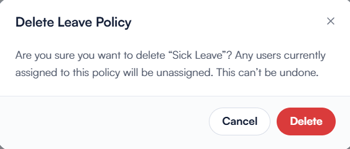
By following these steps, you can easily delete leave policies in Pabau to keep your system organised and up to date.
How to Manage the Leave Tracker
Step 1: Navigate to the Leave Tracker
Log in to your Pabau account, and in the left sidebar menu, go to Team, then click on "Leave Tracker".
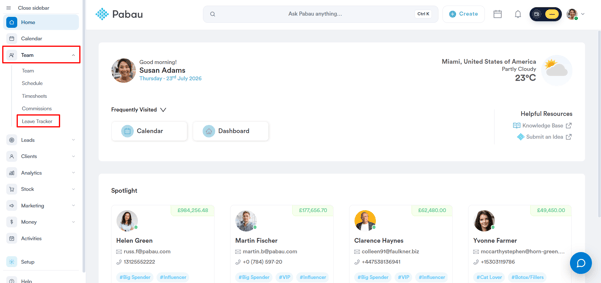
Step 2: Explore the Leave Tracker Features
Once you're in the Leave Tracker, you'll see a table displaying all staff members alongside their leave allowances and usage. Below is a detailed breakdown of each feature:
Search Bar
Use the search bar at the top to quickly find a specific team member by entering their name. This is especially useful when managing larger teams.

Date Range Selector
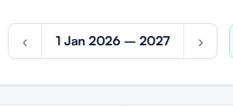
Use the date range selector at the top to navigate between years. Click the arrows on either side to move forward or backward and view leave data for a specific period.
Take a Tour
Click the ''Take a Tour'' button for a guided walkthrough of the Leave Tracker's features.
Tools
Click the ''Tools'' button to access additional options for managing the Leave Tracker like Leave policies.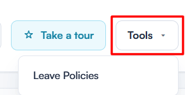
+ New Leave Button
Click the + New Leave button in the top right corner to submit a leave request on behalf of a staff member. A panel will open on the left where you can fill in the following details:
- Employee — Select the staff member the leave is for.
- Leave type — Choose the applicable leave type (e.g. Sick Leave). The remaining balance for that leave type will be displayed beneath it.
- Location — Select the relevant location.
- Start date and End date — Set the date range for the leave, with the option to specify morning (am) or afternoon (pm).
- Paid / Unpaid — Indicate whether the leave is paid or unpaid.
- Message (optional) — Add a note that will be visible to the employee, up to 300 characters.
Once all details are filled in, click Add leave to submit the request.
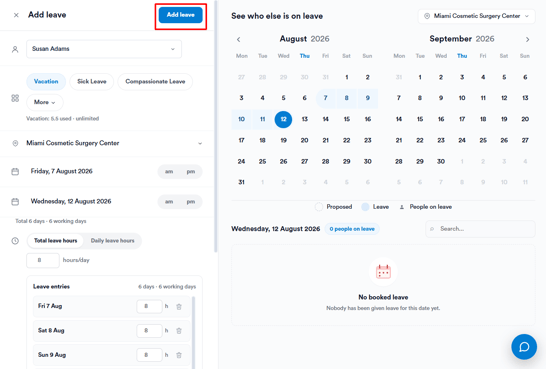
On the right side of the panel, you'll also see a See who else is on leave section — once you enter a start and end date, this area will display a calendar showing which other team members are on leave at the same time, helping you plan cover accordingly.
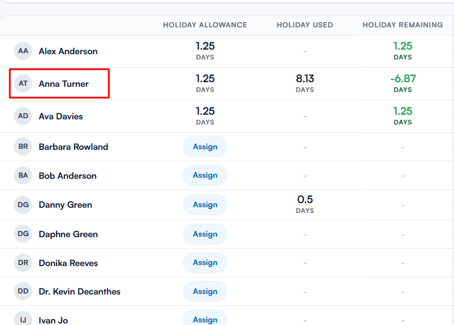
Staff List and Leave Overview
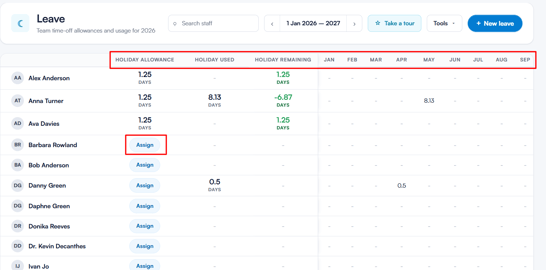
The main table lists all staff members along with the following columns:
- Holiday Allowance — The total leave allowance assigned to the employee. If a leave policy hasn't been assigned yet, an Assign button will appear here, allowing you to assign one directly from this view.
- Holiday Used — The amount of leave the employee has already taken.
- Holiday Remaining — The remaining leave balance, displayed in green. If an employee has exceeded their allowance, the balance will appear as a negative number in red.
- Monthly Columns — A month-by-month breakdown showing when leave was taken throughout the year.
Viewing an Employee's Leave Profile
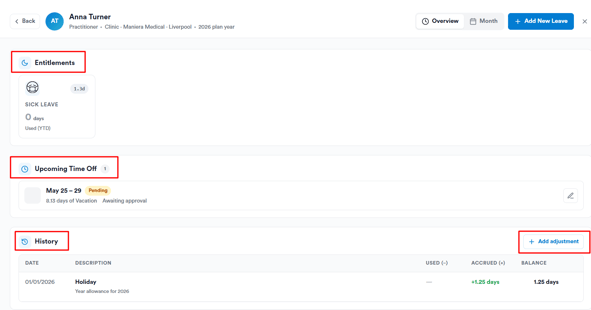
Clicking on a staff member's name opens their individual leave profile, where you can manage their time off in detail. At the top of the profile, you'll see the employee's name, job title, location, and the current plan year.
From here you have access to the following:
- Overview / Month toggle — Switch between an overview of the employee's full leave record and a month-by-month breakdown.
- + Add New Leave — Submit a new leave request directly from the employee's profile.

The profile is divided into three sections:
- Entitlements — Displays the leave policies assigned to the employee, including the total allowance and how many days have been used year to date (YTD).
- Upcoming Time Off — Shows any approved or scheduled leave for future dates. If no leave is booked, a prompt to use Add New Leave will appear.
- History — A full record of the employee's leave activity, including the date, description, days used, days accrued, and current balance.
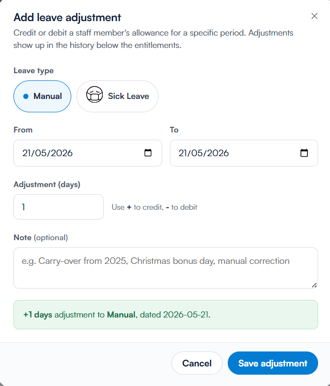
You can also click + Add adjustment in the top right corner of this section to manually adjust the employee's leave balance when needed.
By understanding how each feature works within the Leave Tracker, you'll be able to efficiently manage absences, ensure proper coverage, and keep operations running smoothly across your team.
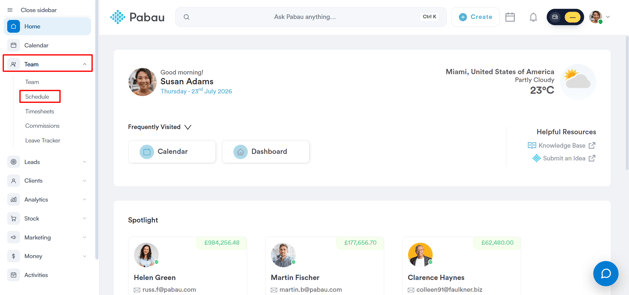
Step 1: Navigate to the Scheduler
Log in to your Pabau account, and in the left sidebar menu, go to Team, then click on "Schedule".
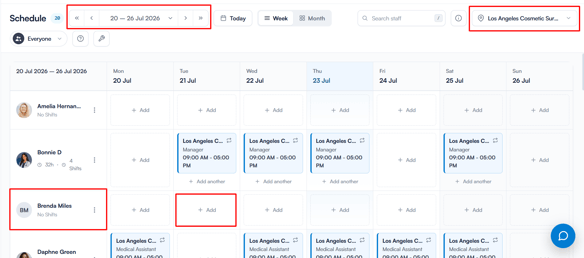
Step 2: Select a Slot for the Time Off Request
Once you access the Scheduler, first ensure you have selected the correct location (if your clinic has multiple locations) and the appropriate date for your time off request.
Next, locate your name in the staff list on the left side of the Scheduler. Find an empty time slot on the chosen date - this is similar to how you would select a slot when creating a shift.
Click on the empty slot to proceed.
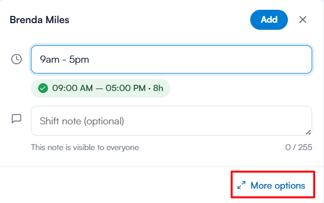
Step 3: Access the Leave Option
After selecting the empty slot, a modal window will open. Click "More options" at the bottom right to see all shift types, including Leave.
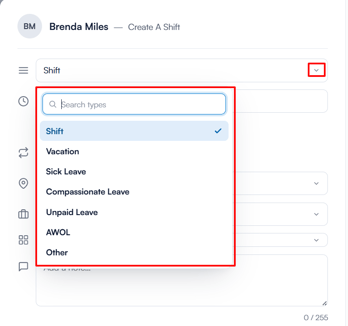
Step 4: Choose the Leave Type
A dropdown will open showing all available types. Select the relevant leave type (e.g., Vacation, Sick Leave, Compassionate Leave, Unpaid Leave, AWOL, or Other).
Step 5: Submit the Leave Request
Once the leave type is selected, set the start and end dates for the request. The location will default to the employee's assigned clinic, and you can add any optional staff comments.
On the right, the Day Digest panel shows helpful context for the selected date(s) — including how busy the location usually is, the employee's usual working days and recent shift history, and overall coverage for that day (e.g., "Well covered"). This can help you decide whether the leave date works well before confirming.
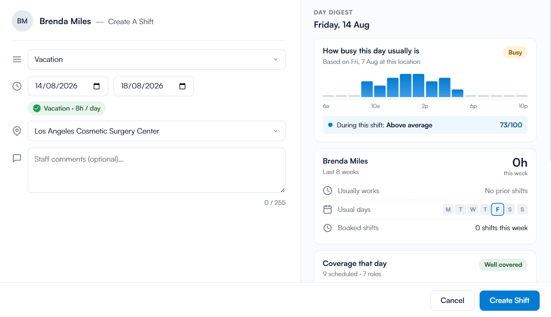
Once everything looks correct, click "Create Shift" to submit the request.
What happens next
Once submitted, the leave request will appear on the schedule for that staff member, marked with an airplane icon on the relevant days. Hovering over it shows the leave type and date range.
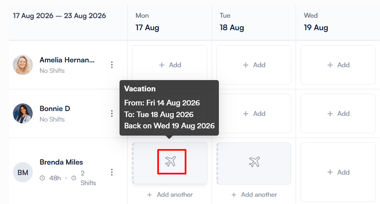
The request will also be visible in the Leave Tracker, where it can be reviewed and approved.
Step 1: Navigate to the Leave Tracker
Log in to your Pabau account, and in the left sidebar menu, go to Team, then click on "Leave Tracker".
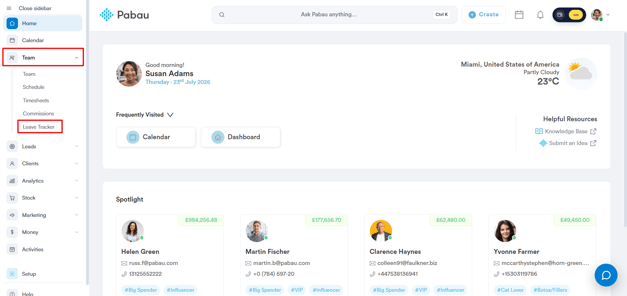
Step 2: Start a New Leave Request
From the Leave Tracker, there are two ways to begin:
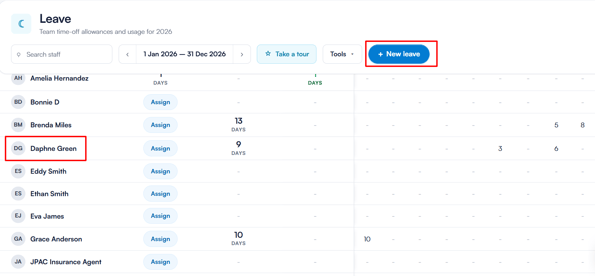
- Click "+ New leave" in the top-right corner, then select the employee from the dropdown.
- Or click directly on a staff member's name in the list, which opens the "Add leave" form with that employee already selected.
Step 3: Fill in the Leave Details
In the "Add leave" form, complete the following:
- Leave Type — Choose from Vacation, Sick Leave, or Compassionate Leave, or click "More" to see additional leave types.
- Location — Confirm or select the clinic location.
- Date Range — Set the start and end date. The system will show the total days and working days, along with the leave hours (total or broken down daily).
On the right side, the "See who else is on leave" panel shows a calendar for the selected location, so you can check who else is off during the same period before confirming.
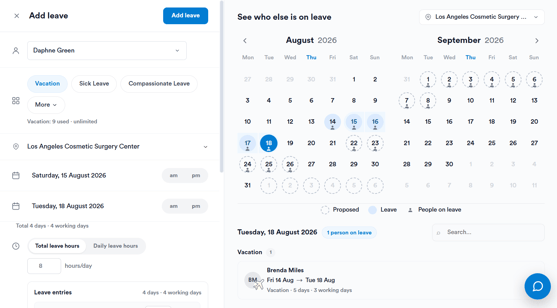
After adding the details, click "Add leave" to proceed with the request.
NOTE: If the staff member already has appointments booked during the leave period, a "Clashing Shifts" window will open, allowing you to review the overlapping appointments before deciding how to proceed. Available options are:
- Do Nothing — shifts remain unchanged
- Permanently delete — shifts are removed
Select an option, then confirm with Approve.
What happens next
Once the leave has been added the request will be visible in:
- The Leave Tracker, awaiting approval.
- The employee's Leave Profile, under their leave history for approval.
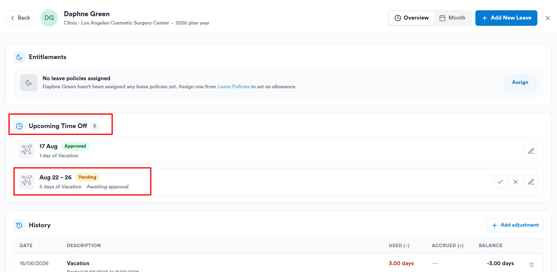
By following these steps, you can successfully submit a leave request on behalf of a team member.
How to Edit a Leave Request
Step 1: Navigate to the Leave Tracker
Log in to your Pabau account, and in the left sidebar menu, go to Team, then click on "Leave Tracker''.
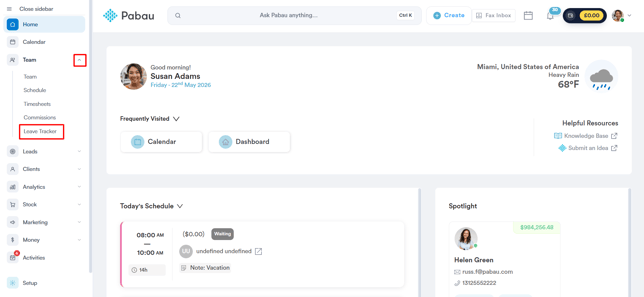
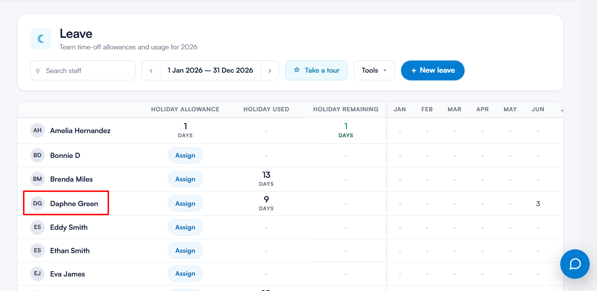
Step 2: Open the Staff Member's Leave Profile
In the Leave Tracker, click on the name of the staff member whose leave request you want to edit. This opens their leave profile, including Entitlements, Upcoming Time Off, and History.
Under Upcoming Time Off, locate the relevant request, then click the pencil icon to open it for editing.
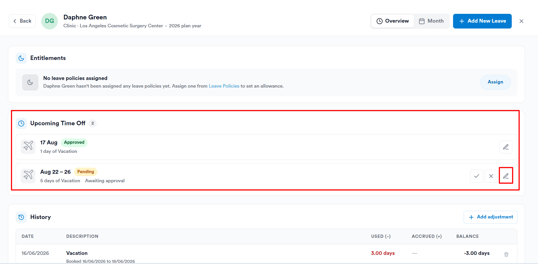
Step 3: Update the Leave Details
In the "Edit leave" form, you can update the leave type, location, or date range as needed. On the right, the "See who else is on leave" panel shows a calendar for the selected location, helping you check for overlaps before saving.
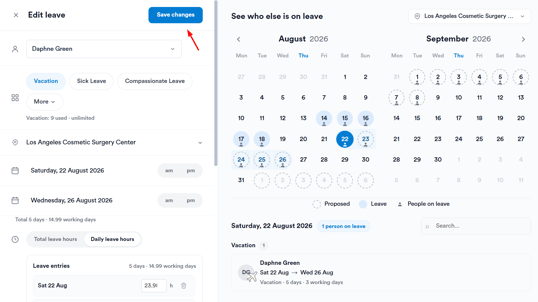
Once you're done, click "Save changes" in the top-right corner to confirm.
By following these steps, you can easily update leave requests, ensuring accurate records and smooth scheduling.
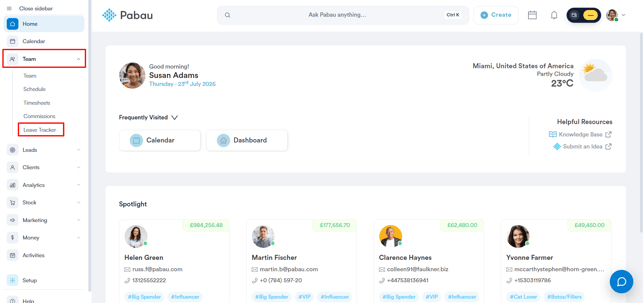
Step 1: Navigate to the Leave Tracker
Log in to your Pabau account, and in the left sidebar menu, go to Team, then click on "Leave Tracker".
Step 2: Open the Staff Member's Leave Profile
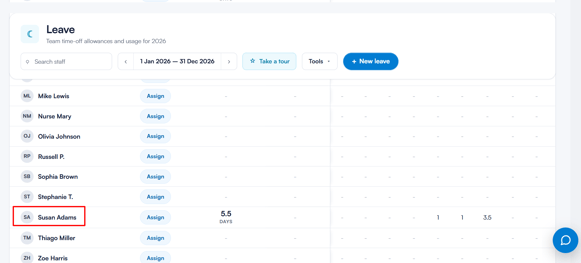
In the Leave Tracker, click on the name of the staff member whose leave request you want to approve. This opens their leave profile.
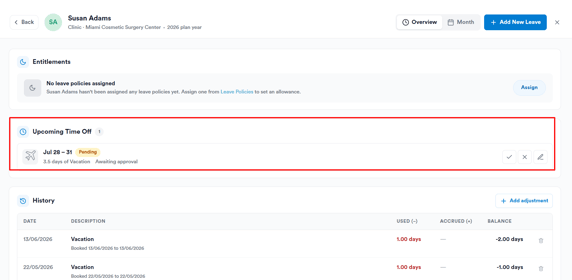
Under Upcoming Time Off, you'll see all requests for that employee, each showing the dates, leave type, number of days, and status (e.g., Pending or Approved).
Step 3: Approve the Leave Request
Locate the request marked Pending, then click the checkmark icon next to it to approve.

Once approved, the status updates to Approved, along with the name of the admin who approved it.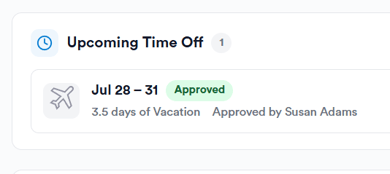
By following these steps, you can easily approve leave requests in Pabau and keep your team’s schedule running smoothly.
Step 1: Navigate to the Leave Tracker
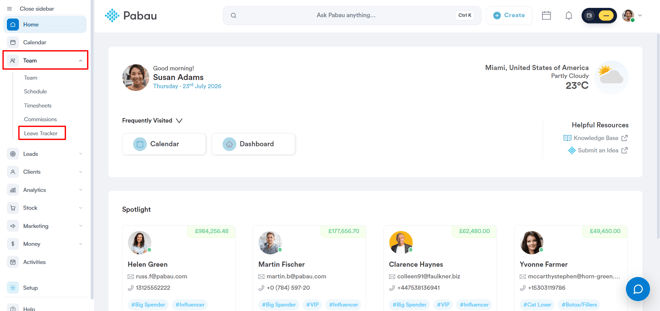
Log in to your Pabau account, and in the left sidebar menu, go to Team, then click on "Leave Tracker".
Step 2: Open the Staff Member's Leave Profile
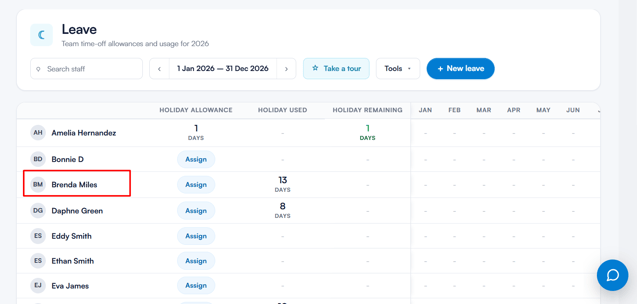
In the Leave Tracker, click on the name of the staff member whose leave request you want to decline. This opens their leave profile.
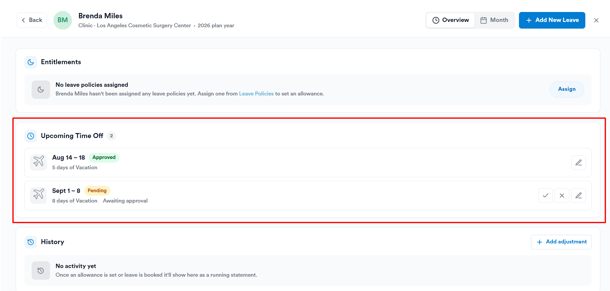
Under Upcoming Time Off, you'll see all requests for that employee, each showing the dates, leave type, number of days, and status (e.g., Pending or Approved).
Step 3: Decline the Leave Request
Locate the request marked Pending, then click the X icon next to it to decline.

Please note: The X icon serves as both Decline and Delete — there's no separate action for removing a request you submitted yourself. Clicking X will remove the request whether you're declining someone else's submission or withdrawing your own.
By following these steps, you can efficiently decline leave requests, helping ensure clarity and accuracy in your team's scheduling.
Now that you know how to manage leave effectively, you can ensure your clinic stays organised, compliant, and well-prepared for any staffing changes.
For more guides, refer to related articles below, select additional guides, or use the search bar at the top of the page. These guides will help you get the most out of your Pabau account.
Additionally, to help you fully utilize and understand your Pabau account, we recommend exploring additional guides and resources offered at the Pabau Academy. It offers in-depth video tutorials and lessons, offering a holistic learning experience that can equip you with the essential skills for achieving success with Pabau.