
Table of Contents:
1. Overview of Labs
2. How to Create a Lab Request
3. How to Review and Share Lab Results
This article covers the new Client Card, available to selected clinics from August 2026. If your Client Card looks different, see Labs (Classic) guide instead.
Overview of Labs
Step 1: Navigate to Clients
Log in to your Pabau account and in the left sidebar menu, click on Clients, then select the "Labs" sub-tab to open the Labs page.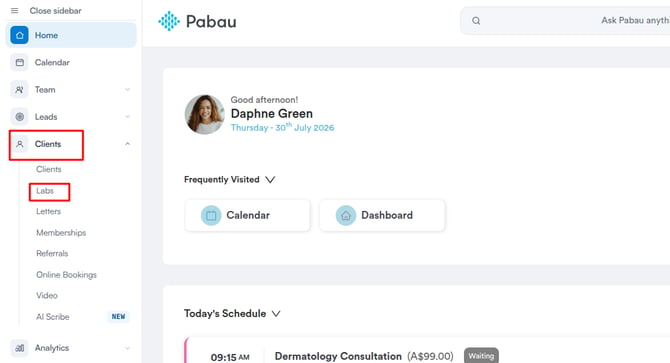
Step 2: Understand the Labs Page
At the top of the Labs page, four summary cards give you an at-a-glance view of your current lab request status:
- Awaiting results: The number of requests currently out at the labs.
- Overdue: Requests that are stuck past their target turnaround time.
- Abnormal unread: Results that are flagged as abnormal and need to be reviewed.
- Avg turnaround: The average turnaround time for lab results.

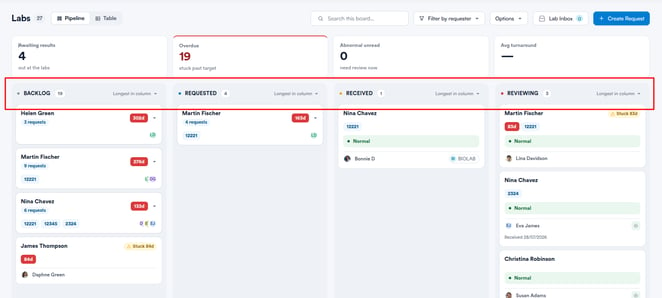
Below the summary cards, all lab requests are displayed in a Kanban-style Pipeline view, organised into four columns:
- Backlog: Lab requests that have been created but not yet submitted to a lab.
- Requested: Lab requests that have been sent to a lab.
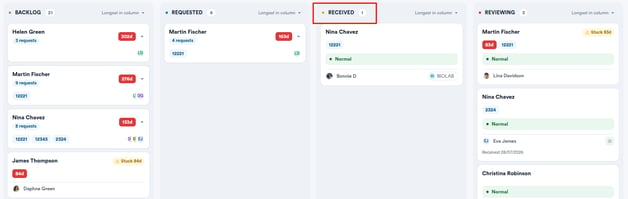
- Received: Lab requests that have returned from the lab but have not yet been opened.
- Reviewing: Lab requests that have been received and opened for review.
You can switch between the Pipeline and Table views using the toggle buttons at the top left, and search the board by client, test, or requester.
Use the "Filter by requester" dropdown to filter requests by staff member, or use the "Options" dropdown to adjust the board — including showing the Sent column, importing a result, or opening the audit log.
Click "Lab Inbox" to view incoming lab results, and "Create Request" to start a new lab request directly from this page — search for the client to begin.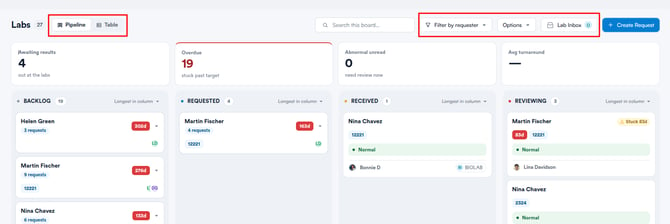
Step 3: Read the Lab Request Cards
Each card in the Backlog and Requested columns shows the client’s name, the lab test codes, the staff member who made the request, and — for older requests — a counter showing how many days the request has been in that column. If a request is overdue, a "Stuck" warning will appear on the card.
In the Received and Reviewing columns, cards also show the result status (for example, Normal shown as a green pill, or an ABNORMAL tag), the lab name, and the date the result was received.
Click any request card to open a side panel with the full request details — its status timeline, test codes, requester, results, and internal notes. Click the client’s name on a card to jump straight to their client card.
Each column can be sorted using the "Longest in column" dropdown to prioritise the oldest requests.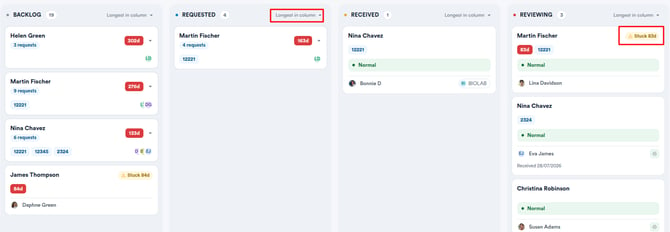
If you have a lab integration set up, lab requests will move through the columns automatically. Otherwise, you can manually drag and drop them between stages. While dragging, a "Drop here to cancel" zone appears at the bottom of the board — drop the card there to cancel the request.
How to Create a Lab Request
Step 1: Navigate to the Client Card
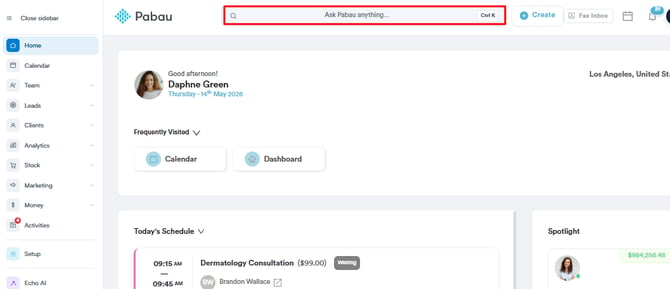
Start by logging in to your Pabau account using your login credentials. Navigate to the search bar at the top of the page and type at least three letters of the client’s name for whom you wish to create a lab request.
Step 2: Open the Create Menu
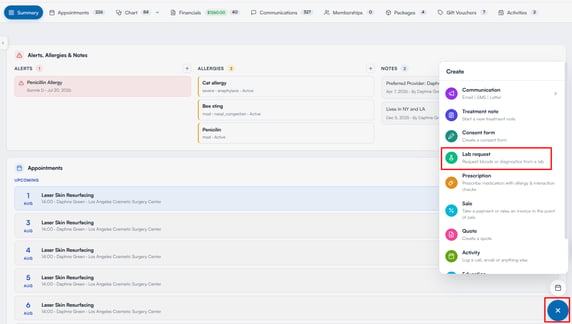
Click the "+" button in the bottom right corner of the client card. From the Create menu that appears, select "Lab request".
Step 3: Select a Lab
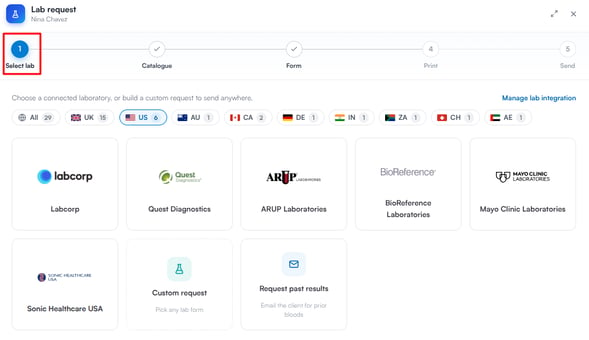
The "Lab request" wizard will open, showing five steps across the top:
Select lab, Catalogue, Form, Print, and Send.
On the first step, choose the laboratory you want to send the request to. Labs are organised by country — use the filter chips at the top (All, UK, US, AU, and others) to narrow the list to labs available in your region.
Click a lab to select it and continue. If the lab isn’t connected yet, clicking it opens a short setup wizard so you can link it first. You can also click "Manage lab integration" at the top of the step to open your lab settings.
Two additional options are also available:
- Custom request: Pick any lab form and build a request you can send to any laboratory, even one not listed.
- Request past results: Emails the client to request prior blood test results from outside the system.
NOTE: The Doctors Laboratory (TDL) is only available for clinics in the United Kingdom.
Step 4: Select Tests from the Catalogue
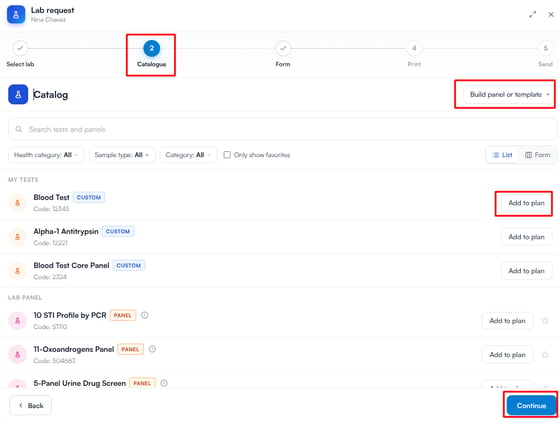
The second step of the wizard is Catalogue, where you select the tests to include in the request.
Use the search bar to find a specific test, or browse using the filters — Health category, Sample type, and Category. You can also tick "Only show favorites" to see only starred tests, or switch between the List and Form views.
Your clinic’s own items appear under My tests, My panels, and My templates, while the selected lab’s standard panels and tests appear under Lab panel and Lab test.
Click "Add to plan" next to each test or panel you want to include. You can also click "Build panel or template" to create your own groupings — this opens a dropdown with three options:
- Custom test: Add a one-off test with its own code and price.
- Custom panel: Group biomarkers from one lab company.
- Template: Group panels, specialty labs, and products from multiple companies.
Once you’ve added all the required tests, click "Continue". If a selected test isn’t linked to a priced service yet, an extra Pricing step appears next so you can set a price before continuing.
Step 5: Complete the Form
The next step is Form, where you choose the lab request form to use. You can search by name or browse all available forms. Each form shows who created it, when it was last completed, and when it was last modified. If the selected lab already has a linked request form, it’s selected for you automatically.
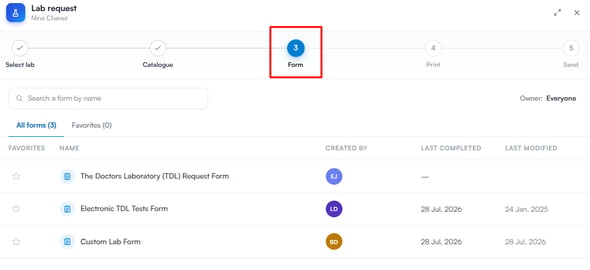
Click a form to open it, then complete the required details and save it. Saving the form creates the lab request.
Step 6: Print (Optional)
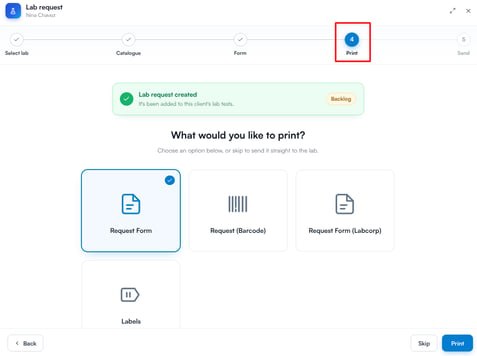
Once the form is saved, the lab request is created and added to the Backlog on the Labs page. The Print step then asks what you would like to print before sending. Choose from the following:
- Request Form: Print the standard lab request form.
- Request (Barcode): Print a barcode for the request.
- Request Form (Labcorp): Print a Labcorp-specific request form.
- Labels: Print labels for the samples.
Select an option and click "Print". If you don’t need to print anything, click "Skip" to proceed directly to the Send step.
Step 7: Send the Request
The final step is Send, where you review the request and choose how it reaches the lab. The screen shows the selected laboratory, the tests in the request, and the delivery method. For a custom request, you also choose the laboratory from a dropdown here. Review all details before sending.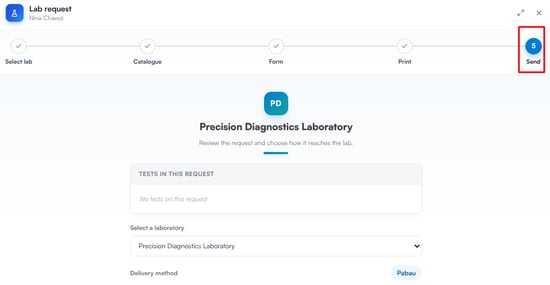
NOTE: If there are any issues to resolve before sending (for example, a missing lab test), a warning will appear in red. Resolve these before sending the request.
Click "Send request" to submit the lab request to the lab. For labs that receive requests by email or fax, the button reflects the chosen delivery method (for example, "Send by email").
How to Review and Share Lab Results
Step 1: Navigate to Clients
Log in to your Pabau account and in the left sidebar menu, click on Clients, then select the "Labs" sub-tab.
Step 2: Locate the Lab Result
Check the Received column to find the lab result you want to review.
Step 3: Review the Lab Result
Once you have found the result you want, click the client’s name on the request card to open their client card. It opens on the Lab Tests section, focused on that request.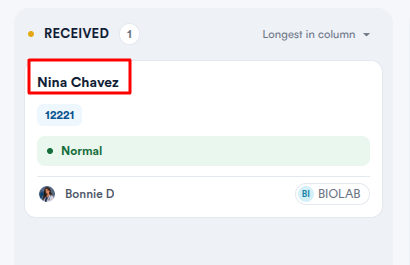
NOTE: If a test result is abnormal, the test name is highlighted in red, and the request shows an abnormal-results badge, to draw attention to it.
Click the expand button on the far right of the request to open the results for detailed review. This also moves the request to the Reviewing stage.
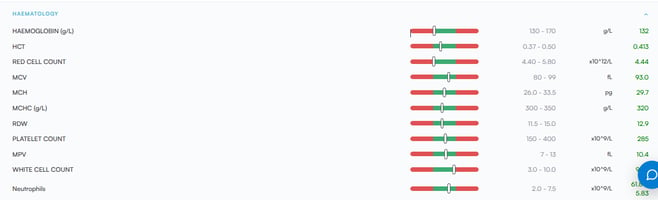
Each individual test row shows:
- Test name: Displayed on the left.
- Visual range bar: A colour-coded bar showing where the result falls within the reference range. The green section represents the normal range and the red sections represent out-of-range values. A marker on the bar shows exactly where the client’s result sits.
- Reference range: The expected normal range for that test (for example, 130-170).
- Unit: The unit of measurement (for example, g/L).
- Result value: Shown in green if normal. If the result is abnormal, the test name is highlighted in red and a "High" or "Low" label appears next to the value.
Step 4: Share Lab Results
Click the three-dot menu on the right of the request. From here you can Print the results or choose "Send as email" to email them to the client as an attachment.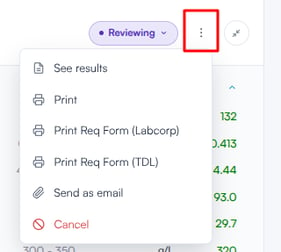
Alternatively, hover over the request and click the Share icon to choose who to share the result with.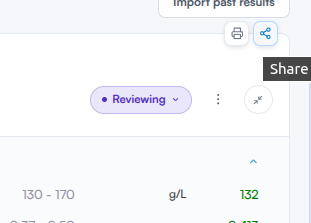
Step 5: Share via Email
Another way to share lab results with a client is by inserting them into an email.
When composing an email, use the "Client Record" option in the toolbar at the bottom of the composer, then choose Labs and select a result to insert it into the email before sending.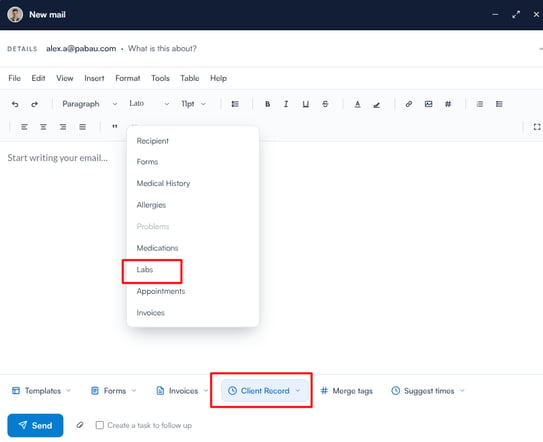
With the Labs feature fully set up, your team can manage the entire lab workflow from one place - creating requests, tracking progress through each stage, and reviewing results with a clear visual view of what’s normal and what needs attention. Keeping lab records in Pabau ensures every result is tied to the right client and accessible whenever it’s needed.
Was this guide helpful? Let us know by voting below - your feedback helps us write clearer articles.
For more guides, browse the related articles below or use the search bar at the top of the page. You can also watch our video learning series, the Pabau Academy, or visit the Support page for additional help.