
Add-ons let you attach customizable option groups to a service, so staff can offer relevant enhancements at the point of booking. When a service with add-ons configured for the calendar is added to an appointment, staff are prompted to make selections before the appointment is booked, ensuring the correct duration, pricing, and resource requirements are applied from the outset.
Before you start:
Add-ons must be created and enabled for the calendar on a service before they appear when booking. To learn how to set up add-ons, read this article.
Step 1: Create a new appointment
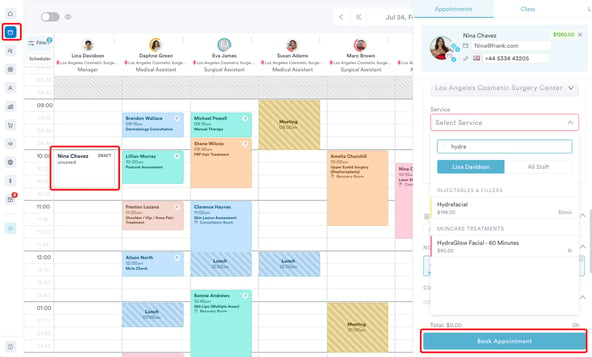
Log into your Pabau account and open the Calendar from the left sidebar menu. Click on an empty time slot to start a new appointment, then select the client and the service you want to book.
Step 2: Open the customization modal
When you add a service that has add-ons enabled for the calendar, the "Customise the [Service]" modal appears automatically. The modal is titled after the service and displays the client's name and avatar, along with a count of how many option groups are attached to the service.
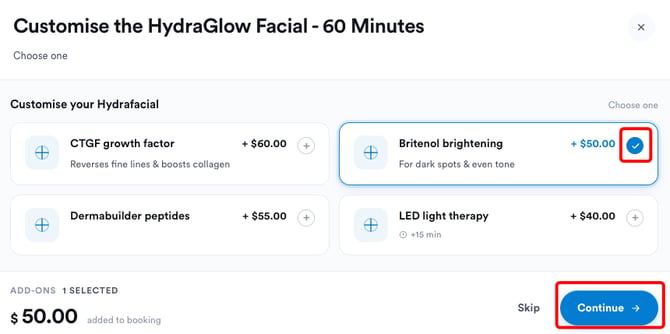
Note: The modal only appears if the add-on is configured to apply to the calendar. Services without calendar-enabled add-ons are booked as usual. To learn how to set up add-ons, read this article.
Step 3: Make your selections
Each option group is displayed as its own section. The group prompt appears on the left, and the status and selection limit appear on the right:
Required - A selection must be made before you can continue.
Optional - shows only the selection limit in grey (e.g. "Choose any number"). These groups can be skipped.
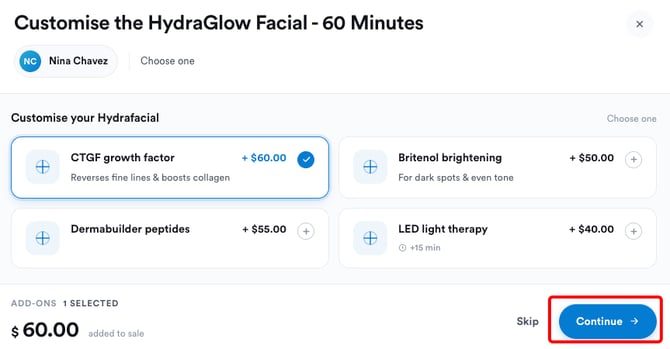
Each option tile displays the option name, its price adjustment, and, where configured, a description and duration change. Click on the "+" button to select an option. A selected option is highlighted with a blue border and checkmark. In a "choose one" group, selecting an option greys out the remaining tiles.
Step 4: Review and continue
The "Continue" button becomes active once all required groups have a valid selection. Click on "Continue" to confirm your choices and apply them to the appointment.
Step 5: Book the appointment
Your selections are applied to the appointment automatically:
Price - the service price increases by the amount defined on the selected options, and the appointment total updates accordingly.
Duration - if an option is set to increase or decrease the service duration, the appointment slot on the calendar is adjusted to reflect the new total.
Deposit - if a percentage-based deposit is configured for the service, it is recalculated against the new price, so the deposit due updates to reflect the add-on.
Finish booking the appointment as usual. The add-ons are now tied directly to the appointment.
By following these steps, you can add relevant enhancements to an appointment at the point of booking, with pricing, duration, and resource requirements adjusting automatically on the calendar.
Was this guide helpful? Let us know by voting below - your feedback helps us write clearer articles.
For more guides, browse the related articles below or use the search bar at the top of the page. You can also watch our video learning series, the Pabau Academy, or visit the Support page for additional help.