
Table of Contents:
1. How to Enable Vaccines
2. How to Create Vaccines as Products
3. How to Configure Vaccines
3.1. How to Manage Disease Records
3.2. How to Create and Manage Schedule Types in Vaccine Management
3.3. How to Create Vaccines
4. Vaccine Dashboard
4.1. How to Schedule a Vaccine for a Client
4.2. How to Administer a Vaccine for a Client
This article covers the new Client Card, available to selected clinics from August 2026. If your Client Card looks different, see How to Manage Vaccines (Classic) guide instead.
Vaccine Management in Pabau gives your clinic a smarter way to schedule, administer, and track vaccinations - all from one place. Whether it’s for travel, seasonal flu, or routine care, you can log batch numbers, track progress, and keep fully compliant records with ease.
How to Enable Vaccines
Step 1: Navigate to Business Details
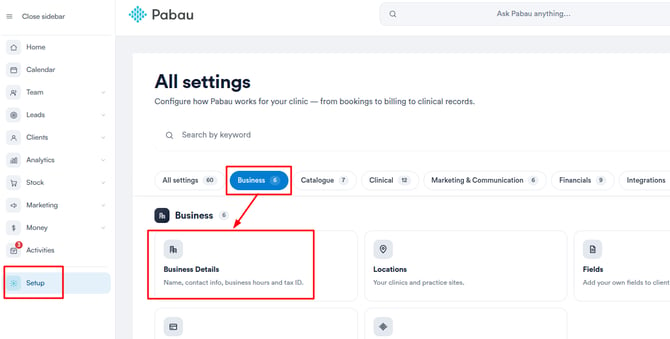
Start by logging into your Pabau account using your login details. Then, navigate to the Setup button on the bottom left corner of the screen to access the Setup page. Navigate to the "Business Details" tab located under the Business section.
Step 2: Enable Vaccines
On the Business Details page, switch to the "Features" tab. Here, you’ll see the 'Vaccines' option. To activate it, simply toggle the switch on the right-hand side - it will turn blue once enabled.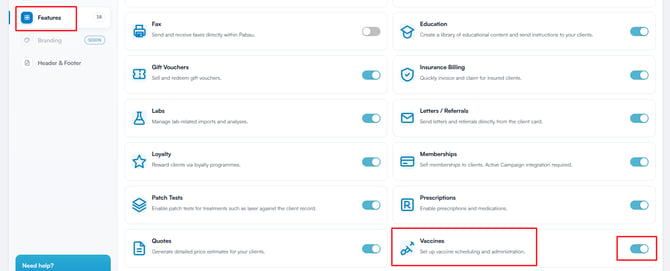
Once enabled, the Vaccines feature will appear under the Clinical section on the Setup page and can be accessed from the client card via the EMR tab (labelled "Chart" for US accounts).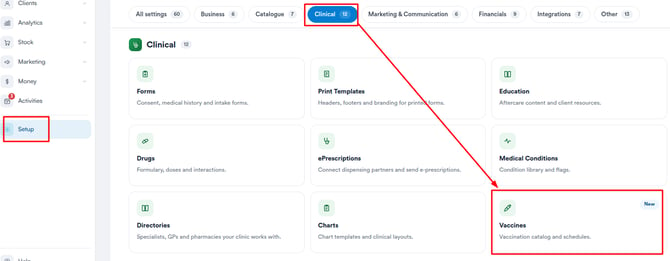
By following these steps, you can easily enable the Vaccine feature on your Pabau account.
How to Create Vaccines as Products
Step 1: Navigate to Setup
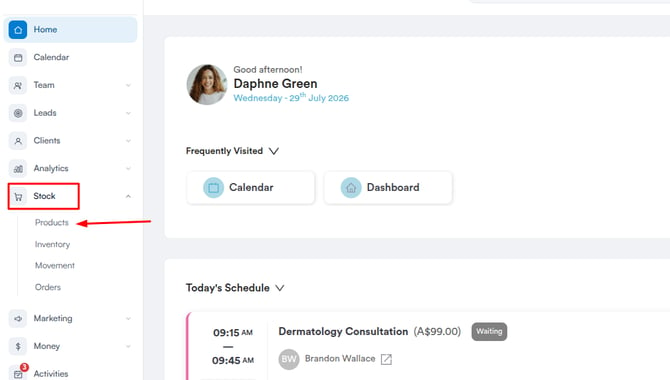
Start by logging into your Pabau account using your login credentials. Then, please navigate to the Stock tab, located in the left sidebar menu, and click to expand it. From there, select "Products" to access all your products.
Step 2: Create a Vaccines Category
Before creating a vaccine product, create a Vaccines category to keep them organised. Switch to the "Categories" tab and click "New Category" in the top right corner.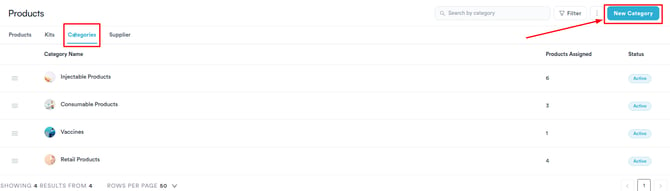
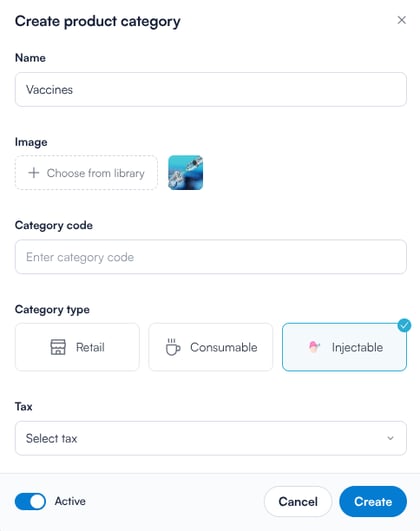
In the pop-up window, fill in the following fields:
- Name: Enter the name of the category - for example, Vaccines.
- Image (Optional): Upload an image to visually represent the category on the POS.
- Category Code (Optional): Add a custom code for internal reference if needed.
- Category Type: Choose the appropriate type. For vaccines, select Injectable.
- Tax: If applicable, select a tax rate from the dropdown menu. This will show any tax rules you’ve already created in the system.
Step 3: Create a Vaccine Product
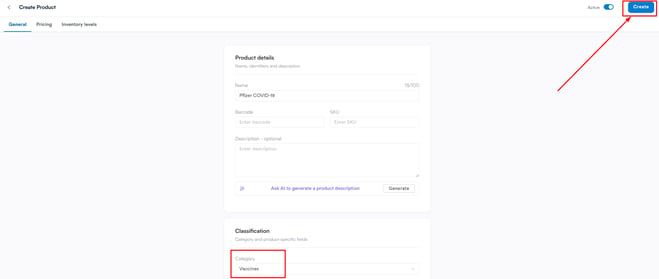
From the Products tab, click "New Product" in the top right corner and create a new product as usual, filling in all required fields.
Once you're done filling out all the required fields, ensure to select the "Save" button in the top right corner of the screen to finalise.
NOTE: Make sure to select "Vaccines" as the Category to correctly classify the product.
By following these steps, you’ll be able to quickly and accurately set up vaccines as stock products in Pabau.
How to Configure Vaccines
Setting up vaccines in Pabau involves several key steps that ensure your clinic’s vaccination workflow is accurate, efficient, and compliant. Here’s an overview of the process to guide you through:
1. Manage Diseases
Start by creating and managing the diseases your vaccines protect against. This includes associating each disease with relevant vaccines and the countries where they are prevalent.
2. Define Vaccine Schedule Types
Set up schedule types to organise how vaccines are administered — for example, first dose, second dose, booster, or any custom schedule your practice requires.
3. Create Vaccines
Once diseases and schedules are configured, create your vaccines in the system. Enter essential details like dosage, route, product consumption, and link each vaccine to the appropriate disease and schedule type.
Follow the detailed step-by-step guides below to configure each part properly and get your vaccine management ready in Pabau.
How to Manage Disease Records
Step 1: Navigate to Setup
Log in to your Pabau account and in the left sidebar menu, click on Setup. Click on the "Clinical" filter tab at the top of the All Settings page, then click on the "Vaccines" card.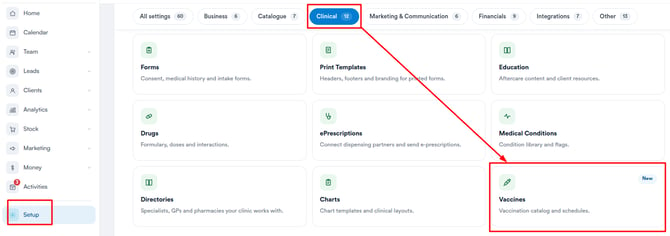
Step 2: Access the Disease Manager Page
Click on "Diseases" to open the full list of diseases available in your Pabau account.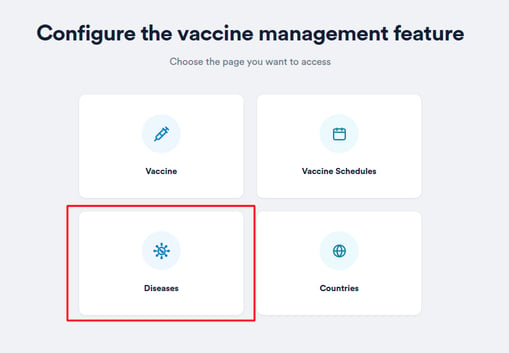
This page is where you’ll find all diseases stored in your system. Each entry displays key information, including:
-
Disease name
-
Associated vaccines
-
Associated countries
-
Status (via the Active and Inactive tabs)
To add a new disease, click the "Create Disease" button at the top right of the page.
Step 3: Create a New Disease
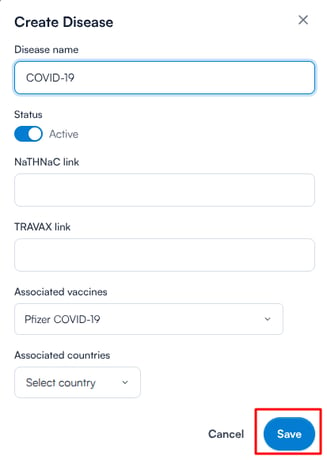
In the pop-up window, you’ll be able to:
-
Enter the disease name (required field)
-
Link vaccines to this disease (via the Associated vaccines field)
-
Link countries to this disease (via the Associated countries field) — each country you add is assigned a risk level
-
Set the disease’s status (Active/Inactive), and optionally add TRAVAX and NaTHNaC reference links
Once you’ve completed the necessary fields, click Save to add the disease to your list.
NOTE: You’ll only be able to associate vaccines that already exist in your Pabau vaccine database. If you don’t see the vaccine you’re looking for, you may need to add it first under the Vaccines section.
Step 4: Edit or Delete an Existing Disease
To edit a disease, locate it in the list and click the "Edit" button on the right side of its row. The same form will open with existing information pre-filled. Update the name, vaccine or country associations, or active status as needed, then save.
To remove a disease from use, click the "Delete" button on the right side of its row. A confirmation prompt will appear before the deletion is finalised. Deleting moves the disease to the Inactive tab rather than erasing it — you can reactivate it later by editing it and setting its status back to Active.
By following these steps, you can easily create and edit diseases in Pabau.
How to Create and Manage Schedule Types in Vaccine Management
Schedule types help you organise how different vaccine courses are structured in Pabau. Whether it's a first dose, booster, or a recurring vaccination type, schedule types let you define and manage these stages clearly.
Step 1: Navigate to Setup
Log in to your Pabau account and in the left sidebar menu, click on Setup. Click on the "Clinical" filter tab, then click on the "Vaccines" card and select "Vaccine Schedules."
Step 2: Access Vaccine Schedules
Click on "Vaccine Schedules" to open the setup area where you can create, edit, or manage different schedule types for your vaccines.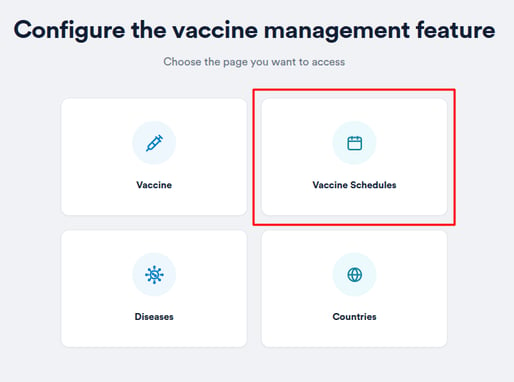
Step 3: Create a Schedule Type
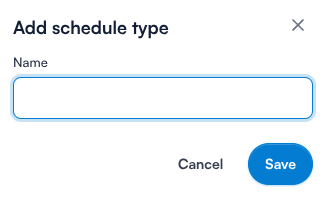
Click "Add schedule type" in the top right corner. A modal will appear where you can enter a name such as "First Dose", "Booster" or "Second Dose", then click "Save" — a name is required. Once created, the schedule type will appear in the list immediately.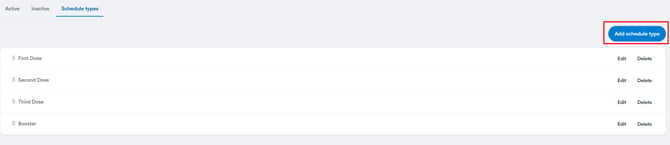
Step 4: Edit or Delete Schedule Types
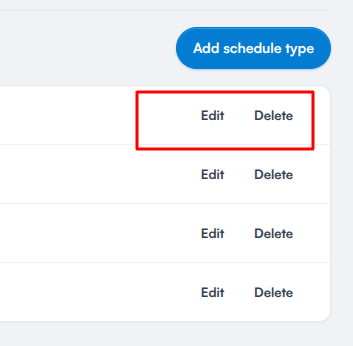
Each schedule type has direct Edit and Delete buttons on the right side of its row.
-
Edit: Opens the modal with the current name pre-filled, allowing you to update and save.
-
Delete: Removes the schedule type from future use — existing vaccine schedules keep their data. A confirmation prompt will appear before the deletion is finalised.
Step 5: Reorder Schedule Types
Drag and drop schedule types using the reorder icon on the far left side to define the order in which they appear when assigning vaccine schedules to clients.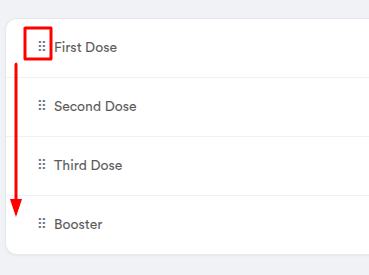
Having structured vaccine schedule types helps maintain consistency across all vaccination plans, ensures clarity in multi-dose treatments, and improves efficiency when scheduling or administering follow-ups.
How to Create Vaccines
Step 1: Navigate to Setup
Log in to your Pabau account and in the left sidebar menu, click on Setup. Click on the "Clinical" filter tab, then click on the "Vaccines" card and select "Vaccine."
Step 2: Access Vaccines
Click the "Vaccine" option to access the vaccines listing page, where you can view all existing vaccines in your account.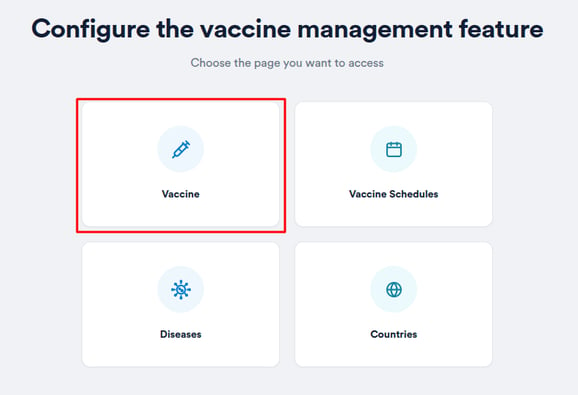
Step 3: Create a New Vaccine
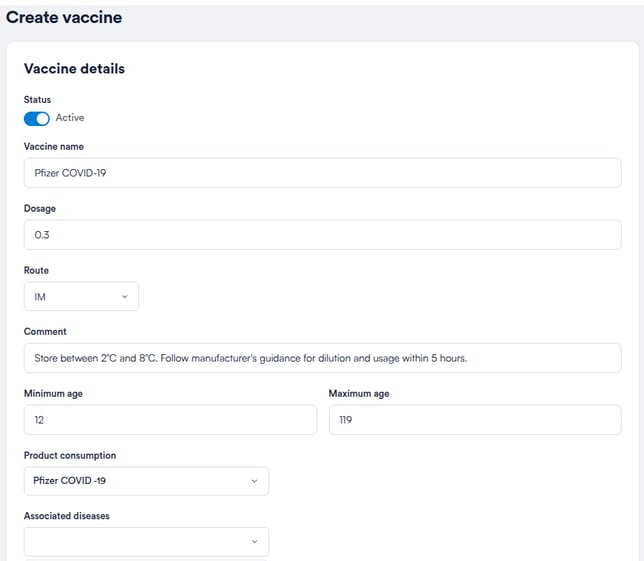
To add a new vaccine, click the Create Vaccine button in the top-right corner of the screen. You’ll be prompted to complete the following fields:
-
Status - Set the vaccine to Active or Inactive.
-
Vaccine Name - The name of the vaccine (e.g., Pfizer COVID-19).
-
Dosage - Specify the amount administered.
-
Route - Choose from the standard options (e.g. IM for intramuscular, SC for subcutaneous).
-
Comment - Add any internal notes.
-
Min/Max Age - Set the age range for administration.
-
Product Consumption - Link the stock product that is consumed when this vaccine is administered.
- Associate Diseases - Search and select one or more diseases that this vaccine targets. These will be pulled from your disease database in Pabau.
Step 4: Configure Vaccine Schedules
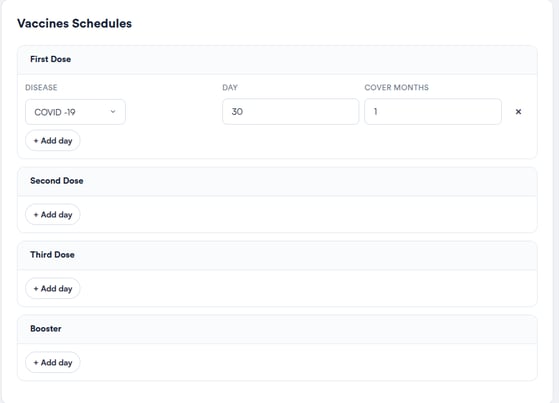
Once diseases are associated, you can configure vaccination schedules tailored to each disease.
Click "+ Add day" within a schedule type card to add a schedule row for that dose. Each row contains the following fields:
-
Disease: Select the disease this schedule applies to from the dropdown.
-
Day: Enter the number of days from today when this dose should be administered, for example 30 for 30 days from now.
-
Cover Months: Enter how many months this dose provides immunity for.
You can add multiple rows within a single schedule type if the vaccine covers more than one disease or requires different timing per disease. To remove a row, click the × button on the right.
Step 5: Save the Vaccine
Click "Save" in the top right corner to save the vaccine. The new vaccine will appear in the list showing its name, associated diseases, number of schedules, route, and age range.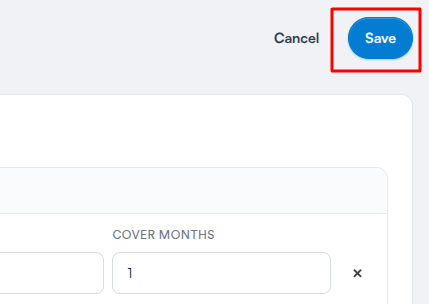
Step 6: Edit Vaccine
To edit an existing vaccine, click the "Edit" button on the right side of its row. The same screen will open with existing data pre-filled - make your changes and click "Save" once done.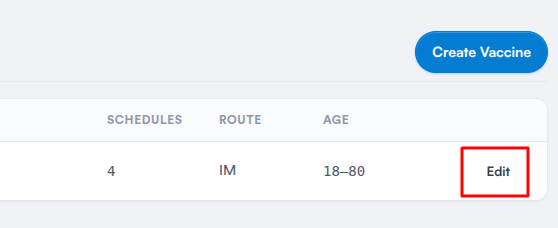
NOTE: Vaccines cannot be deleted — to retire one, edit it and set its status to Inactive.
By following these steps, you can easily create vaccines in Pabau.
Vaccine Dashboard
The Vaccine Dashboard in Pabau offers a centralised view of a patient’s full vaccination history, allowing you to review coverage, track upcoming doses, and take action when needed.
The Vaccine Dashboard serves as a complete overview of:
-
Administered and scheduled vaccines
-
Disease protection status (past, present, and future)
-
Related product and dosage data
-
Site of administration, batch numbers, and more
Step 1: Access Client Card
Start by logging into your Pabau account using your login credentials. Then, navigate to the search bar located at the top of the screen and type in your client's name. Their profile will appear on the search results, click to access their client card.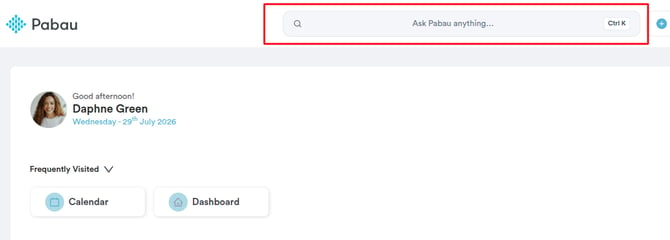
Step 2: Open the Vaccines Dashboard
In the client card, click on the "EMR" tab in the navigation menu at the top (labelled "Chart" for US accounts). This opens the clinical overview grid. Click on the "Vaccines" card to open the client's Vaccine Dashboard.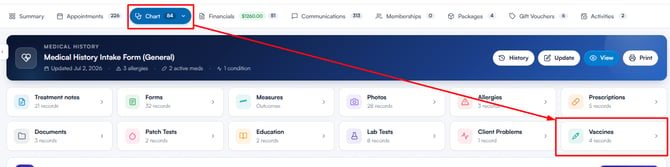
Step 3: Switch Between Views
The "Schedule a vaccine" and "Administer a vaccine" buttons sit in the top right corner of the dashboard. The dashboard itself has three views, selectable using the icons in the top left corner:
-
Vaccine history graph (first icon): The default view. Shows the vaccine timeline at the top and a full table of all scheduled and administered vaccine records below it.
-
Vaccines administration list (second icon): Shows a focused table of all administered vaccines only, with the following columns: Administration date, Administered by, Vaccine Name, Vaccine expiry, Batch Number, Batch Expiry, and Site Given.
-
Diseases coverage list (third icon): Shows a summary of vaccine coverage grouped by disease.
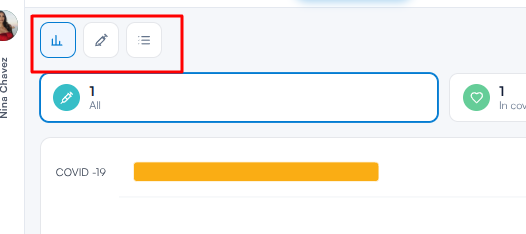
Step 4: Read the Vaccine History Graph
In the Vaccine history graph view, the timeline at the top shows each disease the client is or was vaccinated against, with coloured bars indicating coverage status:
| Colour | Meaning |
|---|---|
| 🟩 Green | In Cover - The patient is currently protected (vaccine administered) |
| 🔵 Blue | Scheduled - A future dose is booked |
| 🟨 Yellow | Lapsed - Coverage has expired |
The filter cards at the top of the dashboard show a count for each status - All, In cover, Scheduled, and Lapsed. Click a card to filter the timeline and the table below by that status. A legend below the timeline shows the colour key for reference. Hover over a bar to see the full details of that dose — vaccine, disease, status, administration details and the planned schedule. The figure at the end of each row shows the disease’s total months of coverage.
Below the timeline is a table of all vaccine records showing: Vaccine name, Diseases, Status, Planned Date, Administration date, Site Given, Batch number, Batch expiry, and Actions. Administered vaccines show a status of "Administration" with full details, while scheduled doses show "Scheduled" with N/A for fields not yet filled in. Click any column heading to sort the table. Each row has a three-dot menu in the Actions column with a Delete option.

Step 5: View the Vaccines Administration List
Switch to the Vaccines administration list view using the second icon at the top left. This shows only vaccines that have been administered, making it easy to review the full administration history for a client, including who administered each dose and when.

Step 6: View the Diseases Coverage List
Switch to the Diseases coverage list view using the third icon at the top left. This view shows a summary of all vaccine coverage grouped by disease, with the following columns: Disease, Vaccine Name, Type, Status, and Estimated Cover Date. The Status column shows whether each record is In Cover, Scheduled or Lapsed, making it easy to see which diseases the client is currently protected against and when that protection is estimated to expire.
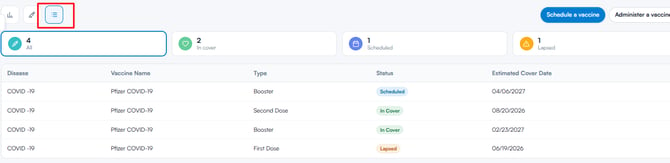
With the Vaccine Dashboard, you’ll have a clear, organised view of each client’s vaccination history, helping your team deliver safer, more accurate care every time.
How to Schedule a Vaccine for a Client
Whether you're following country-specific protocols or adding custom vaccinations, the vaccine scheduler makes it easy to select diseases, pick vaccine schedules, and log upcoming doses with accuracy.
Step 1: Access Client Card
Start by logging into your Pabau account using your login credentials. Then, navigate to the search bar located at the top of the screen and type in your client's name. Their profile will appear on the search results, click to access their client card.
Step 2: Open the Vaccines Dashboard
In the client card, click on the "EMR" tab in the navigation menu at the top (labelled "Chart" for US accounts). This opens the clinical overview grid. Click on the "Vaccines" card to open the client's Vaccine Dashboard.
Step 3: Schedule a Vaccine
From the Vaccine Dashboard, click the "Schedule a vaccine" button in the top right corner. This opens the scheduling wizard, which guides you through four steps: Country, Disease, Vaccine and Schedule.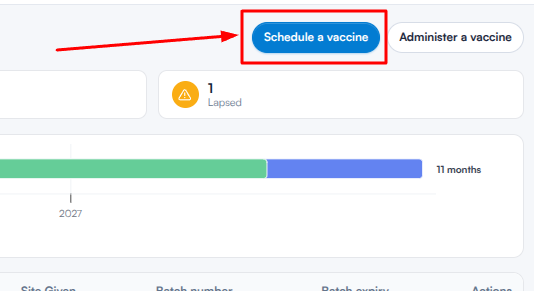
Step 4: Select the Country
Use the search field to find the country related to the vaccine requirement, then click its card to select it. You can select more than one country — your choices appear under "Selected countries", and clicking a selected country removes it again. Click "Next" to continue.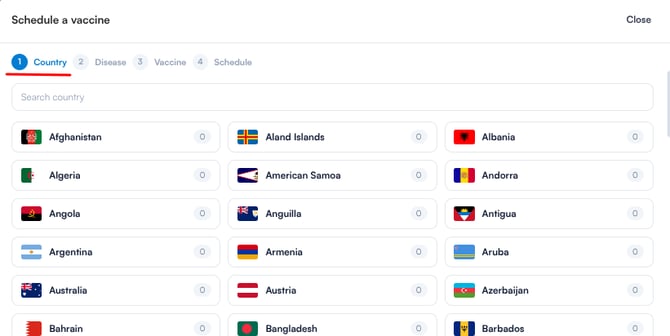
Step 5: Select Disease(s)
You’ll now see the diseases associated with the selected countries, grouped by risk level. Click one or more diseases to select them — selected diseases are highlighted. Click "Next" to continue.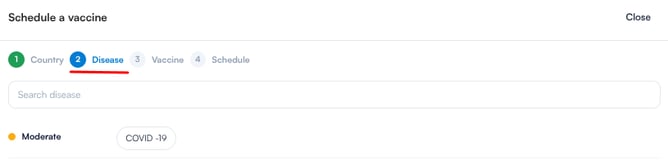
NOTE: Use the search field to filter the list. Diseases that aren’t linked to your selected countries appear under "Other diseases", so you can schedule beyond the country recommendations.
Step 6: Add Vaccine Schedule(s)
A list of vaccine options will appear based on the selected disease(s).
Recommended vaccines are selected by default — untick any you don’t want to schedule. For each vaccine, you’ll see:
-
Vaccine name, with the number of doses in its schedule
-
Route and dosage (e.g. IM · 0.5 ml)
-
Covers — the diseases the vaccine protects against (e.g. Covid-19, Rabies)
If a vaccine offers more than one schedule, a "Schedules" row appears once it’s selected — click the schedule type(s) you want to include. A warning appears if the client’s age falls outside the vaccine’s recommended range.
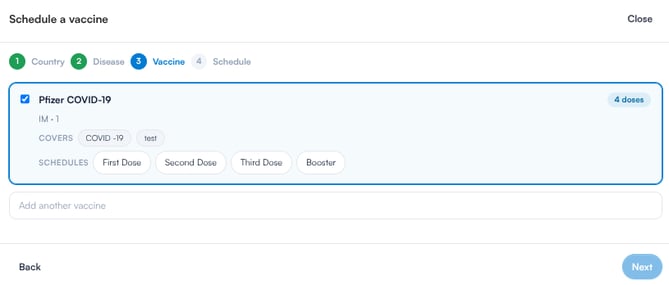
To add a vaccine that isn’t in the recommended list, use the "Add another vaccine" search field below and click a vaccine to add it. Click "Next" to proceed.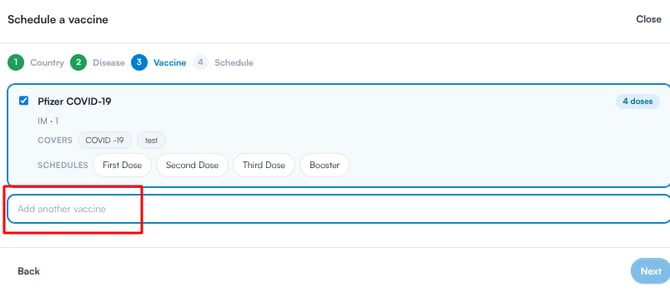
Step 7: Review and Adjust the Schedule
The final step shows the planned schedule for each selected vaccine. A timeline is displayed at the top of each vaccine’s section, with Day 0 representing today’s date. Below it, each dose is listed with an automatically calculated date based on the schedule configuration.
You can edit any date directly in the date field. To add an extra dose date, click "+ Add date". To remove a dose date, click the minus button on the right of that row. To remove the vaccine entirely from the schedule, click "Remove" in the top right corner of the vaccine section. New dose dates must fall after the last scheduled dose and within the next two years.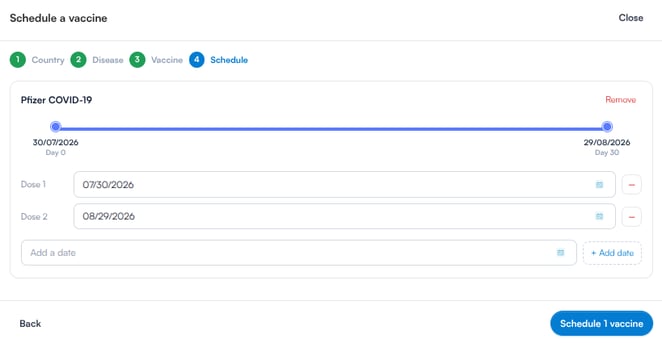
Step 8: Save the Schedule
Once all doses and dates are confirmed, click "Schedule [X] vaccines" in the bottom right corner — the button shows how many vaccines you’re scheduling. The wizard closes and the Vaccine Dashboard updates automatically to reflect the newly scheduled doses.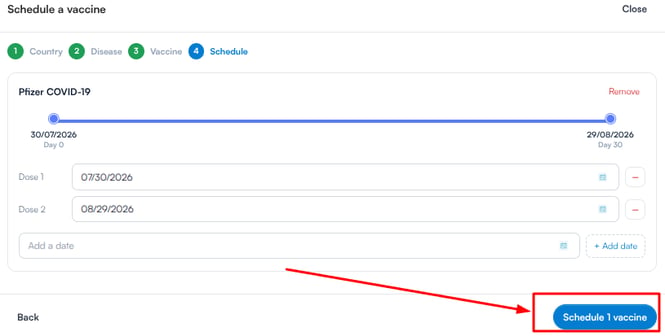
By following these steps, you can successfully schedule a Vaccine for a client in Pabau.
How to Administer a Vaccine for a Client
Step 1: Access Client Card
Start by logging into your Pabau account using your login credentials. Then, navigate to the search bar located at the top of the screen and type in your client's name. Their profile will appear on the search results, click to access their client card.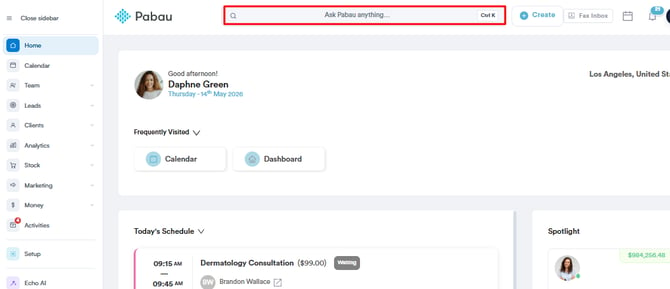
Step 2: Open the Vaccines Dashboard
In the client card, click on the "EMR" tab in the navigation menu at the top (labelled "Chart" for US accounts). This opens the clinical overview grid. Click on the "Vaccines" card to open the client's vaccination dashboard, where you can view and manage their full vaccination history.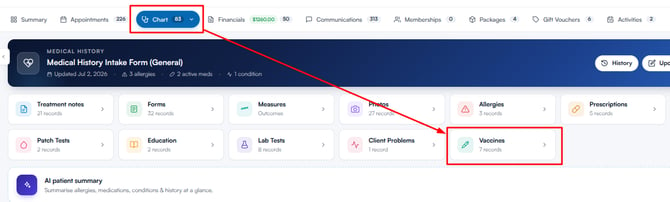
Step 3: Administer Vaccine
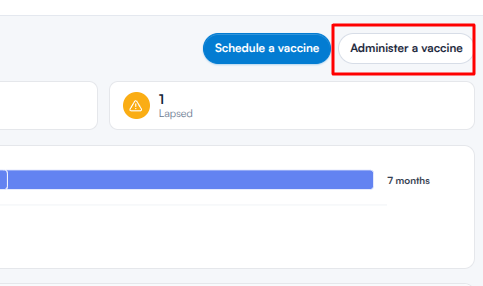
Click the "Administer a vaccine" button in the top right corner of the Vaccines section. This opens the "Administer a vaccine" modal.
Step 4: Select a Vaccine
At the top of the modal, the Scheduled vaccines panel summarises the client’s vaccine courses. Each vaccine is shown with a row of dose indicators — a green tick for administered doses and a clock icon for doses still due. Hover over an indicator to see its scheduled or administered date.
To choose the vaccine you’re administering, open the "Administer Vaccine" dropdown and select the vaccine from the list. Each option shows how many of its doses have been given so far, and you can type in the search box to narrow the list.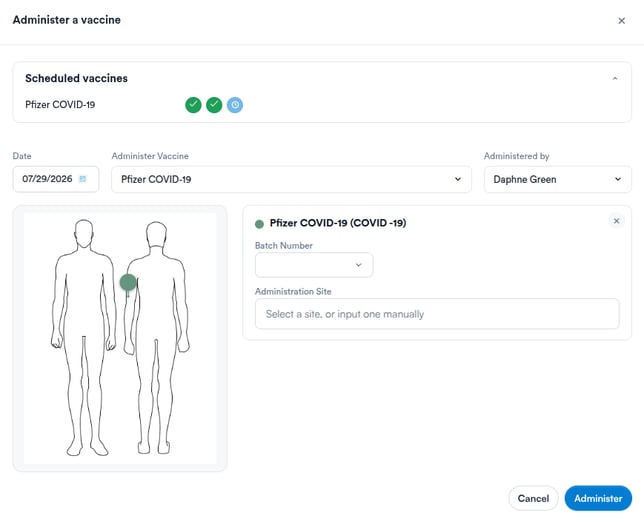
NOTE: Only vaccines that still have doses due appear in the dropdown. When you select a vaccine, Pabau administers its earliest outstanding dose.
If you need to administer a vaccine that isn’t listed at all, click "+ Add Another Vaccine" at the bottom of the dropdown. This opens the "Schedule a vaccine" wizard so you can schedule it first — once scheduled, it appears in the dropdown ready to administer.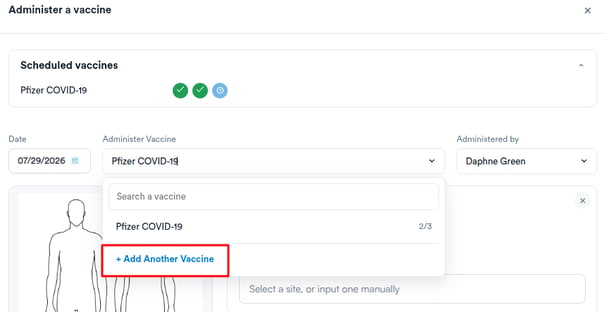
Step 5: Enter Administration Details
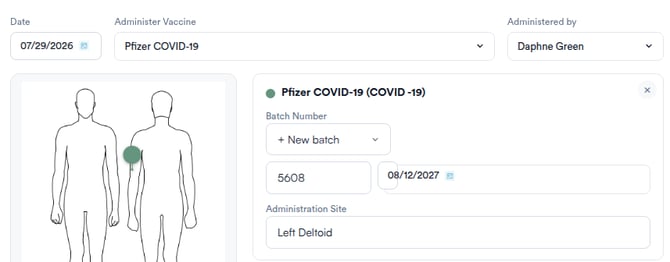
Once a vaccine is selected, tap or click the relevant area on the body diagram (front and back views, on the left side of the modal) to record where it was given. A colour-coded pin is placed on the diagram, and a matching administration card appears beside it. Then complete the following fields:
-
Date: The date the vaccine is administered. This defaults to today’s date and cannot be set in the future.
-
Administered by: The staff member administering the vaccine. This defaults to you — select a different team member if needed.
-
Batch Number (on the administration card): Select an existing batch from stock — each option shows the batch number, expiry date and remaining quantity — or click "+ New batch" to record a new batch number, expiry date and quantity. Recording a batch is optional.
-
Administration Site (on the administration card): Choose a preset site, such as Left Deltoid, or type your own into the "Select a site, or input one manually" field. A site is required for each vaccine.
To administer more than one vaccine in the same visit, select the next vaccine from the dropdown and pin it on the diagram — each vaccine gets its own card. To remove a vaccine, click the × button in the corner of its card.
Step 6: Administer the Vaccine
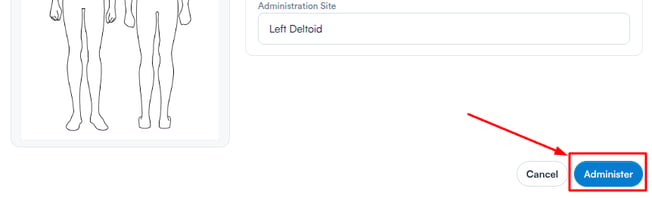
Once all fields are completed, click "Administer" in the bottom right corner of the modal to save the record. If any required information is missing, the modal lists what needs fixing before the record can be saved.
The administered dose will be updated in the vaccine table, showing the administration date, site given, batch number, and batch expiry.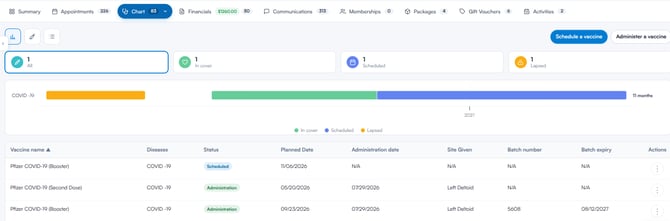
With the vaccine administered and recorded, the client's vaccination history will be updated automatically, keeping their clinical record accurate and complete.
Was this guide helpful? Let us know by voting below - your feedback helps us write clearer articles.
For more guides, browse the related articles below or use the search bar at the top of the page. You can also watch our video learning series, the Pabau Academy, or visit the Support page for additional help.