
Cases are created and managed on the client card, then selected on the appointment when you book it.
Before you start: the client needs an insurance policy on their card, and Insurance Billing needs to be switched on under Setup → Business details. See this article.
Step 1: Navigate to the client card
Start by logging in to your Pabau account. Then use the search bar at the top of the page and type at least three letters of the client's name - Pabau filters the results as you type.
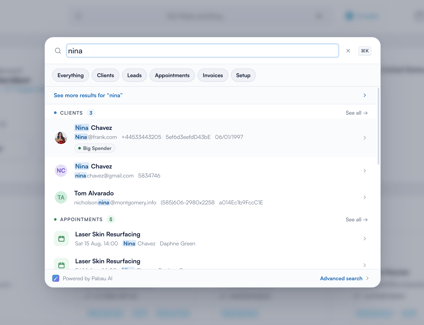
Click the client to open their card.
Step 2: Open the Insurance sub-tab
In the panel on the left of the client card, click Insurance. The sub-tab holds two groups, each with a count:
- Insurance Policies - the insurers on file for this client, with a + New Policy button.
- Case Details - the client's cases, with a + Add Case button.
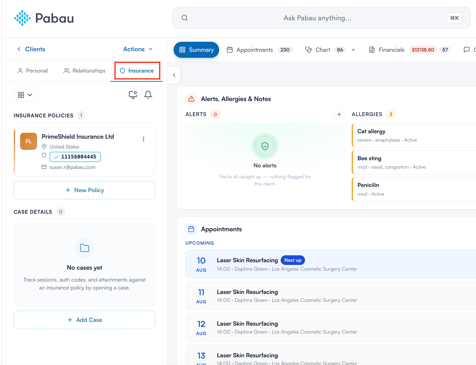
If the client has no cases yet you'll see the No cases yet panel, prompting you to open one. Cases are grouped under the policy they belong to, so a client covered by more than one insurer will see their cases split accordingly.
Step 3: Add a case
Click + Add Case. The Add a case window opens, with three counters across the top - Sessions, Appointments and Files - that fill in as you build the case.
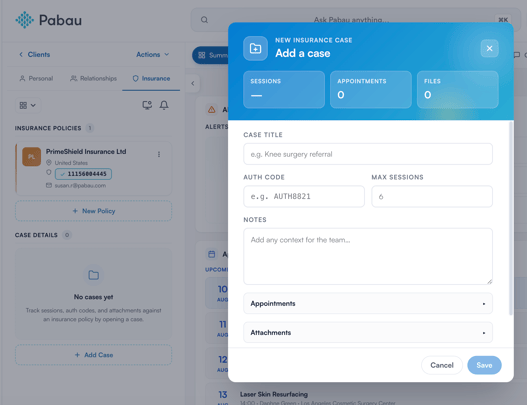
Fill in:
- Case title - what the case is for, so your team recognises it at a glance. For example, Post-surgical scar revision or Blepharoplasty - pre-op consults.
- Auth code - the authorisation code issued by the insurer, e.g. AUTH8821.
- Max sessions - how many sessions the authorisation covers. This sets the ceiling for how many appointments you can tick below.
- Notes - any context the rest of the team should know, for example Insurer approved 4 of 6 requested sessions - resubmit for the rest in October.
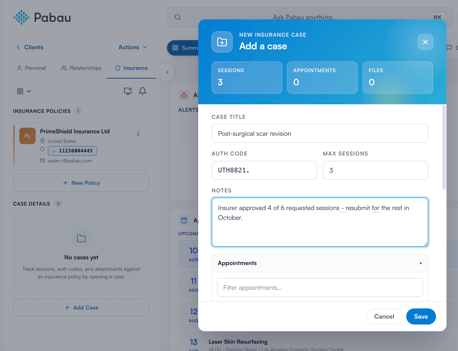
Link the appointments
Expand Appointments to see every appointment on the client's record, each with its service name and date.
- Use Filter appointments… to narrow the list - handy on a client with a long history. Type the service name, for example Dermal Fillers.
- Tick each appointment that falls under this authorisation.
- You can't tick more than your Max sessions figure. Once you reach it, the remaining checkboxes grey out, so if the insurer approved 4 sessions, you can only ever attach 4 appointments.
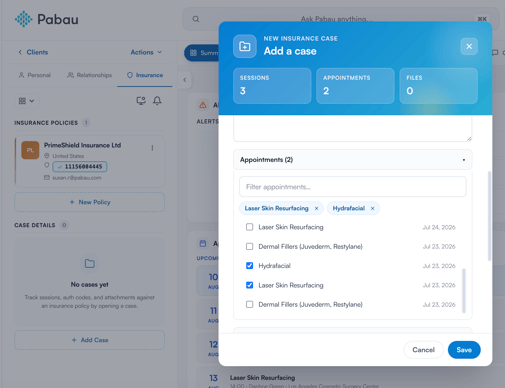
The Appointments counter at the top updates as you tick.
Attach supporting files
Expand Attachments to link documents already saved against the client.
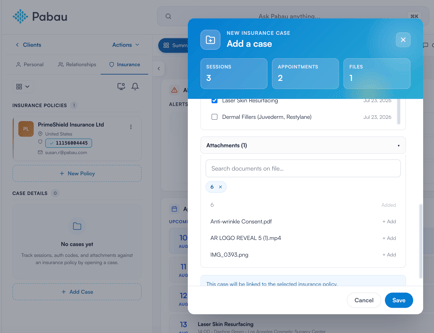
- Use Search documents on file… to find what you need, then click + Add on the row.
- Add as many as the case needs - a referral letter, the signed consent, pre-op photos, the insurer's approval email.
Files come from the client's EMR → Documents, so if the document isn't in Pabau yet, upload it there first and then come back to the case.
Click Save. The case appears under Case Details straight away.
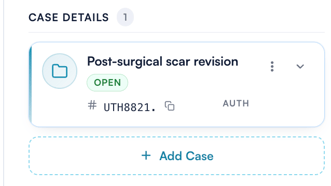
Cases live on the client, not on a single appointment, so one case can cover a whole course of treatment - link every appointment that falls under the same authorisation to it rather than opening a new case each visit. Bear in mind the sessions bar counts what's linked rather than what's happened, so ticking an upcoming appointment uses part of the allowance straight away. Max sessions is a hard cap: if the insurer later approves more sessions, edit the case and raise the figure before you can attach any further appointments. The same appointment can sit on more than one case, and the same attachment can be reused across several cases.
The auth code you record here flows through to the rest of Pabau. It appears in the Auth Code column on the Claims page (Money → Claims) and on the appointment row in the client's Appointments tab, and a claim with no case linked shows an Assign case action there instead - see this article. Closing a case doesn't remove anything either: the linked appointments, attachments, and notes all stay on the record; the case simply stops being offered when you book new appointments.
Case Details appears once Insurance Billing is switched on under Setup → Business details and the client has a policy on file. Attachments are pulled from the client's EMR → Documents, so staff need access to that section to link files.
Step 5: Keep an Eye on the Authorisation
An authorisation is limited in two ways, the number of visits it covers and the date it runs out, and a claim that falls outside either one can be refused. Pabau watches both for you and flags a case before it becomes a problem.
On each case you will see:
- An amber chip when the case is close to its limit, showing either how many visits are left or how soon it expires.
- A red chip once it has run out or the expiry date has passed.
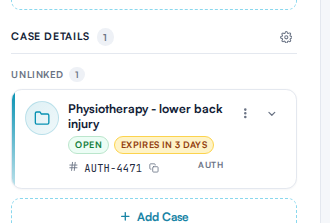
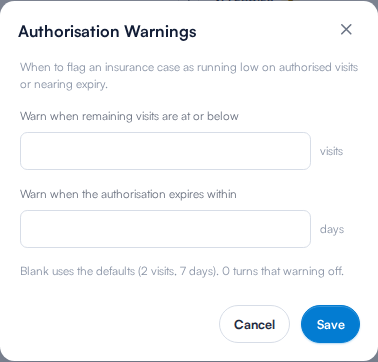
The thresholds are yours to set. Click the gear beside the Case Details heading and choose how early the warning should appear. By default it is 2 visits remaining and 7 days before expiry; leaving a box blank keeps the default, and entering 0 turns that warning off.
IMPORTANT: Workers compensation carriers in particular will deny a claim when the visit count or the date of service falls outside what the authorisation allows, so it is worth renewing a case before it runs out rather than after.
Was this guide helpful? Let us know by voting below - your feedback helps us write clearer articles.
For more guides, browse the related articles below or use the search bar at the top of the page. You can also watch our video learning series, the Pabau Academy, or visit the Support page for additional help.