
Step 1: Navigate to Issuing Companies
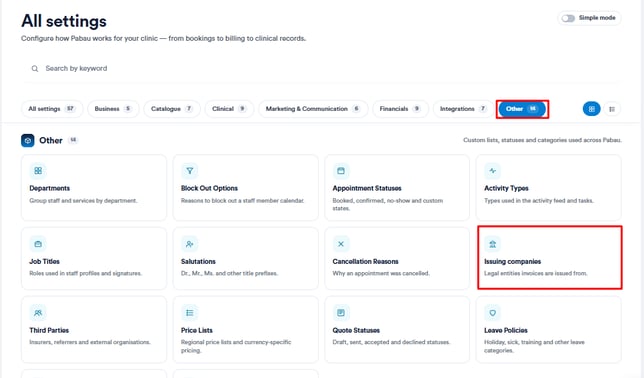
Start by logging into your Pabau account, then click on Setup in the left sidebar menu. Under "Other", click on "Issuing Companies".
Step 2: Create or Edit an Issuing Company
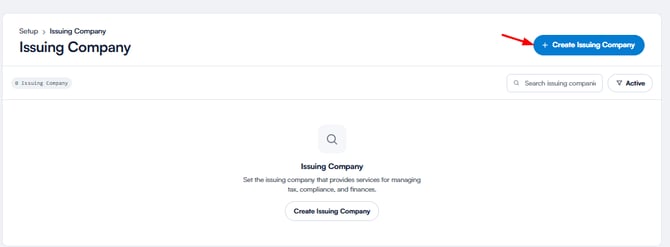
Once there, click the "+ Create Issuing Company" button in the top-right corner. In the General section, enter the company name, phone number, and website.
Step 3: Provide Financial Information
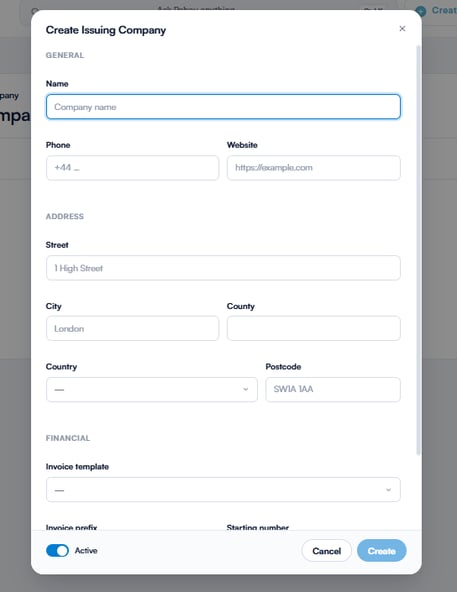
In the Financial Information section, enter the following details:
- Invoice template: Select an invoice template to use when creating invoices for this issuing company. You can choose from the templates you've previously created in your Pabau account. If you don’t select a specific template, the default invoice template will be applied.
- Invoice prefix: Specify the invoice prefix for this issuing company (e.g., NYC).
- Invoice starting number: Set the starting number for invoices issued by this company. This number will appear on the first invoice created for this issuing company. Each subsequent invoice will automatically have the next number in the sequence.
- VAT registered: Select whether this company is VAT registered.
Step 4: Link Services and Locations (Optional)
Instead of picking the issuing company by hand on every sale, you can tell Pabau which services and locations this company bills for. Use the Services and Locations tabs at the top of the issuing company window.
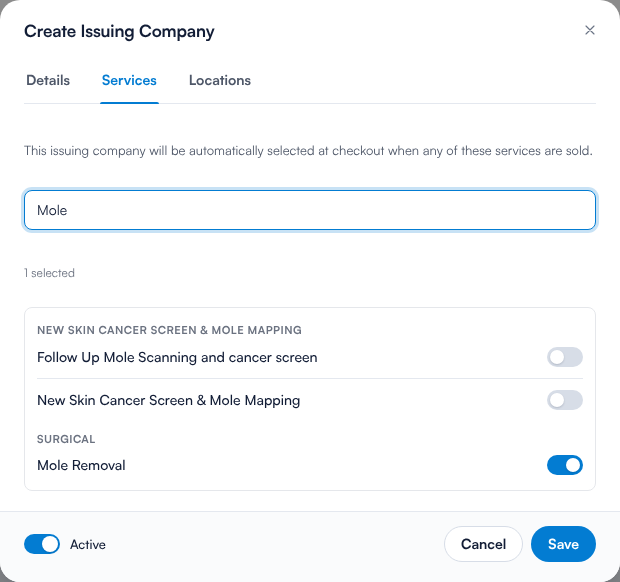
- Services: This issuing company will be automatically selected at checkout when any of these services are sold.
- Locations: Sales at these locations will use this issuing company at checkout, unless a service in the sale is linked to a different issuing company.
Use the search box to find a service or location, then use the toggle to link it. The count above the list shows how many you have selected. Click Save to apply your changes.
NOTE: Services take priority over locations. If a service is linked to one issuing company and the location it is sold at is linked to another, the service link wins.
NOTE: A service or location can only belong to one issuing company at a time. If you select one that is already linked elsewhere, Pabau labels it "Mapped to" that company and warns that it "Will move to this issuing company on save".
TIP: These tabs are entirely optional. If you do not link any services or locations, nothing about your checkout changes — you continue to select the issuing company manually at the point of sale, exactly as before.
By following these steps, you can create issuing companies in your Pabau account.
For more guides, refer to related articles below, select additional guides, or use the search bar at the top of the page. These guides will help you get the most out of your Pabau account.
Additionally, to help you fully utilize and understand your Pabau account, we recommend exploring additional guides and resources offered at the Pabau Academy. It offers in-depth video tutorials and lessons, offering a holistic learning experience that can equip you with the essential skills for achieving success with Pabau.