
Step 1: Navigate to Reports
Log in to your Pabau account, navigate to the left sidebar menu, and click on Analytics, then Reports.
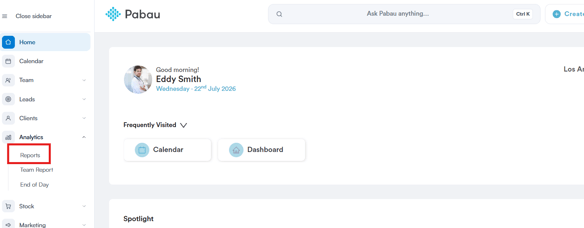
Step 2: Open the Cancellations Report
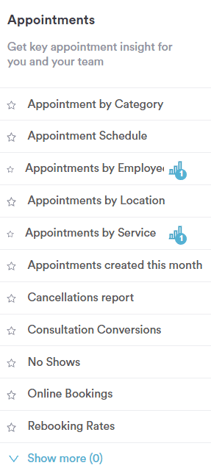
Under the Appointments category on the left, click on "Cancellations report."
Step 3: Understand the Filter Sentence
This report uses two filters joined by "and," meaning both conditions must be true for an appointment to appear:
Showing Appointment where Appointment Status is Cancelled and Appointment where Appointment date is in This month
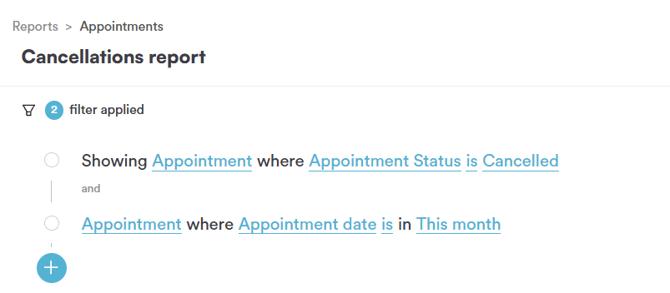
Click on the "+" icon to add another filter, or click on any underlined word to change it.
Step 4: Choose the Object
Clicking on the object name (e.g. "Appointment") opens a dropdown with the available objects to report on:
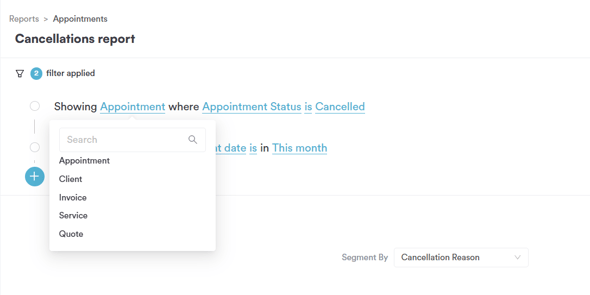
- Appointment — individual bookings on the calendar.
- Client — client profiles in your database.
- Invoice — billing records generated from sales.
- Service — the treatments or services offered by your clinic.
- Quote — quotes created for clients.
Step 5: Choose the Field
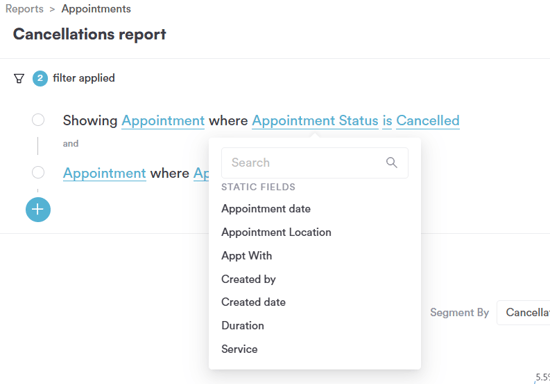
Clicking on the field name opens a scrollable dropdown of the fields available for the Appointment object. This report uses two different field types — Appointment Status (a status field) and Appointment date (a date field) — but both are picked from the same full list, grouped starting with the static fields:
- Appointment date — the date the appointment is scheduled for, which is what powers the second default filter
- Appointment Location — the clinic or location the appointment takes place at
- Appt With — the staff member the appointment is booked with
- Created by — the staff member who created the appointment record
- Created date — the date the appointment record was created in Pabau
- Duration — the length of the appointment
- Service — the service booked for the appointment
- Price — the price of the appointment
- Appointment Status — the current status of the appointment, which is what powers the first default filter
- Cancellation reason — the reason recorded if the appointment was cancelled
- Email Confirmation — whether an email confirmation was sent for the appointment
- SMS Confirmation — whether an SMS confirmation was sent for the appointment
- Confirmed — whether the appointment has been confirmed
- Issued To — the client the appointment was issued to
- Repeat Appointment — whether the appointment is part of a repeating series
- Rebook — whether the appointment was rebooked
- Requested — whether the appointment was specifically requested by the client
- Appointment ID — the unique identifier for the appointment
- Review Score per Appointment — the review score left for the appointment
- Review Comment — the comment left along with the review
- Online Booking — whether the appointment was booked online
- Appointment Date/Time — the combined date and time the appointment is scheduled for
- Converted — whether the appointment resulted in a conversion
- Notes — any notes recorded on the appointment
- Cancelled Date — the date the appointment was cancelled, if applicable
- Cancelled By — the user who cancelled the appointment
- Cancellation comment — the comment recorded when the appointment was cancelled
- Team — the team associated with the appointment
- Secondary Person — a secondary staff member linked to the appointment
- Appointment Price List — the price list applied to the appointment
- Case Name — the case the appointment is linked to
- Auth Code — the authorisation code recorded for the appointment
- Room — the room the appointment takes place in
- Equipment — the equipment used for the appointment
- Form(s) Completed — the form(s) completed in relation to the appointment
- Custom Fields — any account-specific custom fields also appear at the bottom of the list, such as a custom Auth Code field defined separately from the standard one above
Step 6: Choose the Operator
The operators available depend on the field type selected. This report demonstrates both a status field and a date field:
For a status field like "Appointment Status":
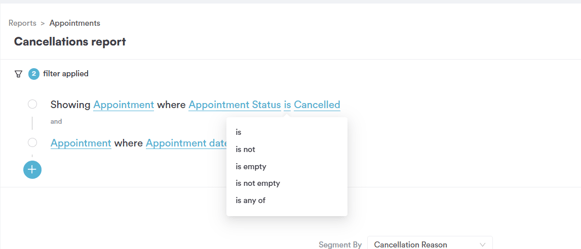
- is — matches appointments where the status matches the selected value.
- is not — excludes appointments where the status matches the selected value.
- is empty — matches appointments where no status has been set.
- is not empty — matches appointments where any status has been set.
- is any of — matches appointments where the status matches any one of several selected values (useful for grouping statuses like "Cancelled" and "No Show" together in one filter).
For a date field like "Appointment date":
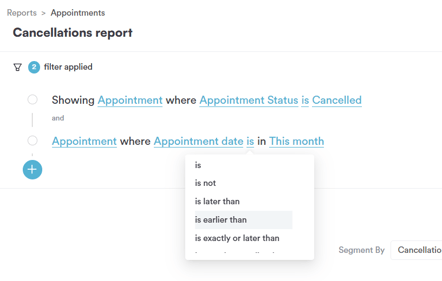
- is — matches appointments where the date falls within the selected value.
- is not — excludes appointments where the date falls within the selected value.
- is later than — matches appointments scheduled after the selected value.
- is earlier than — matches appointments scheduled before the selected value.
- is exactly or later than — matches appointments scheduled on or after the selected value.
Step 7: Choose the Value
For a status field like "Appointment Status," clicking on the value opens a list of the available statuses:
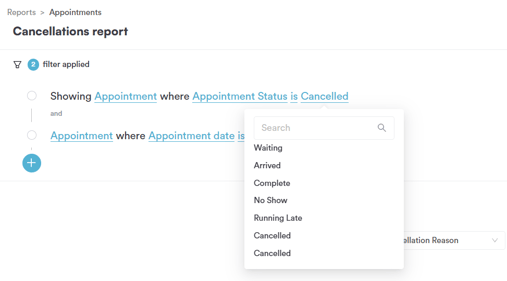
- Waiting
- Arrived
- Complete
- No Show
- Running Late
- Cancelled
For a date field like "Appointment date," clicking on the value opens a dropdown of preset date ranges under "Favourite intervals":
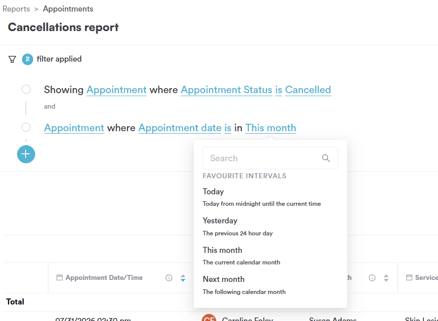
- Today — today, from midnight until the current time.
- Yesterday — the previous 24-hour day.
- This month — the current calendar month.
- Next month — the following calendar month.
You can also use the search bar at the top of either dropdown to find a value not shown in the default list.
Step 8: Segment the Report
Use the "Segment By" dropdown on the right, set to "Cancellation Reason" by default, to break the report's results down by why each appointment was cancelled.
By following these steps, you can build a filtered view of cancelled appointments in Pabau, combining a status filter with a date filter to narrow results to a specific time frame.
Was this guide helpful? Let us know by voting below - your feedback helps us write clearer articles.
For more guides, browse the related articles below or use the search bar at the top of the page. You can also watch our video learning series, the Pabau Academy, or visit the Support page for additional help.